


ITOP מסך הקלטה-כל אחד מקליט מסך מחשב
לאייפון 8 ודגמים קודמים:
אייפון: כיצד לשמור את המסך שלך בווידיאו
גלה כיצד להתחיל צילום מסך בווידיאו באייפון שלך.
ארתור אבאלה / פורסם ב- 14 ביוני 2022 בשעה 9:35 בבוקר
החל משחרור iOS 14, אפל מאפשרת למשתמשי אייפון ואייפד לבצע הקלטות מסך מבלי שתצטרך לעבור יישום שלישי -מפלגתי. רשמנו את הצעדים שעליהם לבצע כדי לבצע מסך תקליט באייפון.
כיצד לבצע הקלטת מסך באייפון
כדי להיות מסוגל לגשת לפונקציונליות, המכשיר שלך חייב להיות בעל iOS 14 או כל גרסה מאוחרת יותר. לפני שתפעיל את הקלטת המסך הראשונה שלך, עליך להוסיף את קיצור הדרך המשויך למרכז הבקרה שלך:
- נתראה ביישום הגדרות,
- בחר בתפריט מרכז שליטה,
- לחץ על הכפתור לְהוֹסִיף מיוצג על ידי אייקון ירוק קטן,
- בחר הקלטת מסך ולאמת.
לאחר שנוספה הסמל למרכז הבקרה שלך, הנה הנוהל לעקוב אחר לכידת וידאו באייפון שלך:
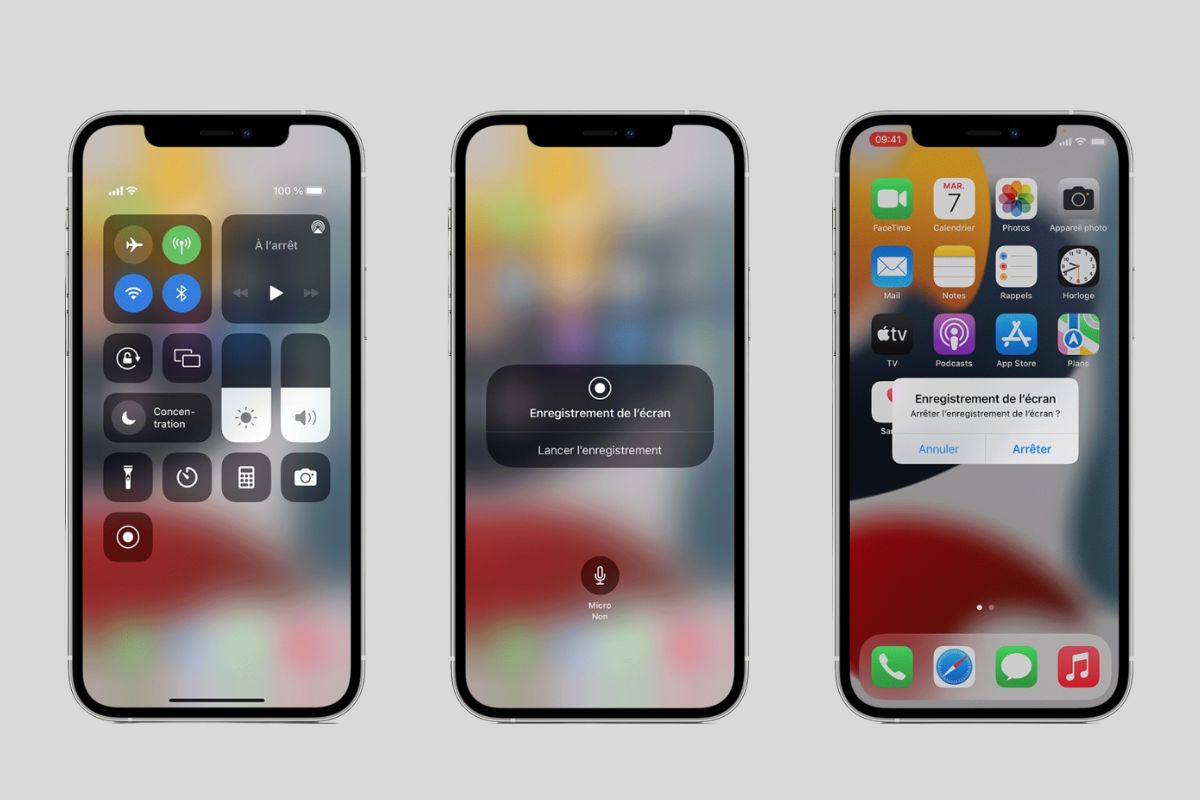
- בצע גלילה קלה בפינה השמאלית העליונה של המסך כדי לגשת למרכז הבקרה של האייפון,
- לחץ על קיצור דרך הקלטת המסך המיוצג על ידי נקודה מוקפת מעגל, ואז המתן 3 שניות,
- כדי לעצור את ההקלטה, לחץ על הסמל האדום הקטן שנמצא בצד שמאל העליון של המסך, ואז בחר תפסיק.
אתה יכול למצוא את כל הקלטת המסך שלך ביישום תמונות, בפורמט וידאו. אפשר לשנות אפליקציות, ולהמשיך להשתמש באייפון שלך בדרך כלל במהלך ההקלטה.
מידע שימושי, כלומר בהקלטת המסך
כדי לייעל את הרשומות שלך, הנה רשימה של מידע שימושי לדעת:
- ההודעות ממשיכות להופיע כרגיל במהלך לכידת וידיאו של המסך, לחתוך אותן, שקול להפעיל את המצב אל תפריע.
- אינך יכול לשמור את המסך שלך ולהשתמש בפונקציונליות העתק מסך באותו הזמן.
- יישומים מסוימים אינם מאפשרים לך להקליט צליל במהלך מסך ההקלטה שלך.
- הודעת ההקלטה המאוחרת מצולמת אוטומטית ונכללת בסרטון האייפון, כדי למחוק אותה ולקבל ממהר נקי, עבור ליישום תמונות, ושנה את הסרטון שלך על ידי חיתוך המעבר הרצוי בסוף.
מקליט מסך ITOP
שמור את כל פעילויות מסך המחשב בצורה חלקה ושמור באיכות HD. שמור משחקי ביצועים גבוהים או סרטוני UHD 4K ללא קיזוז לקיזוז פגישות מקוונות, שיעורים או כל תוכן וידאו אחר בלחיצה אחת שנה והתאמה אישית קנה עכשיו
כיצד לבצע הקלטת מסך באייפון
עדכון Tchen 16-08-2023

עברו שנים מאז שהאייפון שולט בשוק הטלפוניה הניידת, בזכות העיצוב המעודן והתכונות האימתניות שלו. בין אלה הוא צילום המסך באייפון, בוודאי שכבר ידוע לכל משתמש באייפון. עם זאת, ביחס להפעלתרשומת מסך באייפון, הרבה פחות יודע להשתמש בזה. בין אם ברצונך ליצור סרטונים מהנים או לשמור רגעים מדהימים במהלך משחק, חשוב ללמוד כיצד לשמור את המסך שלך באייפון. מסיבה זו מאמר זה מראה לך כיצד לצלם את המסך של האייפון שלך בצורה קלה ומושלמת. אני מקווה שאחרי שקראתי את הבלוג הזה, אתה יכול להקליט את הרגעים היקרים בחייך ולשתף אותם עם אחרים.
- שמור את המסך שלך באייפון עם מקליט משולב
- כיצד לצלם את מסך האייפון שלך עם תוכנת מפלגה שלישית
- בונוס: כיצד לשמור את המסך שלך במחשב?
- 1. לך רשומה
- 2. מקליט המסך של ד”ר FONE iOS
- 3. לכידת Techsmith
- סיכום
שמור את המסך שלך באייפון עם מקליט משולב
בגלל כל התכונות המדהימות שלה והעובדה שהיא מאפשרת לנו לשמור את מסך האייפון עם צליל המערכת והמיקרופון, מקליט האייפון המשולב הוא דבר שאסור לפספס אותו. אתה רוצה לדעת יותר ? בואו נצלול שם.
שלב 1. הפעל את פונקציית הקלטת המסך
- לפתוח “הגדרות”.
- בחר “מרכז בקרה”.
- לחץ על שלט “+” ליד “הקלטת מסך” כדי להזיז אותו בסעיף “כולל”.

שלב שני. התחל להקליט
לדגמי אייפון X ודגמים מעולים:
- בצע למעלה מלמטה מהפינה השמאלית העליונה של המסך
- לחץ על כפתור “הקלטת מסך” כדי להתחיל את ההקלטה. (אם אתה צריך להקליט צליל, וודא שהפעלת את המיקרופון.))
לאייפון 8 ודגמים קודמים:
- הכינו החלקה מלמטה לראש מהפינה התחתונה של כל מסך
- לחץ על כפתור “הקלטת המסך” כדי להתחיל את ההקלטה (גם וודא שהמיקרופון מופעל אם אתה משתמש בקול שלך.))

טיפ: אם אינך רוצה להפרעה במהלך ההקלטה, עדיף שתכניס את המכשיר למצב מטוס.
שלב 3: אתר ושנה את ההקלטה שלך
לאחר סיום ההקלטה, כל הסרטונים נמצאים ב”תמונות “. אתה יכול ללחוץ על כפתור “שנה” בצד ימין למעלה של המסך כדי לשנות את ההקלטה שלך. בתחתית המסך, על ידי הזזת החץ הצהוב, תוכלו לחתוך את הווידיאו. אתה יכול גם ללחוץ על כפתור “קריאה” כדי לראות איך זה נראה בעת הפרסום.
בהיותו כלי משולב, זה מאוד מעשי שמשתמשי אייפון יקלטו את מסכי האייפון שלהם, כל כך בקלות ובטוחה. עם זאת, למקליט המסך הזה יש גבולות מסוימים: כדי להגן על התוכן שלהם, יישומי מוסיקה ווידאו מסוימים כמו Apple Music, YouTube ו- Spotify, אל תאפשר לך לשמור את המסך בזמן שהם קוראים מוסיקה או סרטונים.
כיצד לצלם את מסך האייפון שלך עם תוכנת מפלגה שלישית
אם אתה באמת זקוק לפונקציות נוספות כדי לעדן את ההקלטה שלך, כגון לחיצת עכבר, אין עיכוב וזמן הקלטה ארוך יותר, המשך לקרוא. בחלק זה, אנו נראה לך 3 כלים שלישיים -מפלגתיים שיעזרו לך להקליט את המסך שלך באייפון בפשטות יותר. בין אם ברצונך לשמור את המסך שלך באפליקציית אייפון כלשהי או להציג את מסך הטלפון שלך במחשב האישי, תמצא כלים שימושיים אלה.
1. לך רשומה
Go Record הוא ממש דומה מאוד למקליט האייפון המשולב. אכן, הוא גם בחינם ויש לו כמעט את אותם צעדים כמו מקליט האייפון המשולב. כדי להשתמש בו, תצטרך להציג את המסך, למעלה או למטה, תלוי בדגם האייפון שלך, מהמסך כדי להציג את מרכז הבקרה. ואז בצע בדיוק את אותם השלבים כמו השימוש במקליט ה- iPhone המשולב כדי לשמור את המסך באייפון.

למד לשמור בקלות לשמור את המסך באייפון עם רשומת GO:
שלב 1. החלק את המסך מלמטה, לחץ והחזק את כפתור “הקלטה”.
שלב שני. בחר “לך רשומה” כמקליט.
שלב 3. לחץ על “התחל לשדר” עבור שמור את המסך שלך באייפון.
טיפ: וודא שהפעלת את הקלטת המסך באייפון שלך לפני כן.
- הקלטת מסך אייפון בכל היישומים ובכל המשחקים.
- פונקציית המיקרופון זמינה במהלך ההקלטה.
- תמיכה בכל דגמי האייפון.
- עריכה לאחר ההקלטה אינה זמינה ישירות ברשומת GO.
2. מקליט המסך של ד”ר FONE iOS
הנה, אני מציג בפניכם כלי אימתני אחר, מקליט המסך של ד”ר FONE iOS. זה לא יכול לשמש רק כדי לשמור בקלות את המסך שלך ב- iPhone, iPad ו- iPod, אלא גם להציג את מסך הטלפון שלך במחשב. כך שתוכל לשמור את המסך של האייפון שלך ישירות במחשב האישי.

להלן השלבים לתפוס בקלות את המסך באייפון עם מקליט המסך של DR FONE iOS:
שלב 1. הורד והתקן את מקליט iOS.
שלב שני. לאחר מכן עבור אל הגדרות> כללי> ניהול מכשירים, בחר במפיץ מקליט המסך של iOS ולחץ על “אמון”.
שלב 3. לחץ על “אישור” אם חלון קונטקסטואלי מבקש ממך לאפשר לרשומת המסך לגשת לתמונות.

שלב 4. בחר רזולוציית וידאו.

שלב 5. לחץ על “הבא” כדי להתחיל להקליט את המסך שלך באייפון.
- תמיכה במכשירי Bailbreak של iOS ו- Non -jailbreak.
- קל לשימוש
- פונקציית תצוגת מסך טלפון מחשב זמינה
- זמין רק ל- iOS 8 ולגרסאות הבאות.
- לא ניתן להוריד בחנות Apple.
3. לכידת Techsmith
מקליט האייפון האחרון שאני ממליץ עליו הוא TechSmith Capture, כלי בחינם שפותח על ידי Snagit. בין אם ברצונך לתפוס משחק משחק, להקליט מצגות או ליצור סקירות וידאו בחנות האפליקציות, אתה יכול להשיג זאת בקלות עם TechSmith.
עקוב אחר השלבים שלהלן כדי לשמור בקלות את המסך של האייפון שלך:
שלב 1: עבור אל “הגדרות” ובחר “מרכז בקרה” ואז “התאם אישית את הבדיקות”. ואז לחץ על כפתור “+” כדי להפעיל את פונקציית ההקלטה.
שלב שני: צפו מתחתית המסך ולחץ על כפתור “הקלטה”. לחץ על “לכידת TechSmith”. אם אתה רוצה לצלם מסך עם צליל, לחץ על כפתור “מיקרופון”.
שלב 3: לחץ על “התחל שידור” כדי להתחיל את קורס ההקלטות שלך

- אייפון, iPad ו- iPod נתמכים כולם.
- שיתוף קל של קבצי הקלטה ב- Camtasia או Snagit.
- רק פורמט פלט MP4 זמין.
בונוס: כיצד לשמור את המסך שלך במחשב?
ציון המסך שלך בנייד כדי לשתף את כל רגעי השמחה והפנאי שלנו הפך פופולרי מאוד בימינו, במיוחד בקרב הצעירים ביותר. עם זאת, ביחס לווידיאו -הוויות וקורסים מקוונים, המחשב האישי עולה על נייד מבחינת איכות ההקלטה. להלן כמה מכלי הקלטת המסך הטובים ביותר במחשב.
חלונות:
1. מקליט מסך ITOP – מקליט מסך מקצועי מתחת לחלונות, המאפשר למשתמשים לצלם סרטונים באיכות גבוהה בכמה פורמטים ולהוציא אותם ישירות על מקליט המסך של ITOP.

תכונות מצוינות של מקליט מסך ITOP:
- זמן הקלטה ללא הגבלה.
- יציב, פשוט, בטוח וקל לשימוש.
- גמיש לשמירת כל המסך או רק.
- ערוך לאחר ההקלטה זמינה ישירות ברשומת מסך ITOP.
- איכות מובטחת לכל פורמט הקלטת וידיאו.
2. פלאשבק אקספרס – תוכנת צילום מסך בחינם ב- Windows, מייצרת סרטוני סימן מים.
3. Camtasia – מקליט מסך ועורך וידיאו יוקרתי כל אחד.
מק:
סטודיו OBS – מקליט מסך HD של קוד פתוח ב- Windows, Mac ו- Linux. עם זאת, בוודאי תמצא את זה קצת קשה לשימוש.
סיכום
מאמר זה מציג לא רק 4 אמצעים שלשמור את המסך שלך באייפון, אך גם מציג 4 תוכנות לצילום סרטונים במחשב האישי. אם אתם מחפשים גם מקליט כל אחד עם מהדורה במחשב האישי, מקליט מסך ITOP יהיה האפשרות הטובה ביותר מכיוון שיש לו את טכניקת הדחיסה האחרונה, המובילה לאיכות הווידיאו הטובה ביותר עם גודל מופחת. ובנוסף, זה מאפשר לך להקליט את הקול שלך במיקרופון ולצלם את הפנים שלך באמצעות מצלמת רשת.
- שמור כל חלק במסך שלך עם שמע.
- שמור סרטוני 4K/1080p ללא הגבלת זמן.
- הרכבה סרטונים מדהימים עם העורך המתקדם המשולב.
- שמור סרטונים בפורמט MP4/AVI וכו ‘., ושתף אותם בלחיצה אחת.