


כיצד לנהל את הסיסמאות שלך ב- Google Chrome
ברגע שיש לך גישה לקטע ההגדרות, לחץ על התקופה ” שעה אחרונה “המוצג כברירת מחדל.
כיצד להציג סיסמאות מוקלטות ב- Google Chrome
אם נתת לו, גוגל מתעדת את הסיסמאות שלך. אתה יכול לשחזר אותם בכמה לחיצות אם שכחת אותם ותזדקק להם במקום אחר מאשר בכרום.
אם היית משתמש בכניסה לאוטומטית של Chrome (הכוללת הקלטת מזהים וסיסמאות שלך על ידי דפדפן Google). סביר מאוד כי עם הזמן אתה שוכח כמה. מה יכול להיות בעייתי, אך אל תיבהל, גוגל מאפשרת לך לשחזר מידע יקר זה. נסביר כאן כיצד להציג את הסיסמאות המוקלטות ב- Google Chrome.
כיצד להציג סיסמאות מוקלטות ב- Google Chrome ?
ראשית, עליכם להפעיל את Chrome, ואז לעקוב אחר הצעדים הבאים.
- לחץ על הכפתור תַפרִיט (שלוש הנקודות אנכיות).
- בחר הגדרות.
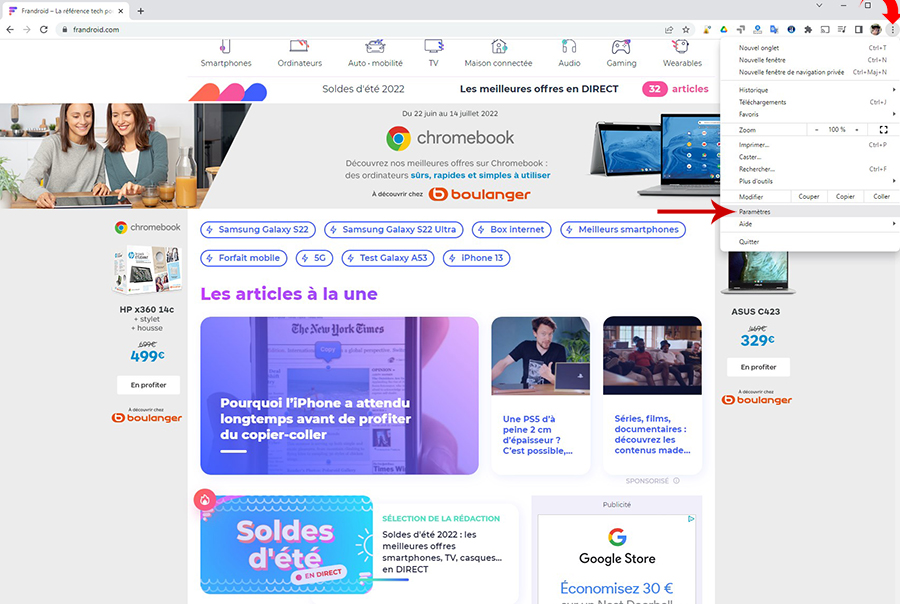
- הדף שנפתח נותן גישה ל הגדרות כרום. זהה את הקו תְפִיסָהאוֹטוֹמָטִי אחרי זה סיסמאות.

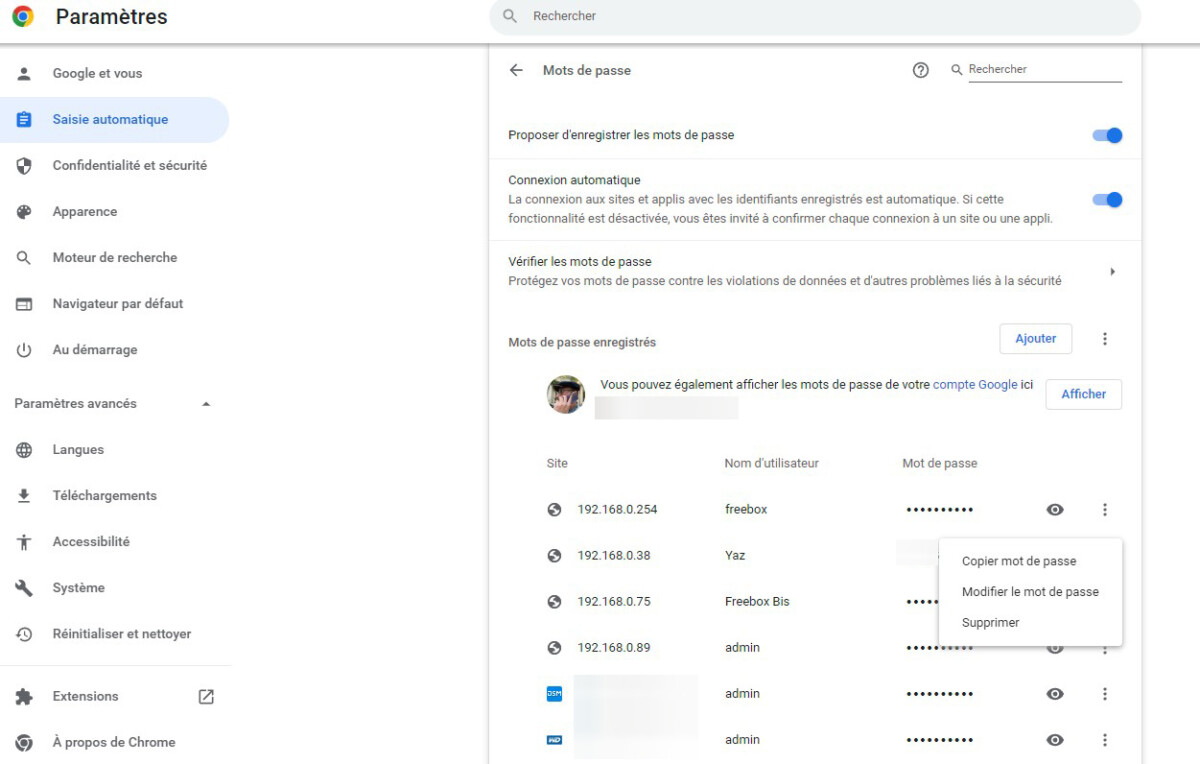
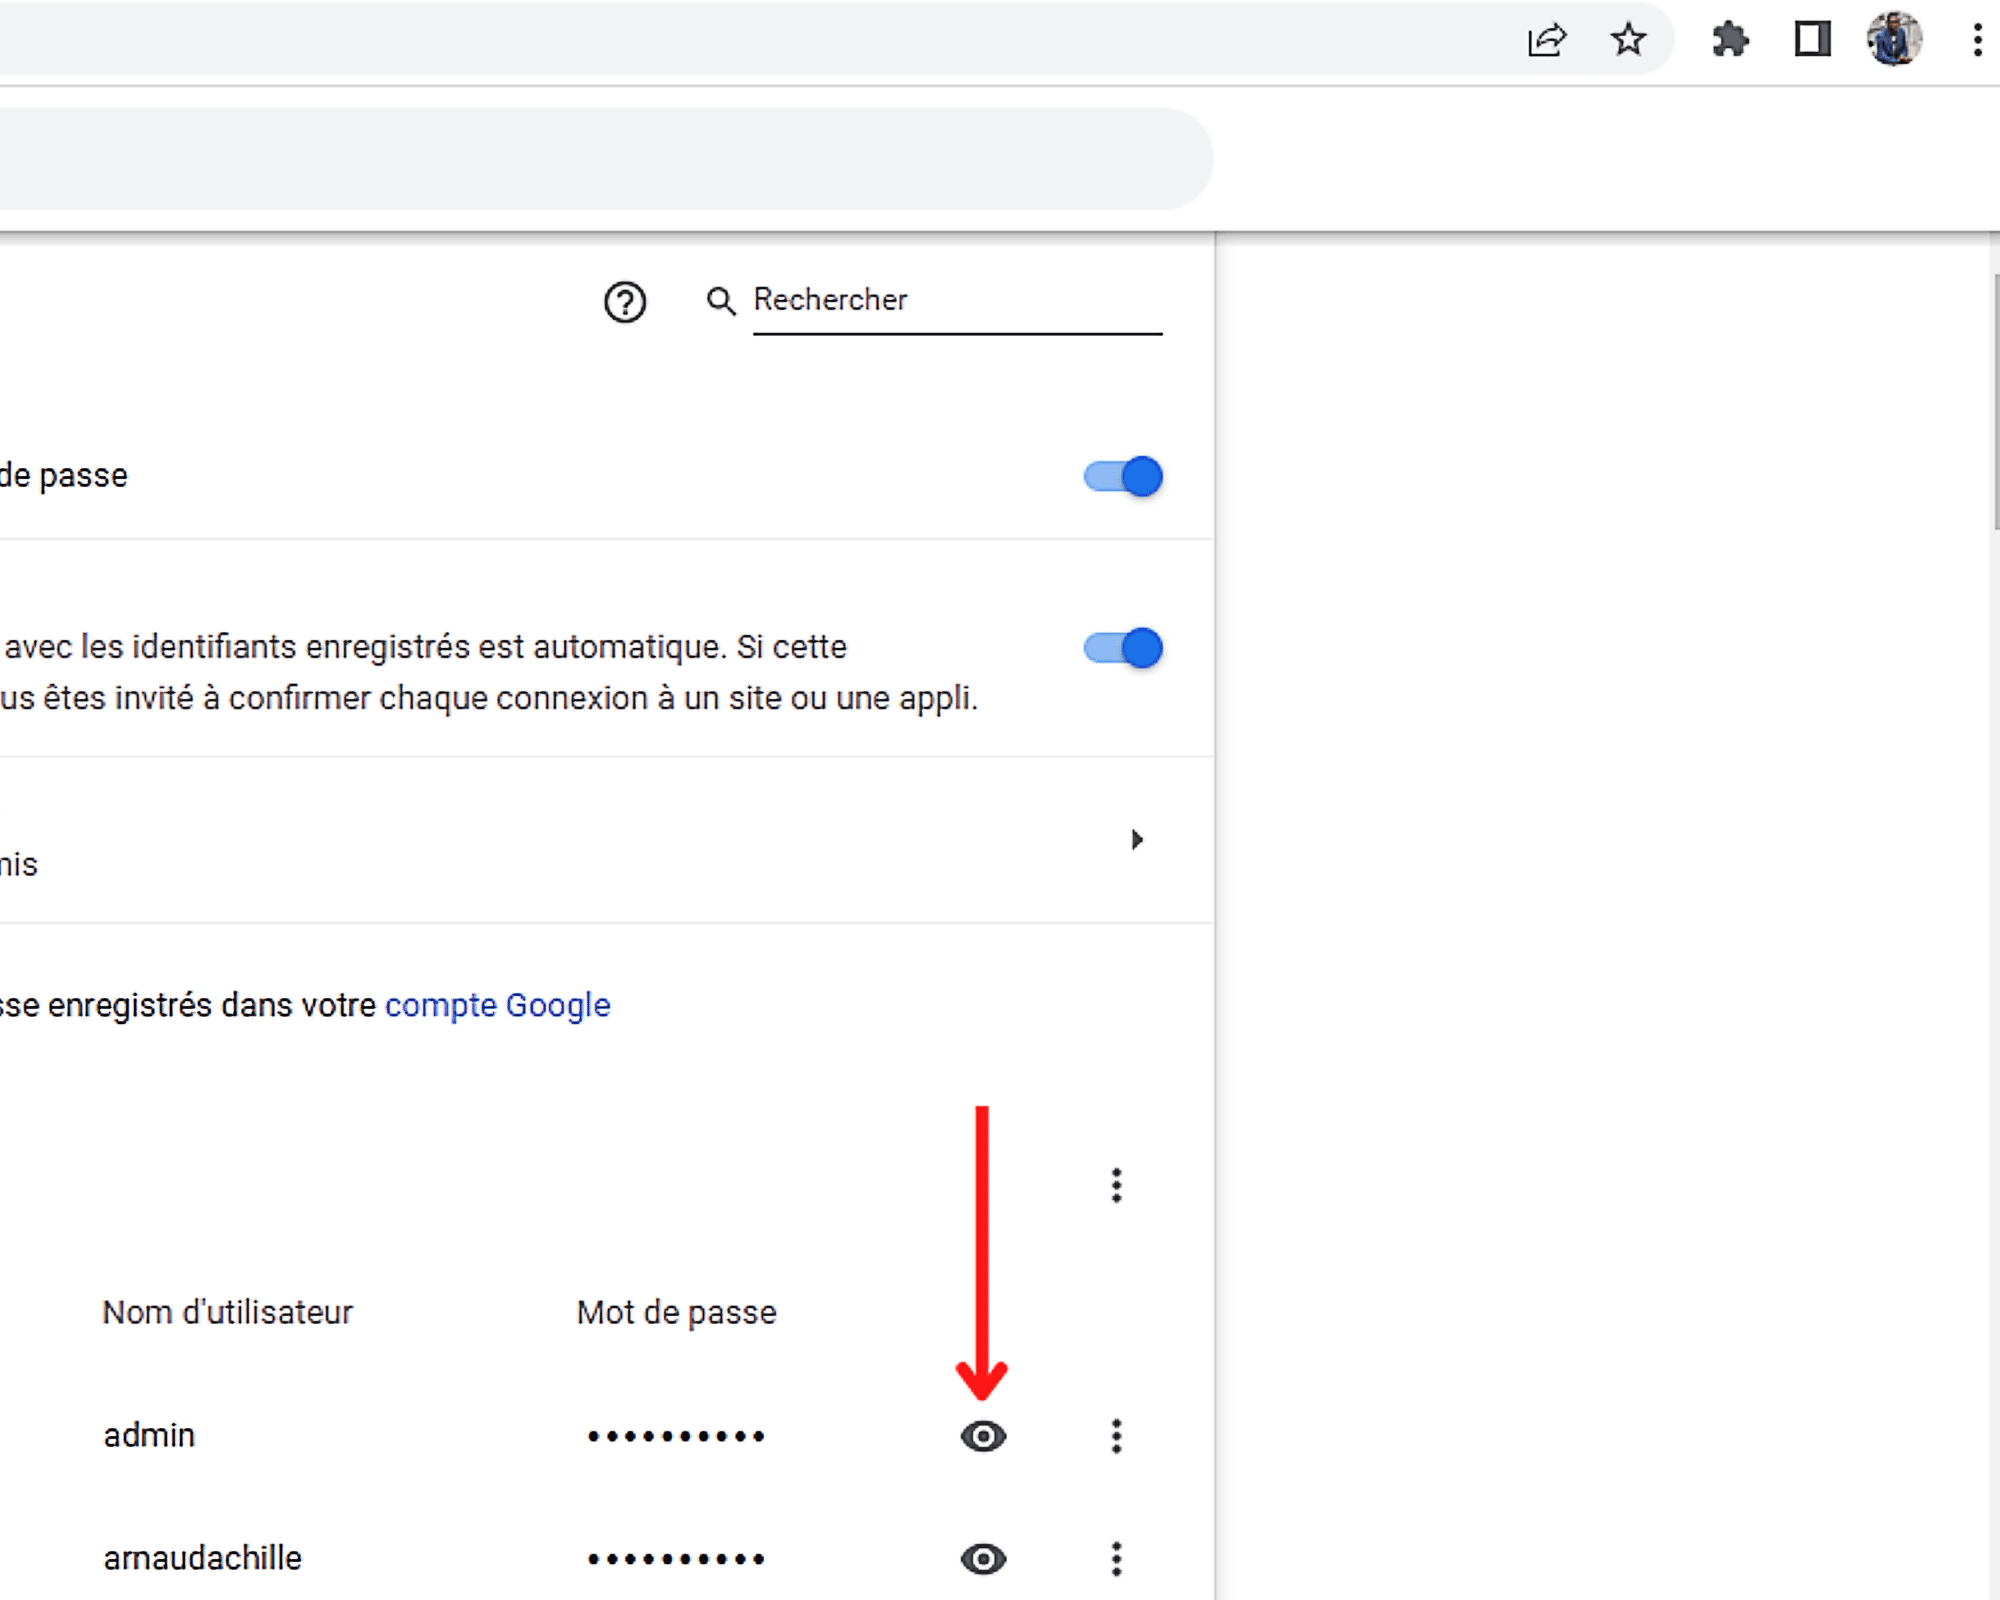
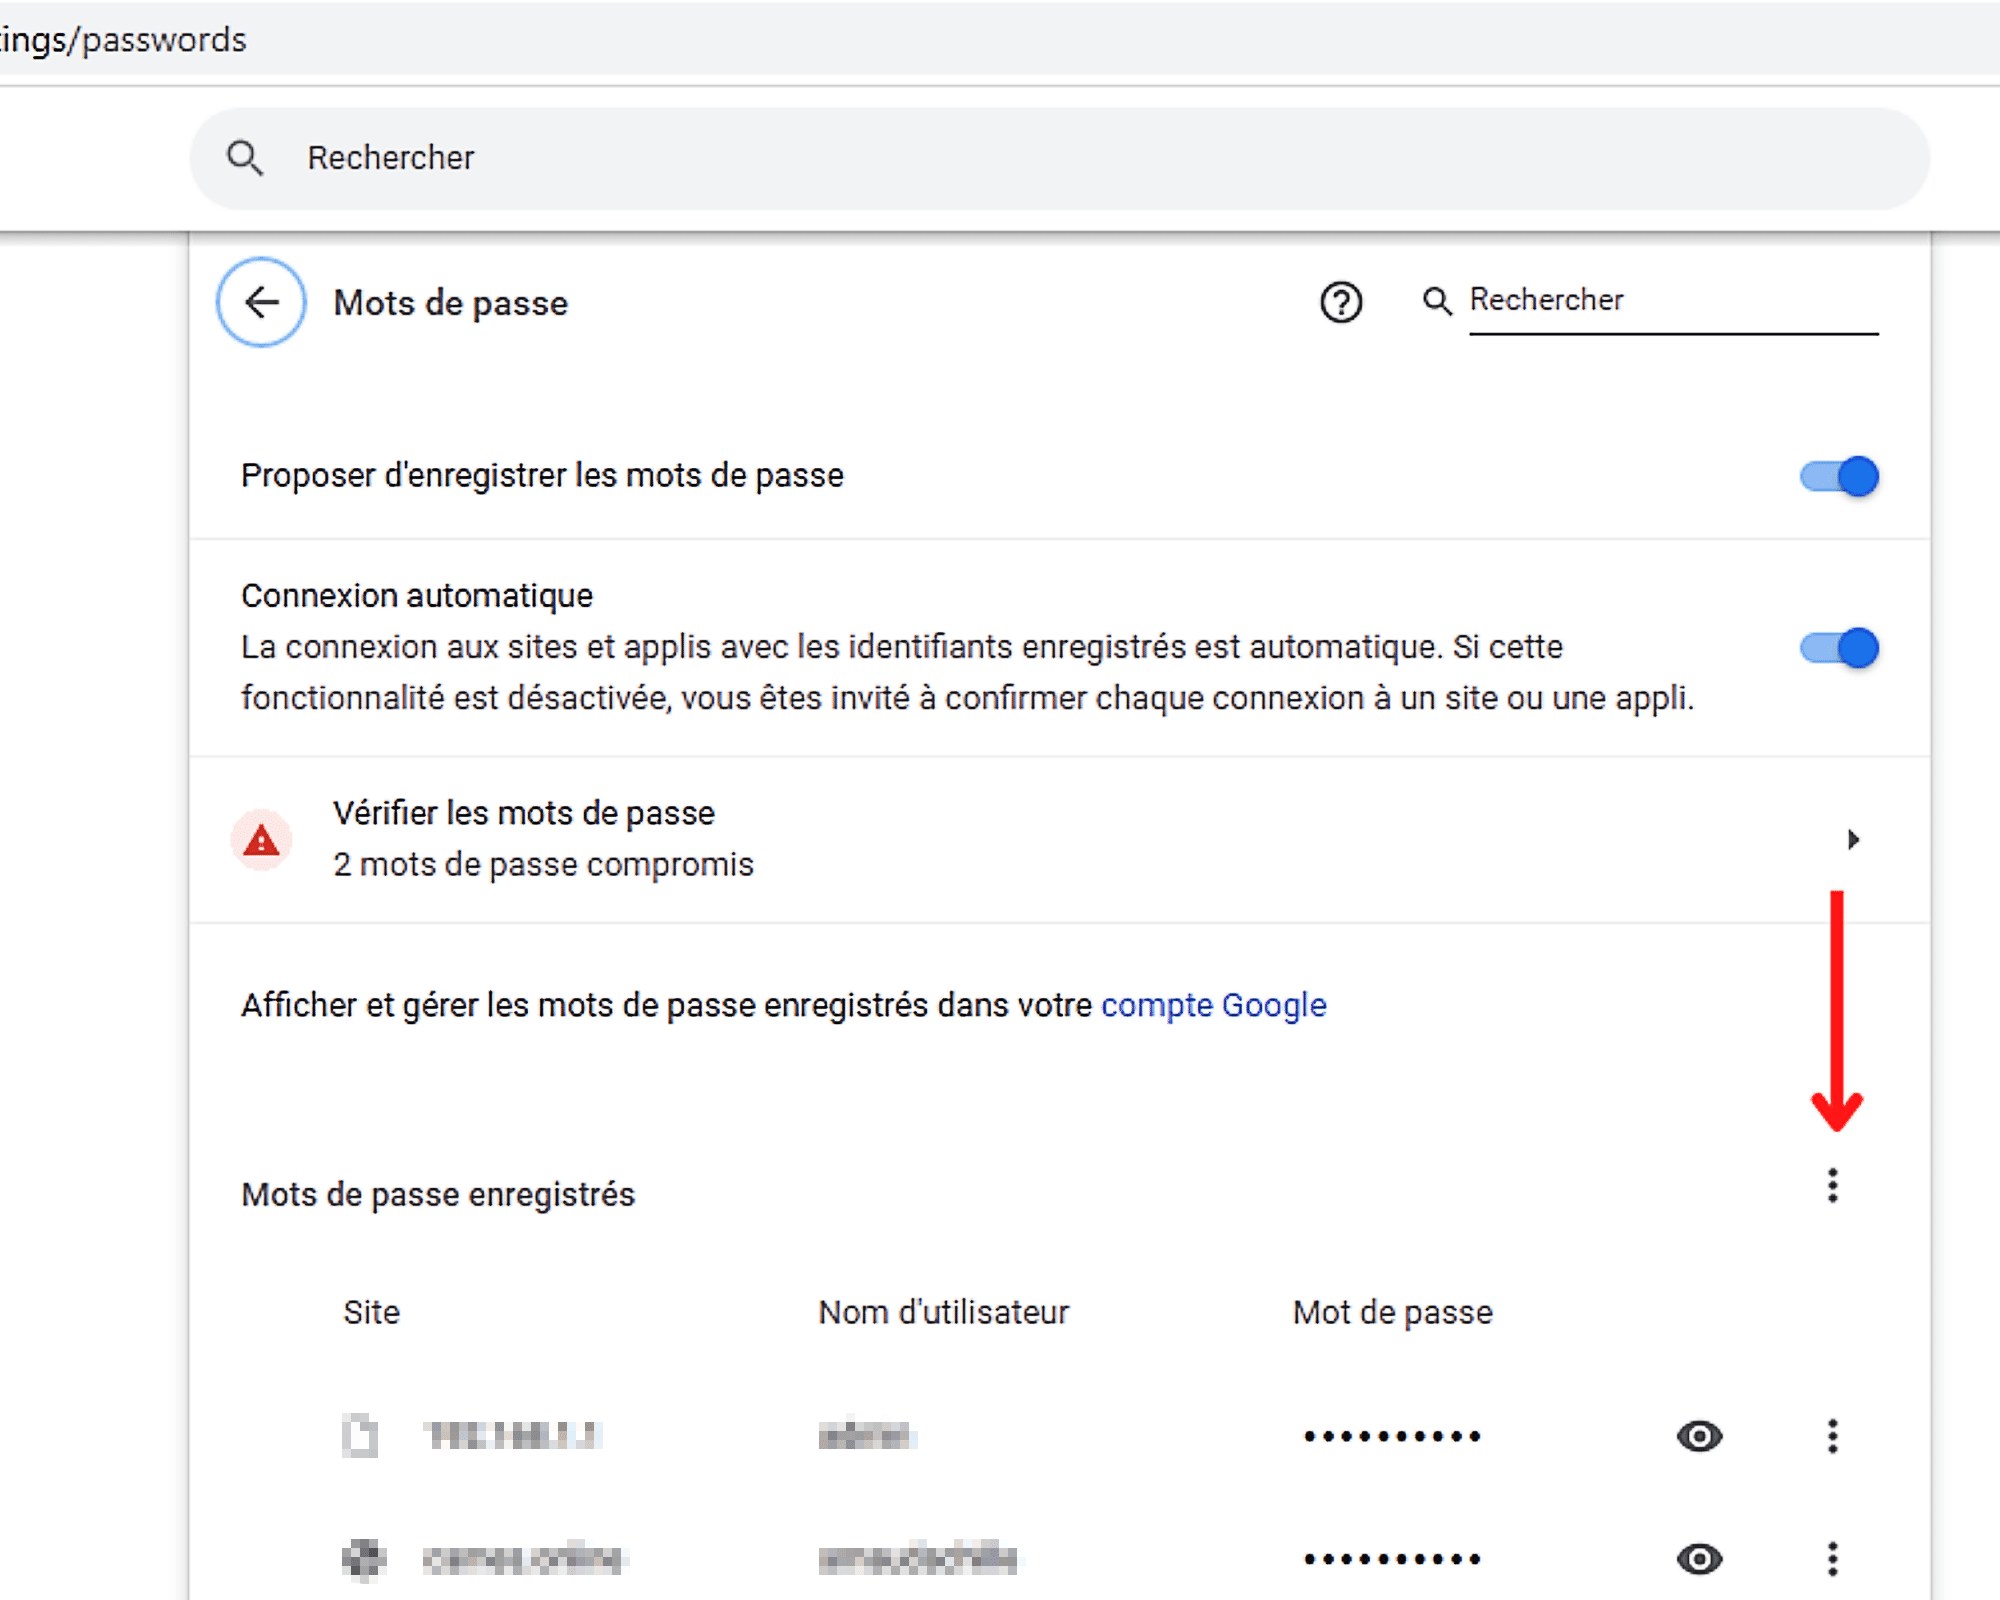
- ואז מופיע רשימת כל האתרים שעבורם נשמרו המזהים והסיסמאות שלך.
- הסיסמה המשויכת לכל אתר מאורכת, לחץ על הסמל בצורת העין מימין כדי לראות אותו מופיע. אם יש לך Windows 10 או Windows 11, מערכת ההפעלה תשיק חלון, תבקש את קוד ה- PIN של Windows שלך וכך לאפשר לתצוגה של הסיסמאות ב- Chrome.


- על ידי לחיצה על הסמל המציג שלוש נקודות קטנות אנכית מימין לסמל בצורת העין, באפשרותך להעתיק את הסיסמה בלוח, לשנות או למחוק אותה מ- Chrome.
אז כעת יש לך גישה פשוטה וקלה לכל הסיסמאות שלך שנשמרות ב- Chrome. אל תהססו לברר על מנהלי סיסמאות.
רוצה להצטרף לקהילה של חובבים ? המחלוקת שלנו מברכת אותך, זה מקום של עזרה הדדית ותשוקה סביב טק.

הסוויטה בווידיאו
הידיעון המותאם אישית שלך
זה מוקלט ! צפה בתיבת הדואר שלך, תשמע עלינו !
לקבל את מיטב החדשות
הנתונים המועברים באמצעות טופס זה מיועדים ל- Humanoid, מפרסם חברה של אתר פרנדרואיד כבקר טיפול. הם בשום מקרה לא יימכרו לצדדים שלישיים. נתונים אלה מעובדים בכפוף לקבלת הסכמתך לשלוח אותך באמצעות חדשות דואר אלקטרוני ומידע הנוגע לתוכן עריכה שפורסם ב- Frandroid. אתה יכול להתנגד להודעות דוא”ל אלה בכל עת על ידי לחיצה על קישורי הברגה הקיימים בכל אחד מהם. למידע נוסף תוכלו להתייעץ עם כל המדיניות שלנו לעיבוד הנתונים האישיים שלכם. יש לך זכות של גישה, תיקון, מחיקה, הגבלה, ניידות ואופוזיציה מסיבות לגיטימיות לנתונים אישיים הנוגעים אליך. כדי לממש אחת מהזכויות הללו, אנא בקש את בקשתך באמצעות טופס תרגיל הזכויות הייעודיות שלנו.
התראות ברשת
התראות דחיפה מאפשרות לך לקבל כל דבר חדשות פנדרואיד בזמן אמת בדפדפן שלך או בטלפון האנדרואיד שלך.
כיצד לנהל את הסיסמאות שלך ב- Google Chrome ?
דפדפן האינטרנט, Google Chrome, מציע לכל משתמש על ידי שמירת הסיסמאות שלו. זה, על מנת להימנע מהצרה לגרום להם לתפוס אותם בכל פעם שהוא רוצה להתחבר לאתרים שהוא בדרך כלל מבקר. לאחרונה התרגלת לשמירת הסיסמאות שלך בדפדפן המפורסם הזה ? אם כן, אז מאמר הדרכה זה הוא ההזדמנות המושלמת עבורך ללמוד נהל את הסיסמאות שלך ב- Google Chrome ?
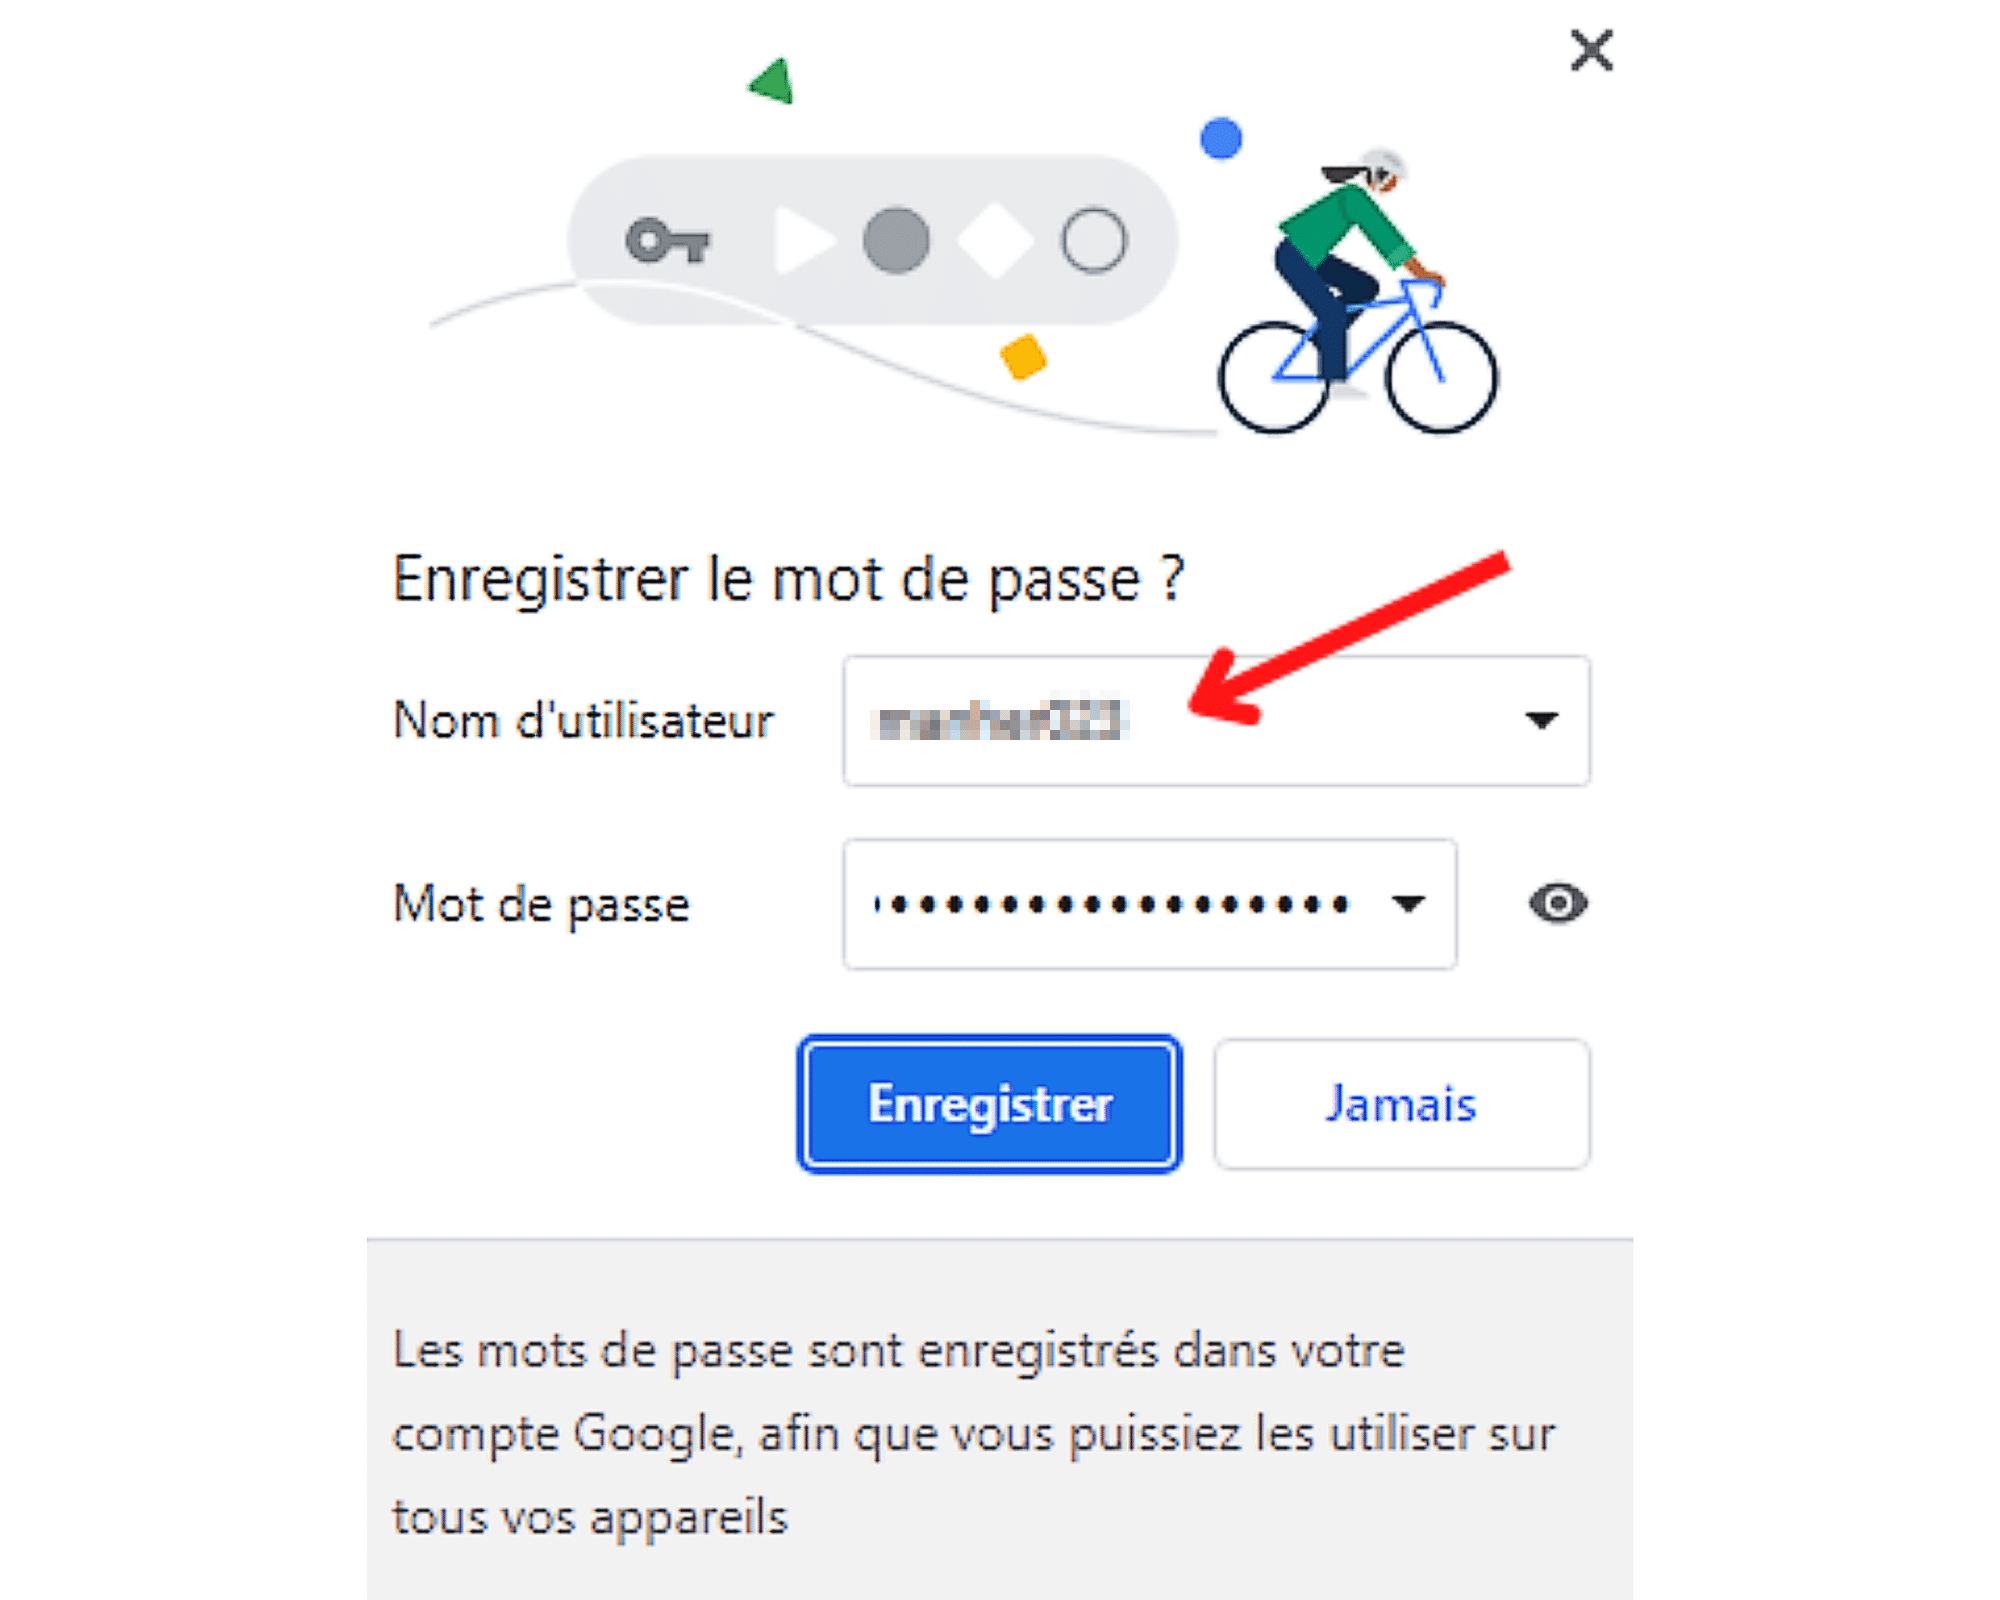
Google Chrome: כיצד לשמור סיסמה ?
כשאתה מתחבר לאתר ומזין את שם המשתמש והסיסמה שלך, Google Chrome מציעה לך באופן שיטתי לשמור אותו. כל מה שעליך לעשות כדי לשמור את הסיסמה שלך בדפדפן המועדף עליך לוחץ עליו ” להציל »». אפשרות זו מופיעה בדרך כלל ב צץ, בצד השמאלי העליון של ממשק היישום.
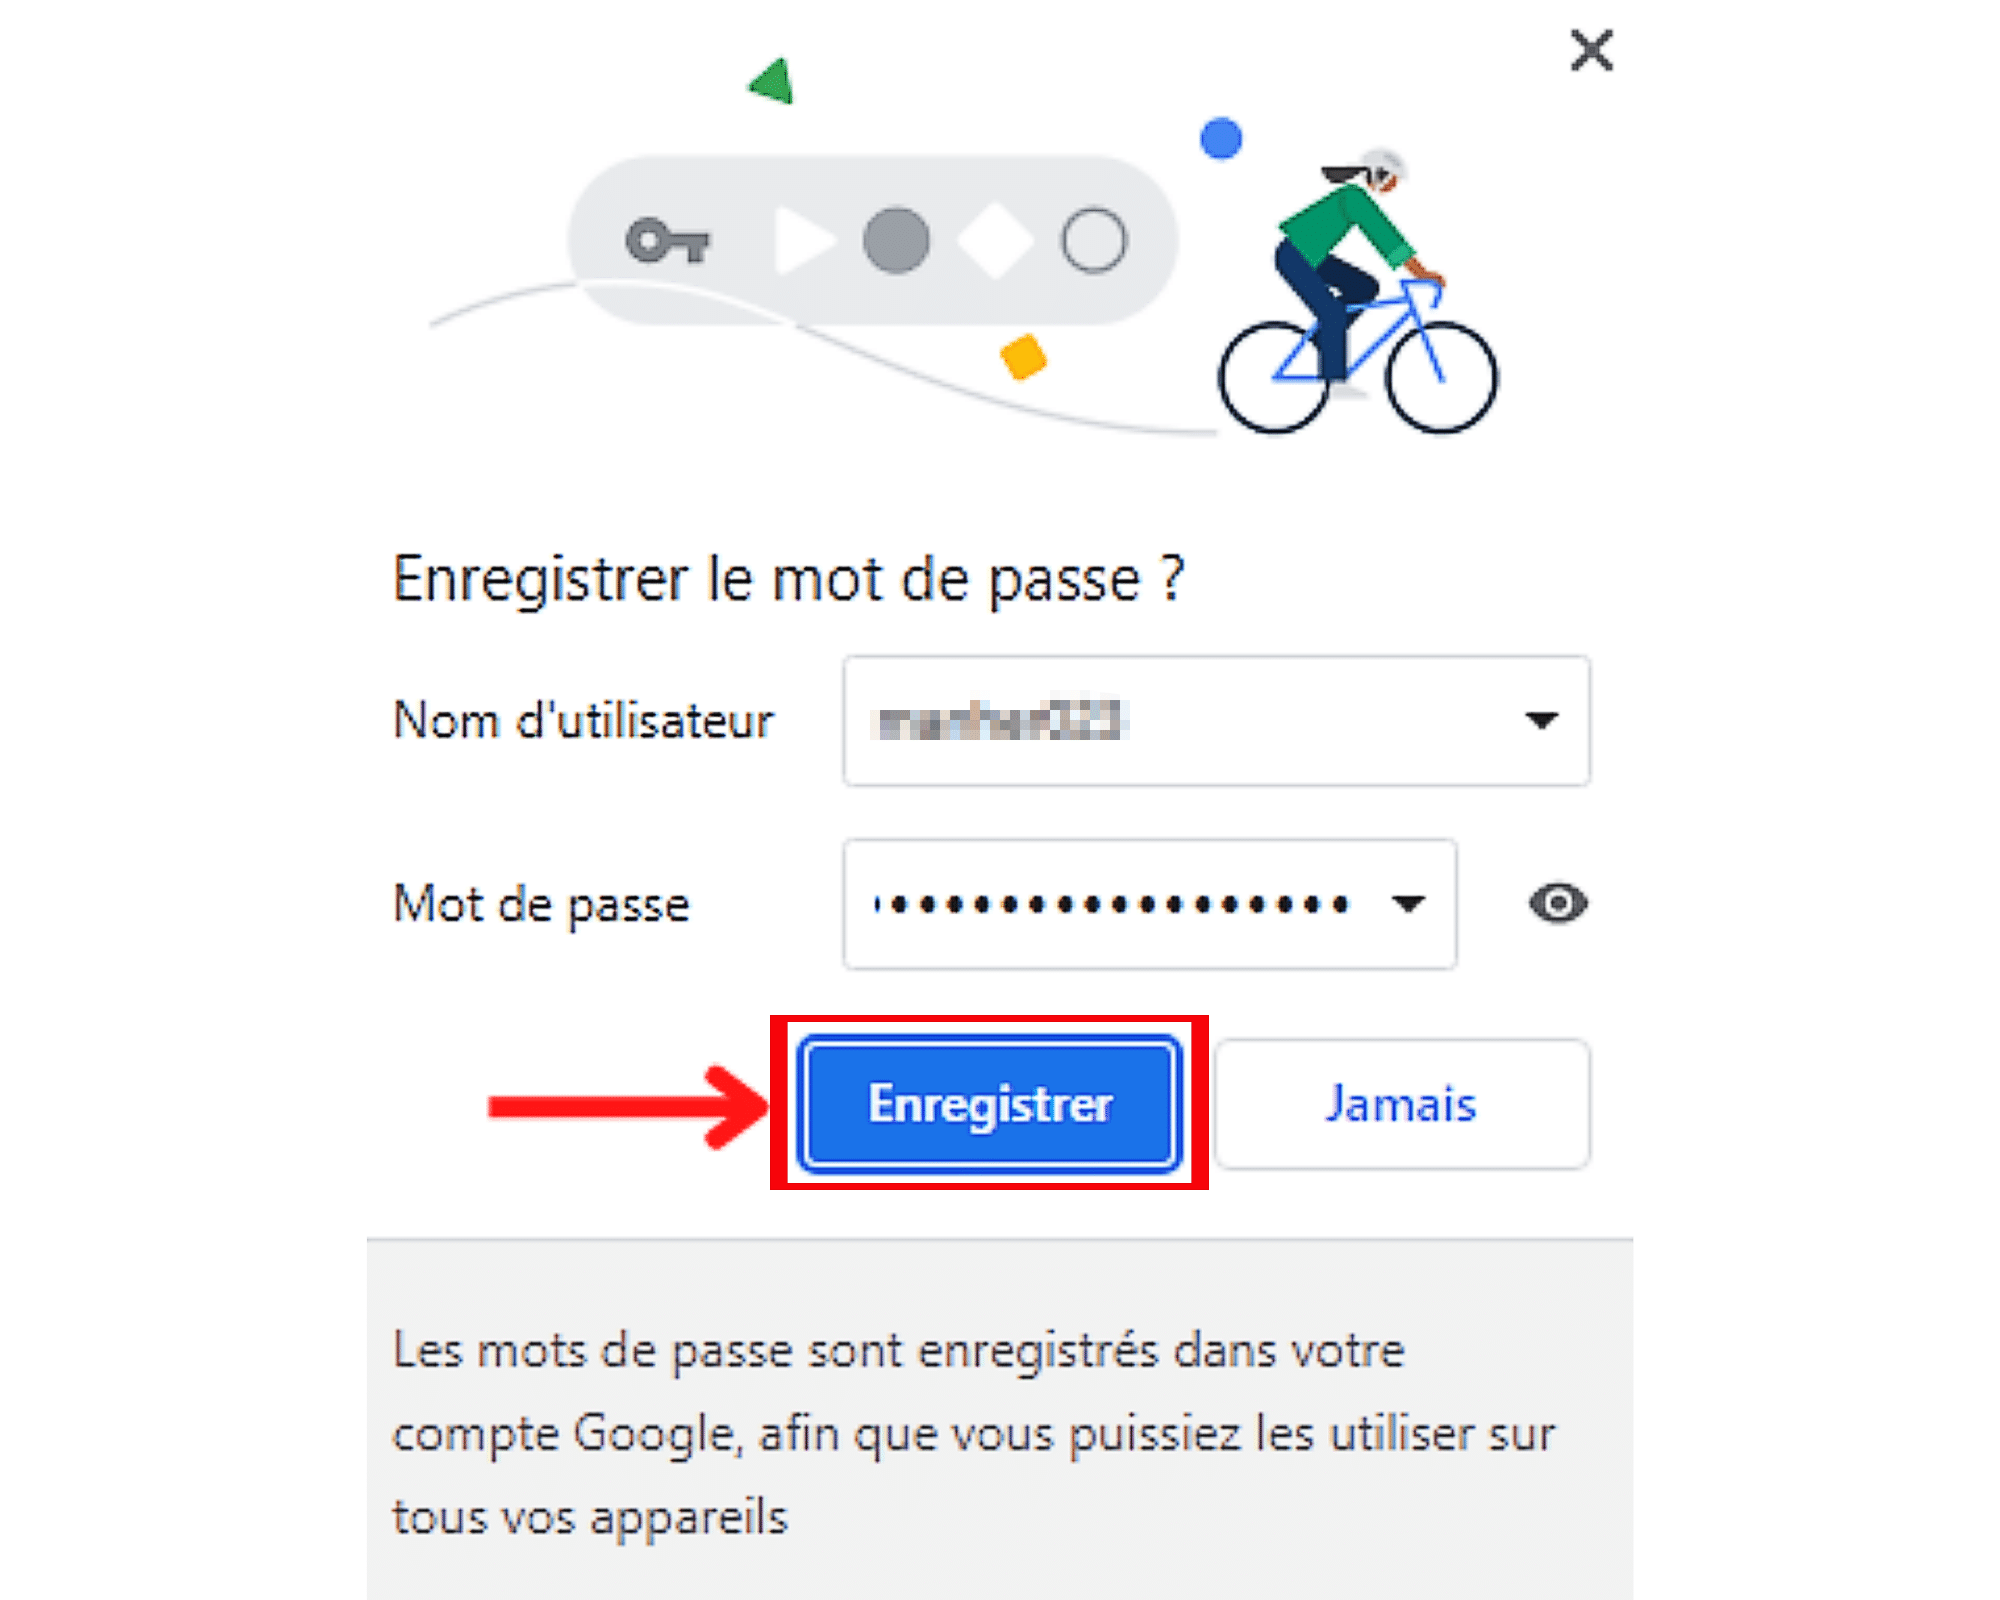
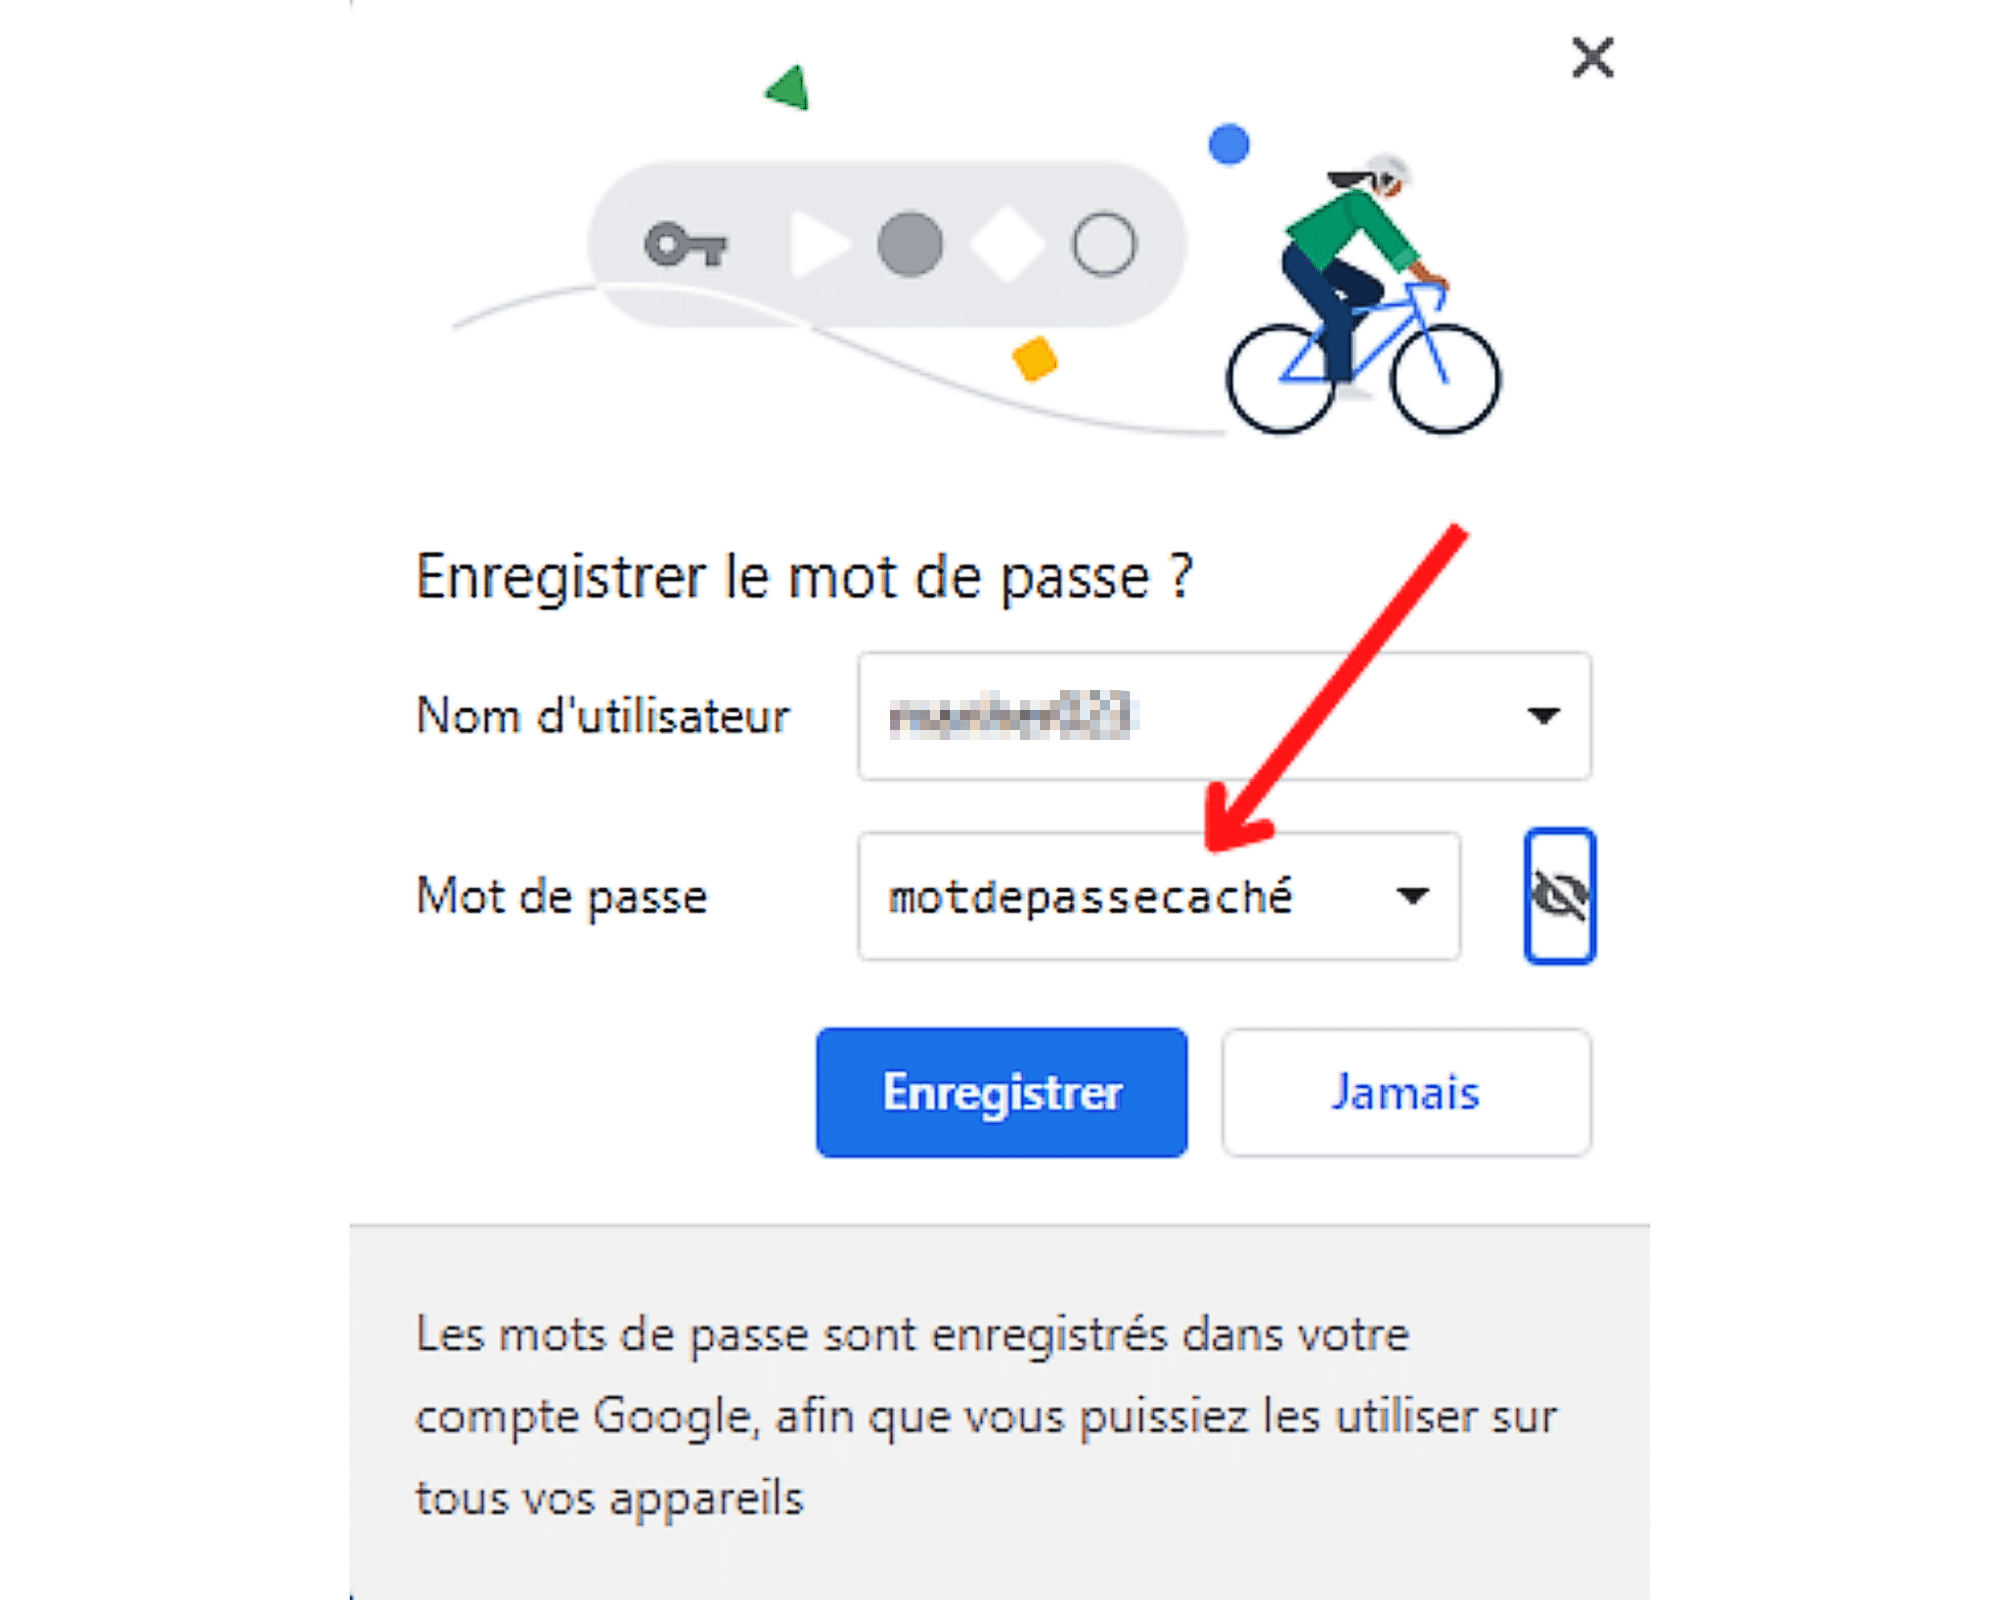
ברצונך לוודא שאתה שומר את הסיסמה הנכונה לפני שתלחץ עליו ” להציל »» ? אין בעיה, להציג את הסיסמה שהודעת באתר, לגעת בעין מול שדה הקלט.
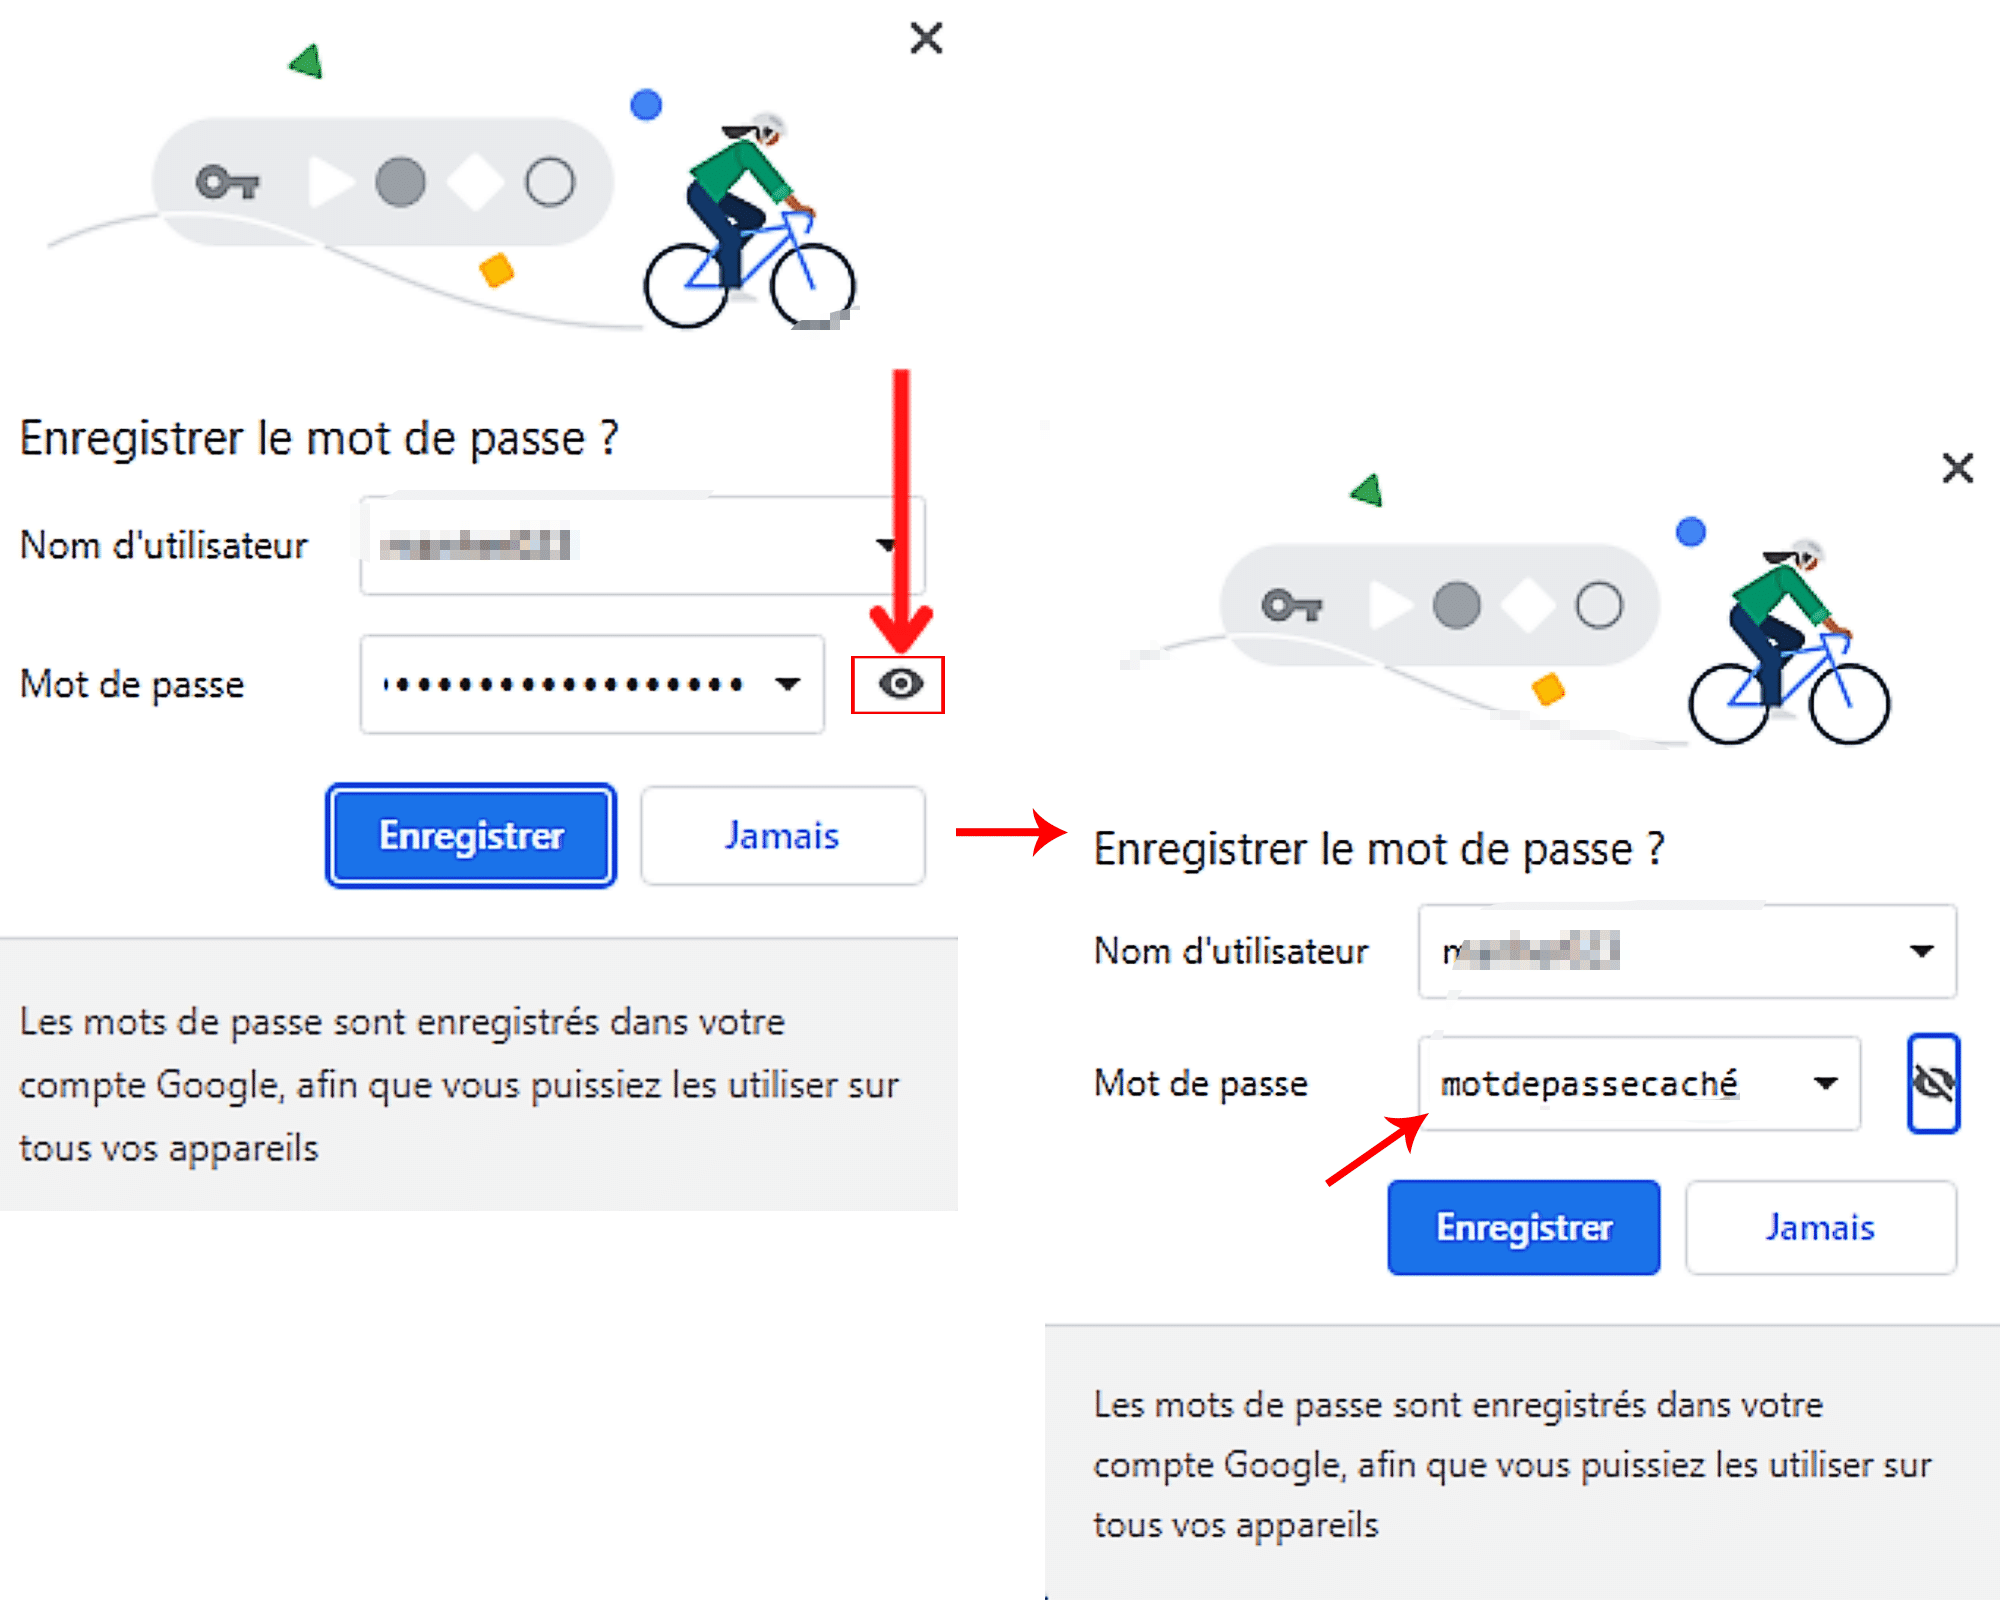
הסיסמה המוצגת ב צץ הוא לא הנכון ? אתה יכול להחליף אותו באחר על ידי הפעלת תחילה את השדה שלו, ואז להקליד את הטוב.
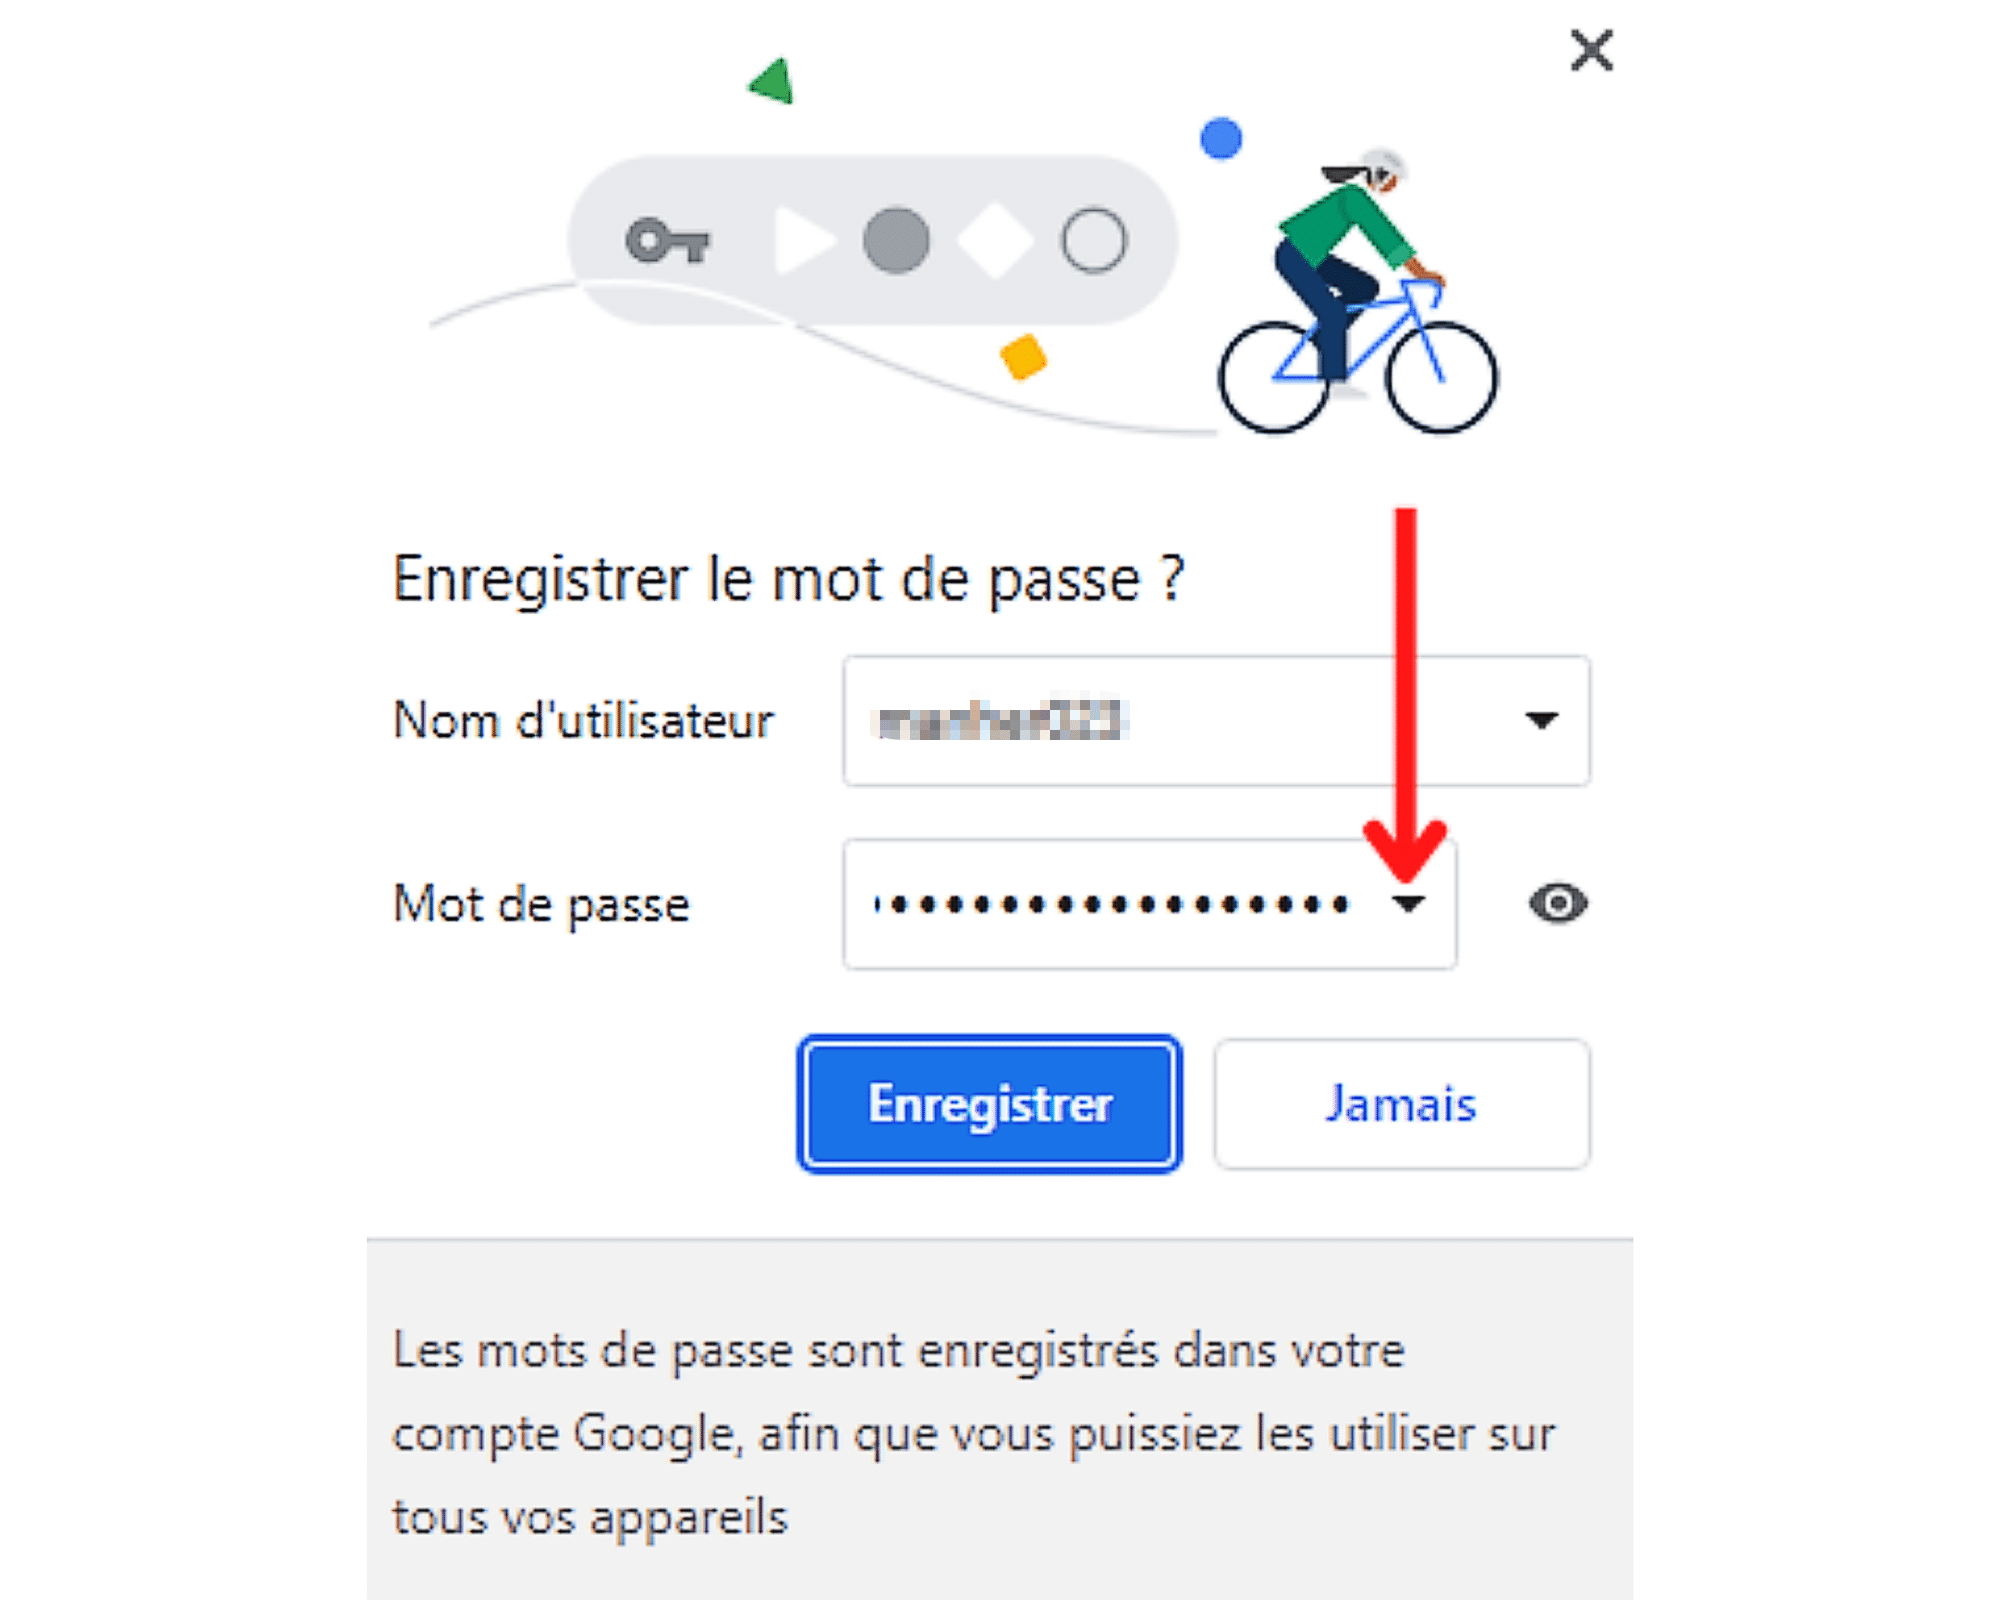
אם הדף בו אתה מכיל מספר סיסמאות, לחץ על החץ הקטן שמכוון למטה, ממוקם בקצה הימני של השדה הנוגע בדבר. ואז עיין ברשימת הסיסמאות ובחר את זו שברצונך לשמור עם שם המשתמש לעיל.
אם שם המשתמש המוצג אינו נכון או אם השדה שמור לו ריק, אתה יכול לתקן אותו. כדי לעשות זאת, אתה רק צריך להפעיל את תיבת הטקסט, על ידי לחיצה עליה, ואז הזן את השם הנכון כדי לשמור עם הסיסמה למטה.
Google Chrome: כיצד להתחבר לסיסמה שנשמרה ?
כבר שמרת את הסיסמה שלך בביקור האחרון שלך באתר ? דפדפן Chrome יכול למלא את שדות החיבור השונים עבורך. אנו מסבירים לך כיצד בחלק זה של המאמר.
שלב 1: התחבר לאתר שכבר נועץ
הדבר הראשון שעליך לעשות כדי להתחבר לסיסמה מוקלטת ב- Chrome הוא גישה לאתר עליו ברצונך לאמת. הקלד את כתובת האינטרנט בדפדפן, לאמת ועבור לדף האימות.

אבל היזהר ! זה חייב להיות אתר שאת פרטי החיבור שלו כבר הקלטת. אכן רק במצב זה גוגל כרום יכול לעזור לך להתחבר.
שלב 2: גש לטופס חיבור האתר
לאחר דף האימות, תצטרך, תלוי במספר שמות המשתמשים והסיסמה שנשמרים באתר האמור, בצע את הצעדים כאן.
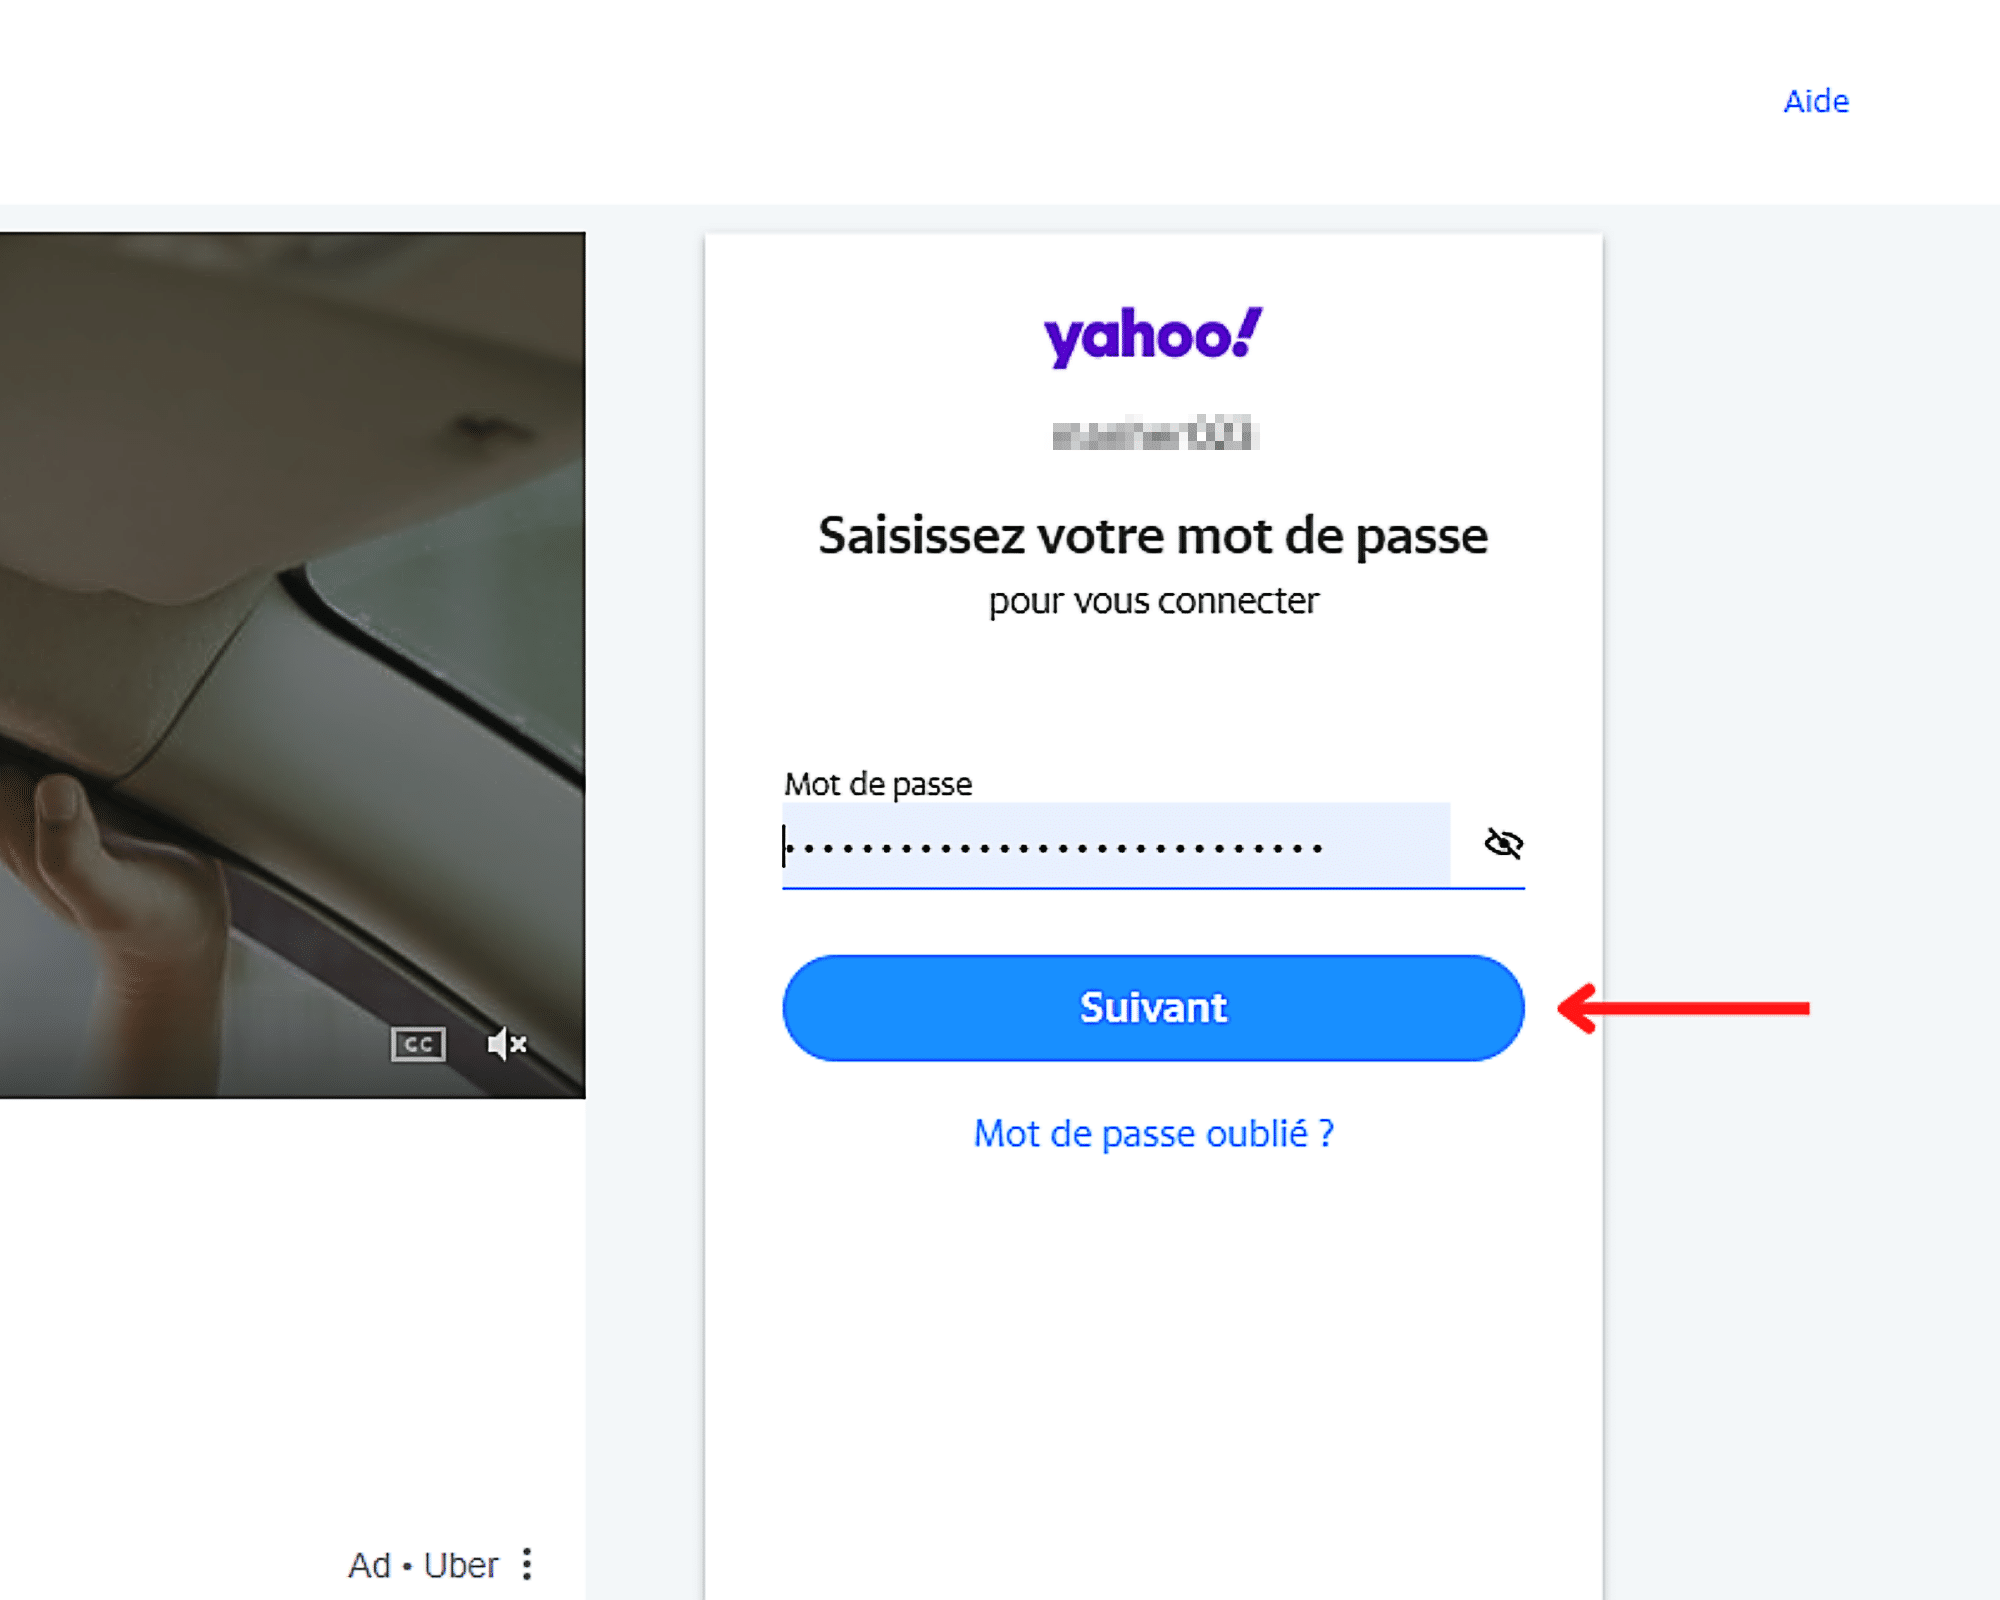
- אם הקלטת רק שם משתמש וסיסמא אחד לאתר, לא תצטרך למלא את השדות הנדרשים לחיבור. Google Chrome ידאג אוטומטית עבורך עבורך.
- מצד שני, אם שמרת שמות וסיסמאות רבות של משתמשים, תצטרך לבחור את שדה שם המשתמש, אז את פרטי החיבור שישמשו. ברגע שעשיתם, Chrome תספק אוטומטית את הסיסמה המשולבת לאחרון. במידת הצורך, כל שעליך לעשות הוא ללחוץ על הבא כדי להתחבר לאתר.
כיצד להציג, לשנות, למחוק או לייצא סיסמאות ב- Google Chrome ?
כמשתמש Chrome, יש לך אפשרות להציג, לשנות, למחוק ואפילו לייצא את הסיסמאות שלך. כדי לעשות זאת, אתה צריך:
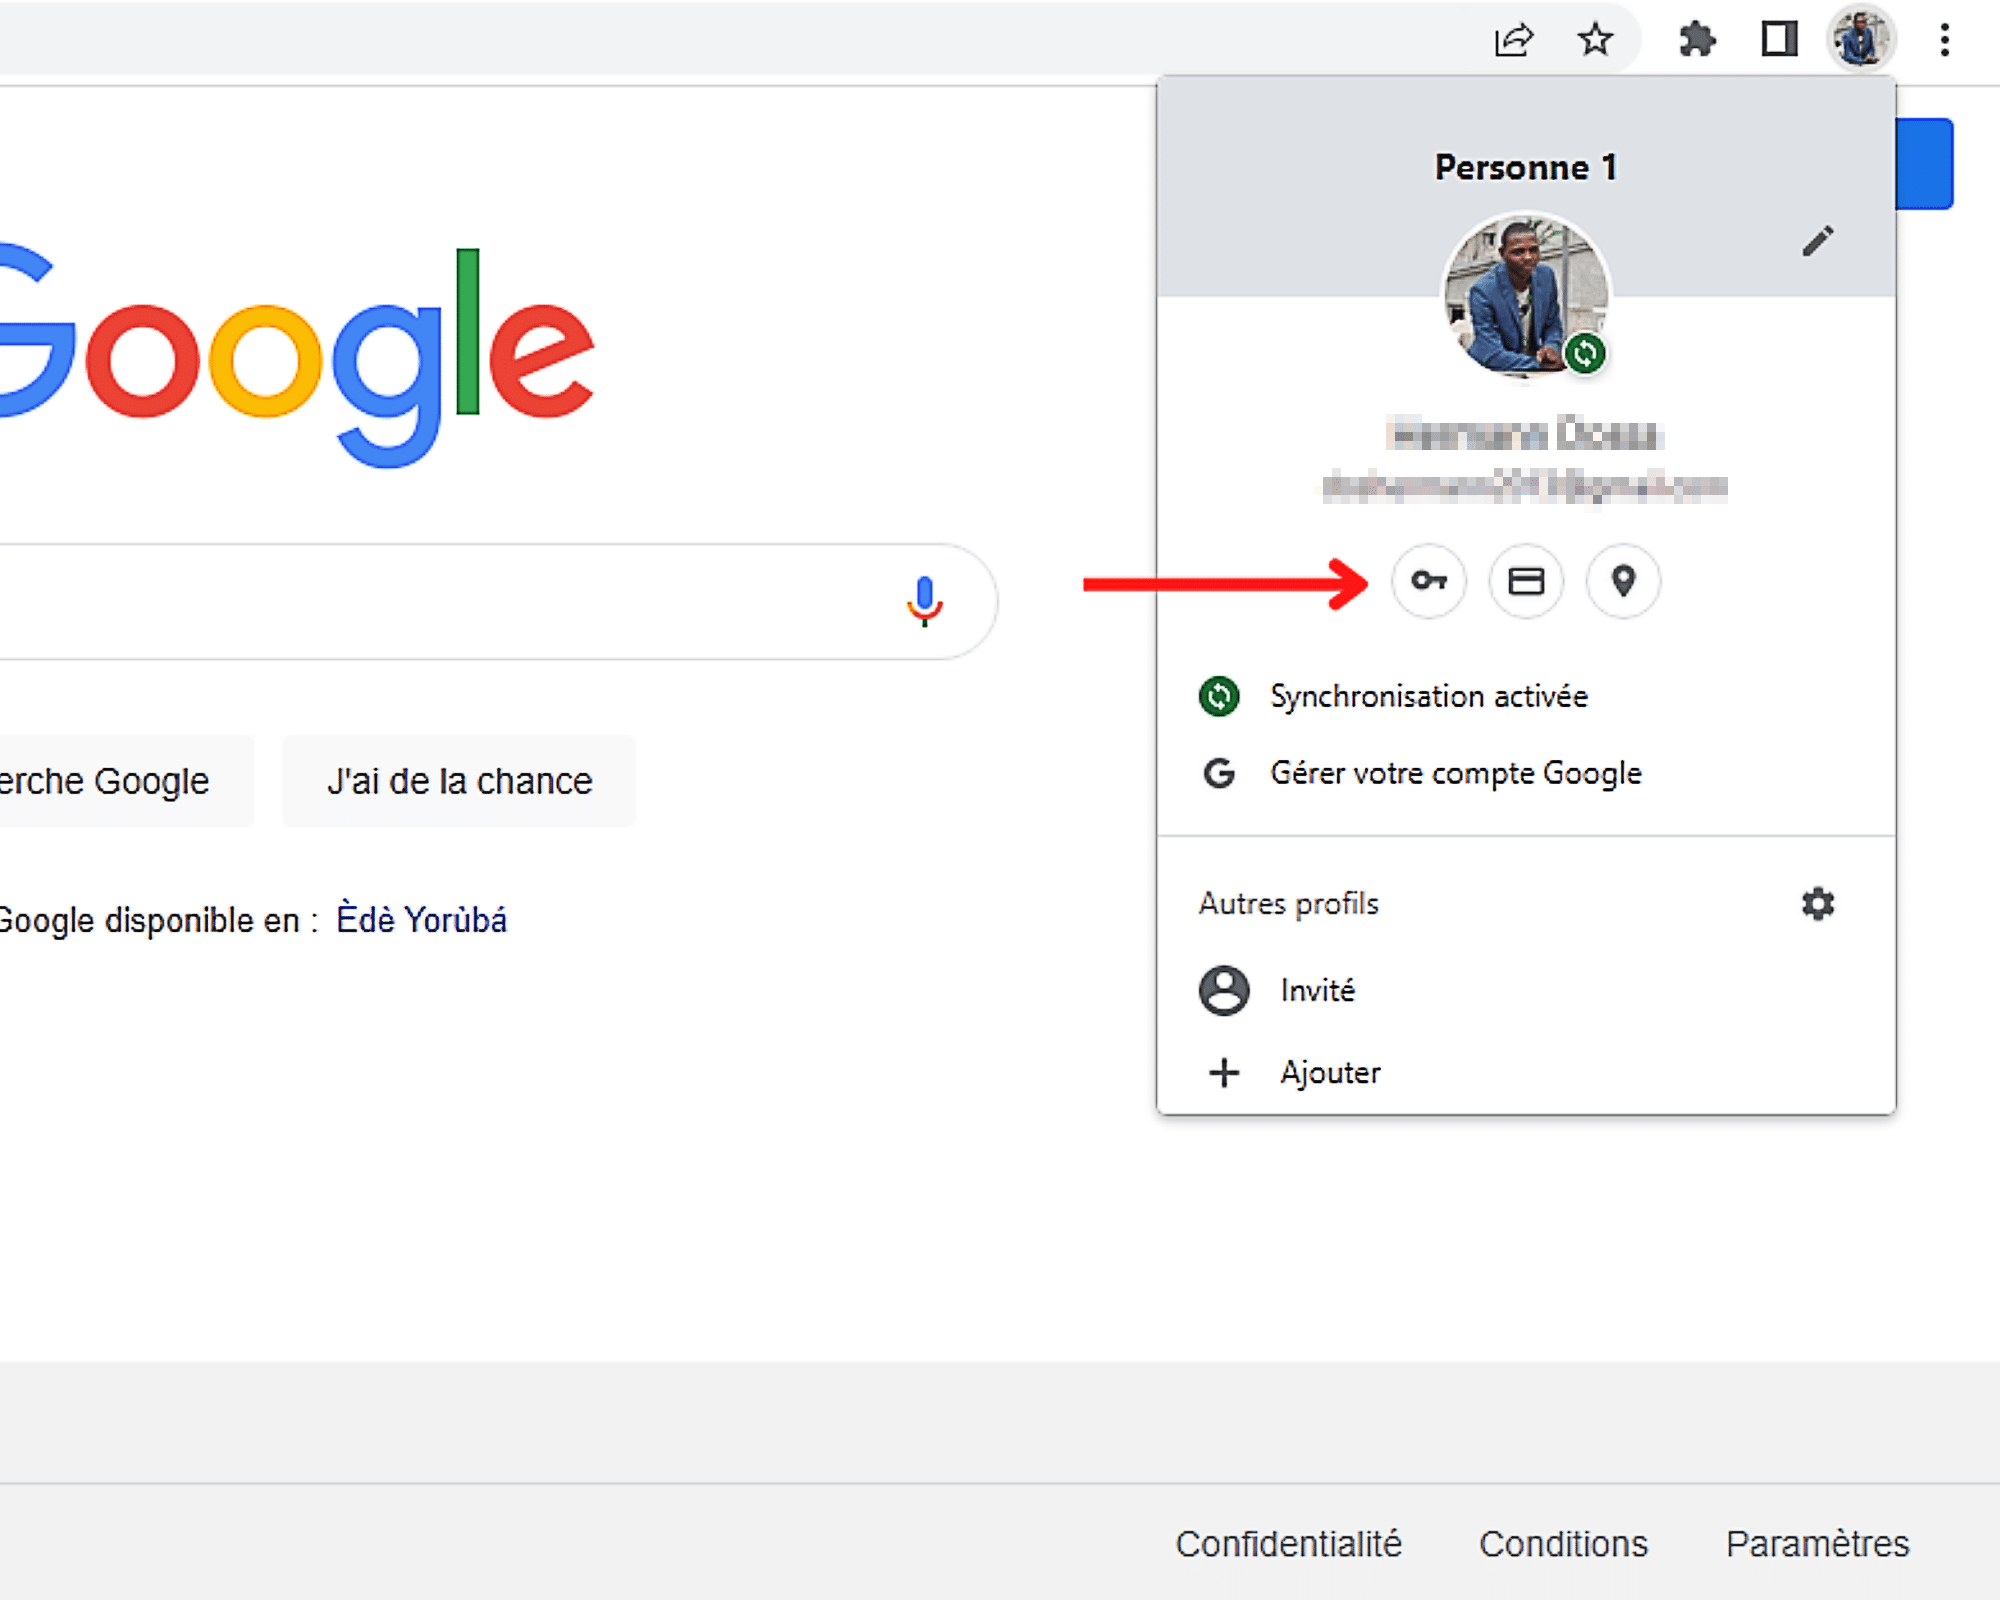
- פתח את Google Chrome.
- לחיצה על שמאל על סמל הפרופיל בפינה השמאלית העליונה של היישום.

- ואז בחר ב צץ זה מופיע, הסמל בצורת המפתח.
- לבסוף, עקוב אחר הצעדים השונים להלן, לפי העניין, להציג, לשנות, למחוק או לייצא סיסמה מוקלטת ב- Google Chrome.
כיצד להציג את הסיסמאות שלך בדפדפן Chrome ?
כדי להציג סיסמה שנשמרה ב- Chrome, לחץ על הסמל בקצה השמיני של השדה שלו.
שים לב שאם המחשב שלך נעול באמצעות סיסמה, תוזמן לתפוס אותו כדי לסוף הפעולה. לחץ על ” בסדר “או על המפתח” להיכנס »מהמקלדת שלך כדי לאמת את הערך שלך ולהציג את הסיסמה.

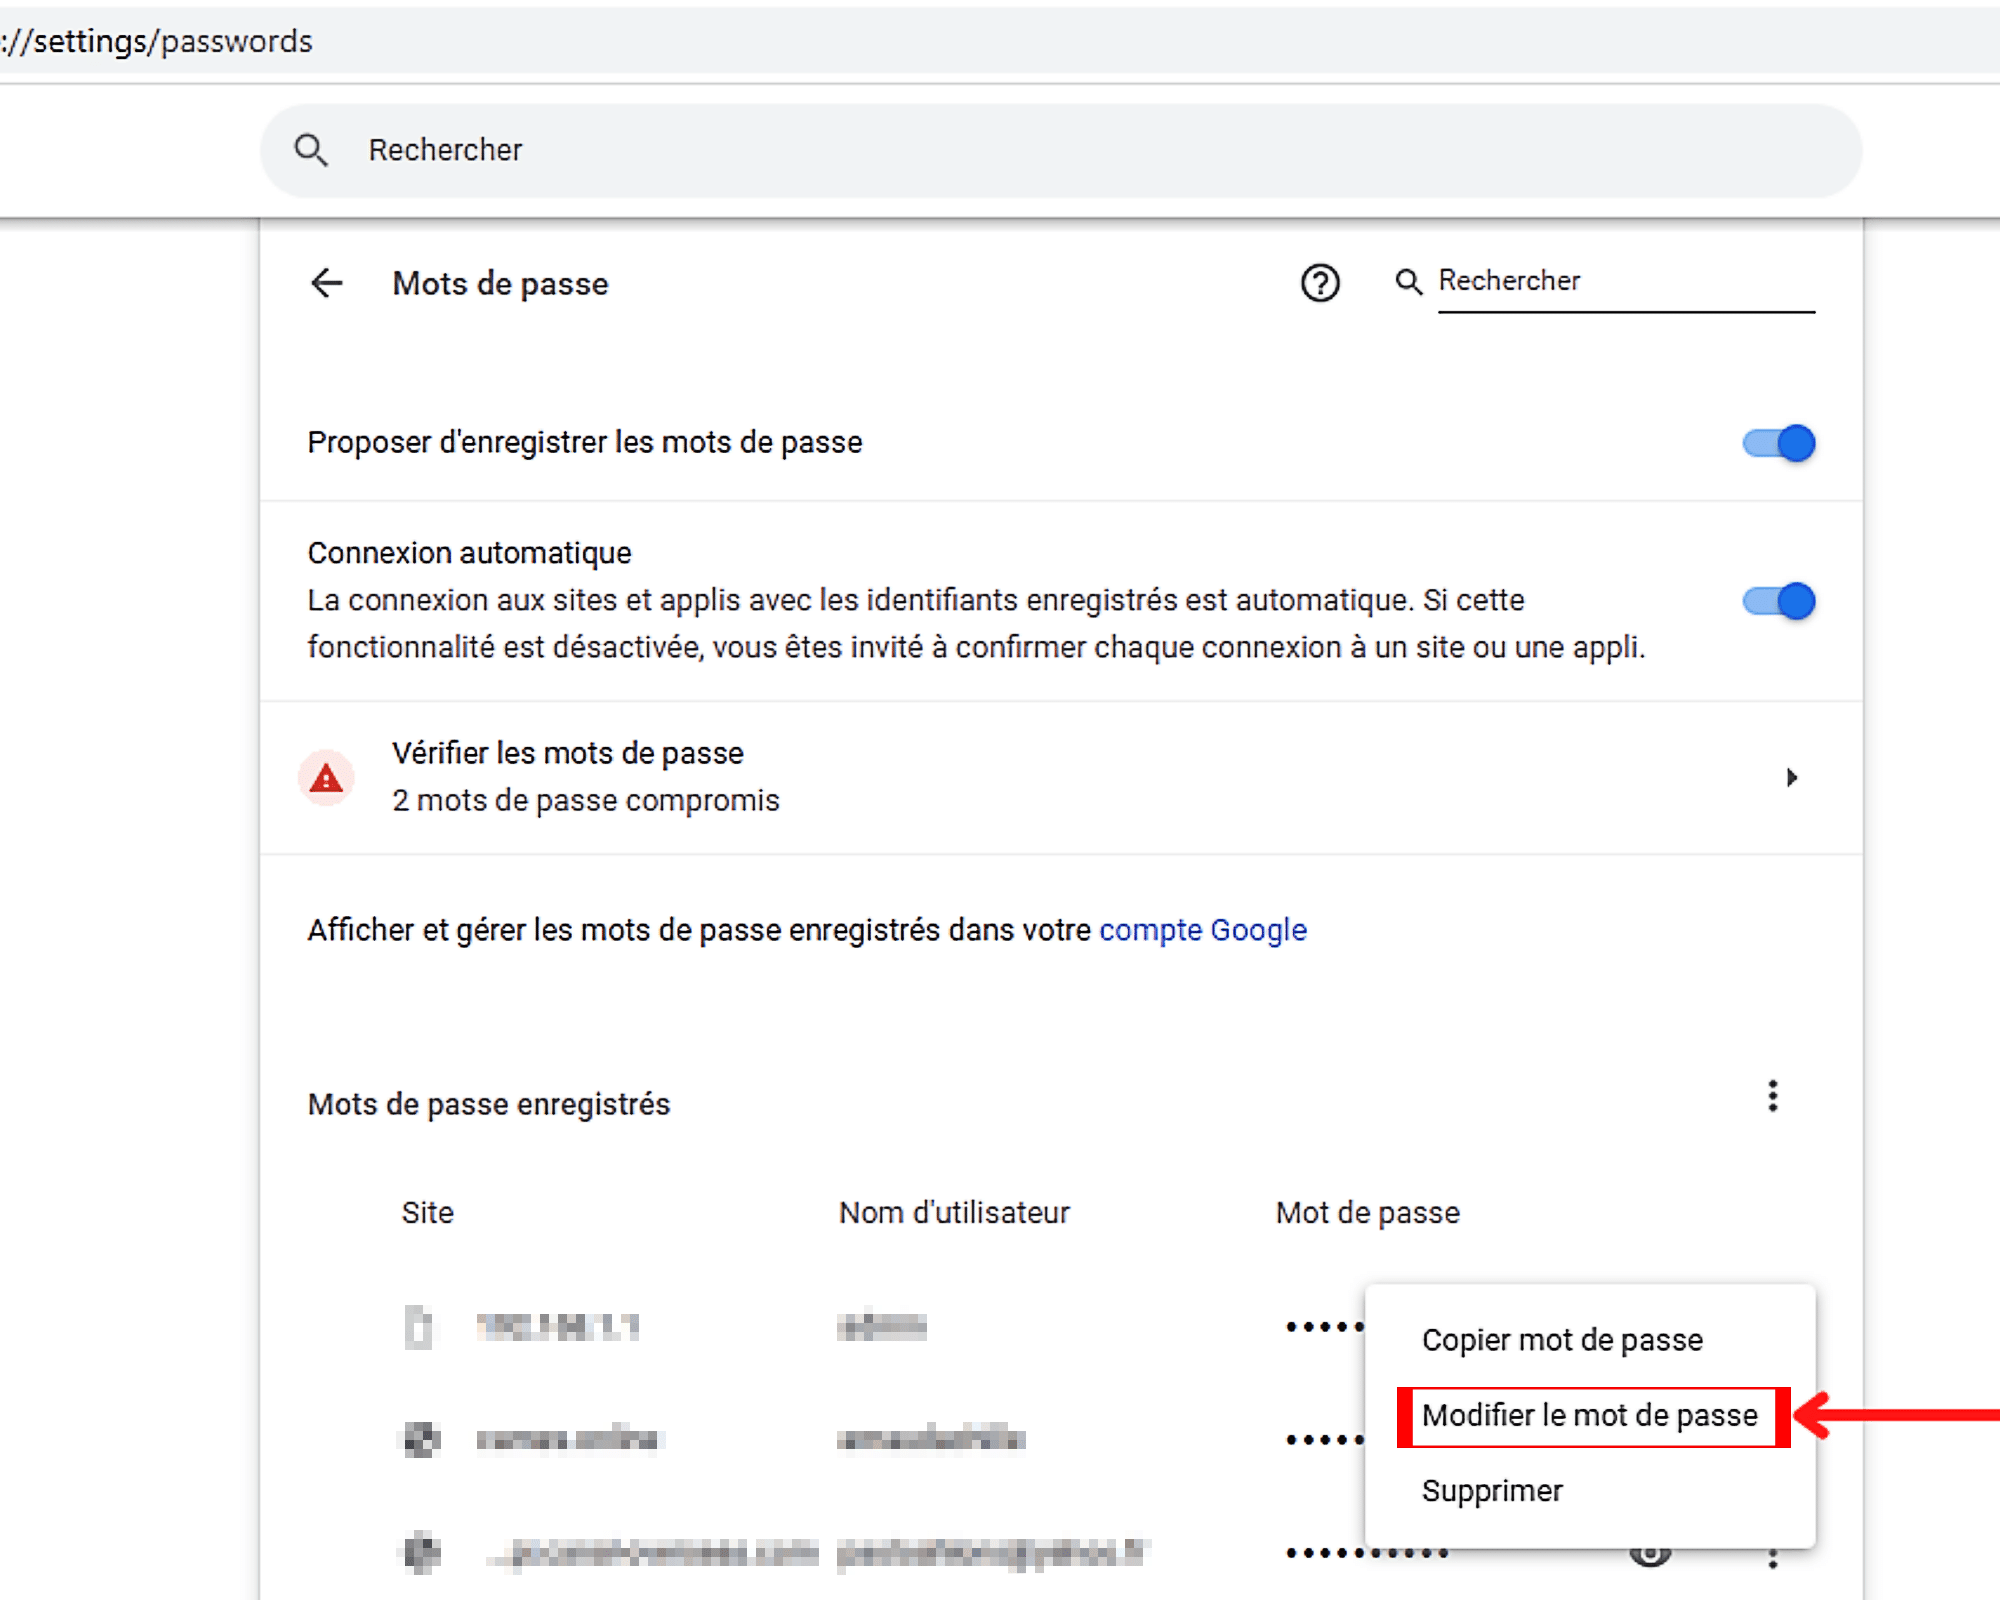
כיצד לשנות את הסיסמאות שלך ב- Chrome ?
כדי לשנות סיסמה ב- Google Chrome, תחילה עליך ללחוץ על ” יותר “כלומר, שלוש הנקודות האנכיות המונחות בקצה הימני של האחרונים. ואז בחר ב צץ זה מופיע, האפשרות ” שנה את הסיסמה »».
זה נעשה, לאחר מכן תצטרך להזין את הסיסמה שלך אם המחשב שלך נעול באמצעותו.

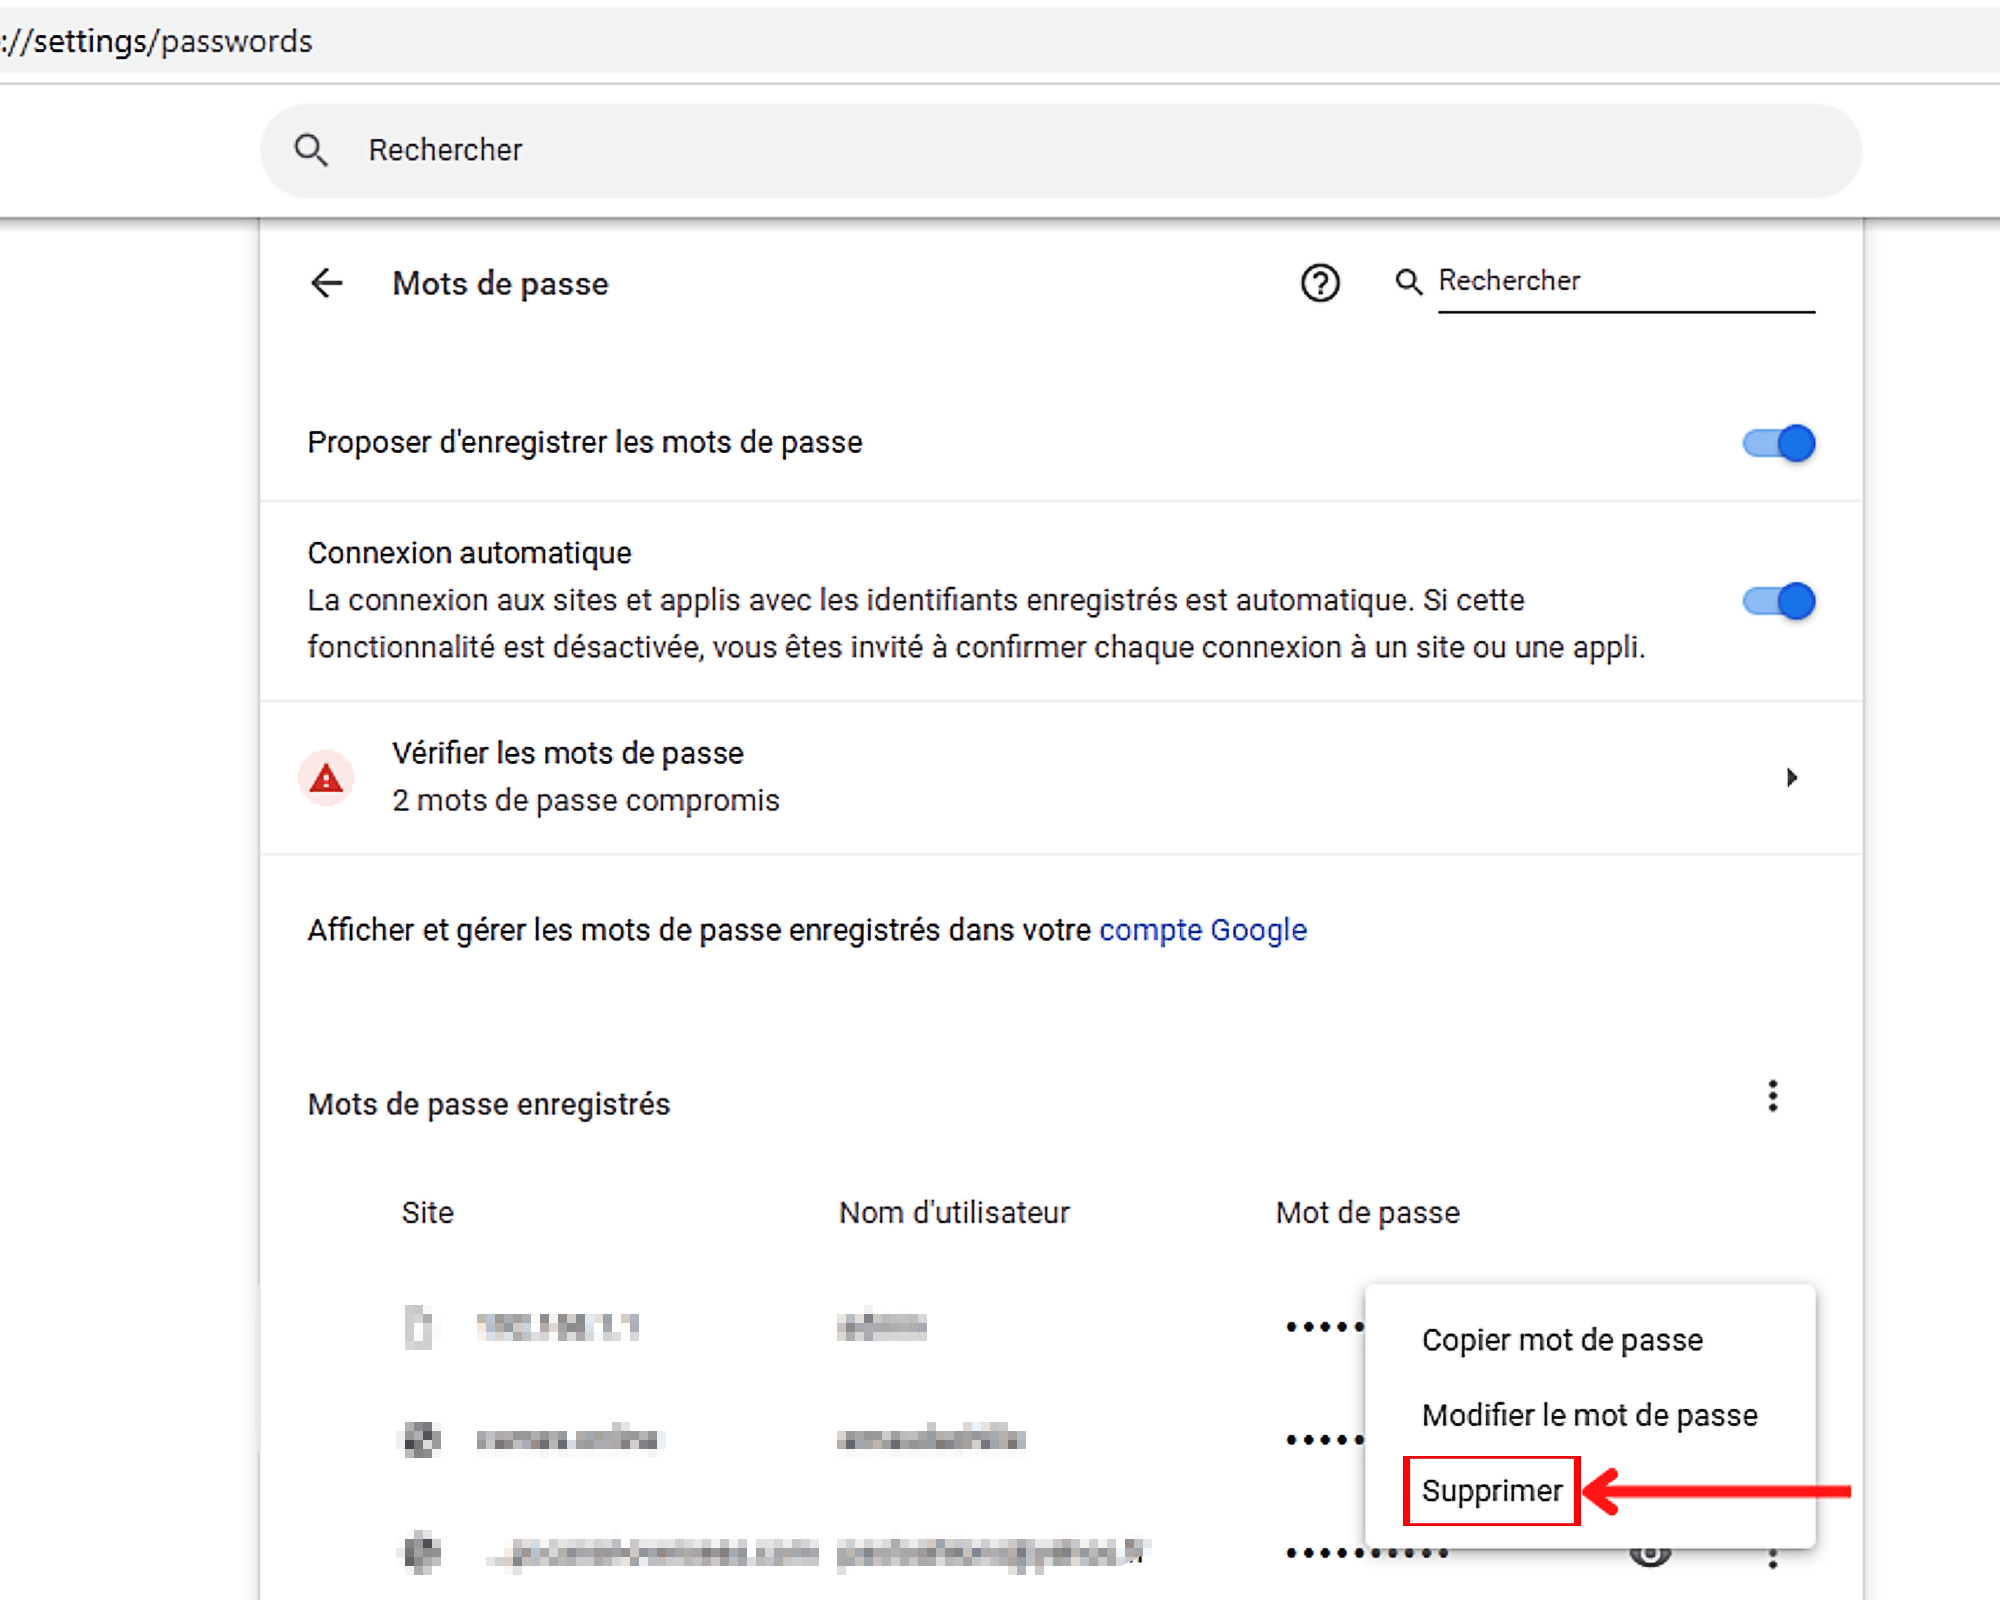
כיצד למחוק סיסמא מוקלטת ב- Google Chrome ?
כדי למחוק סיסמת רשומה ב- Chrome, לחץ על ” יותר “() שנמצא בקצה הנכון, ואז מופעל” לִמְחוֹק »».
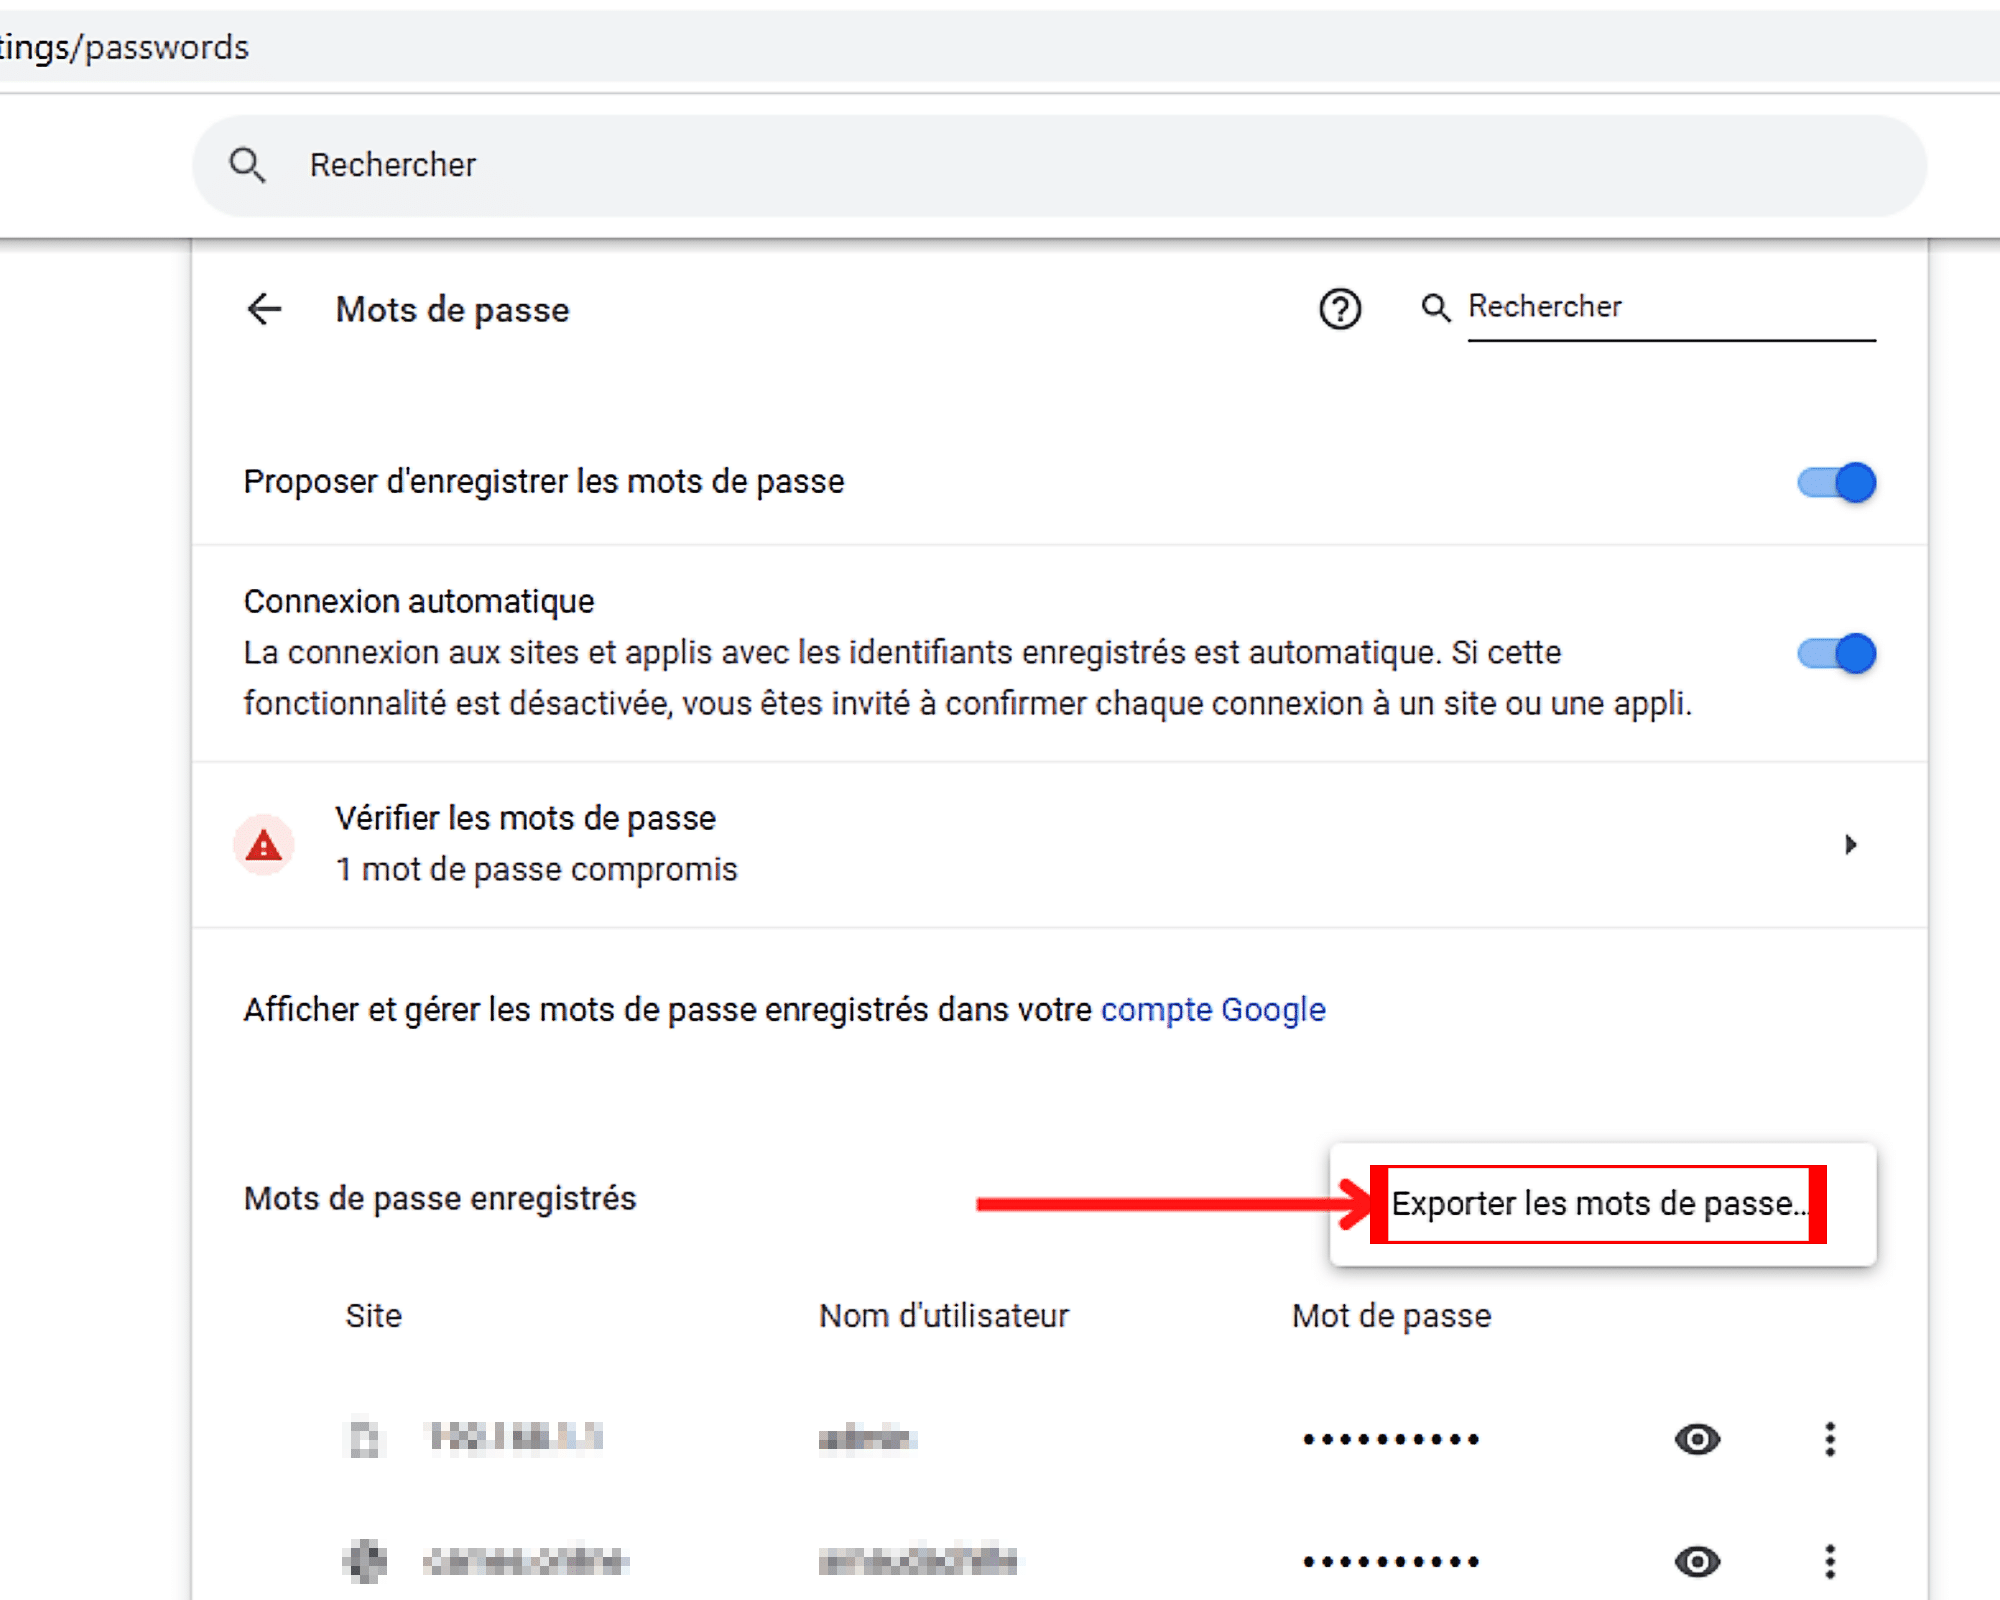
כיצד לייצא סיסמאות שנשמרו ב- Chrome ?
כדי לייצא את הסיסמאות המוקלטות שלך ל- Google Chrome, לחץ תחילה על השמאל ” יותר “ממוקם לפני כן” סיסמאות מוקלטות »».
ואז בחר ” ייצוא סיסמאות ” בתוך ה צץ שזה עתה הופיע, כדי להתחיל לייצא.
כיצד למחוק את כל הסיסמאות המוקלטות ב- Google Chrome ?
כדי למחוק את כל הסיסמאות שהוקלטו ב- Chrome בפעם אחת, עליך לבצע את הצעדים כאן.
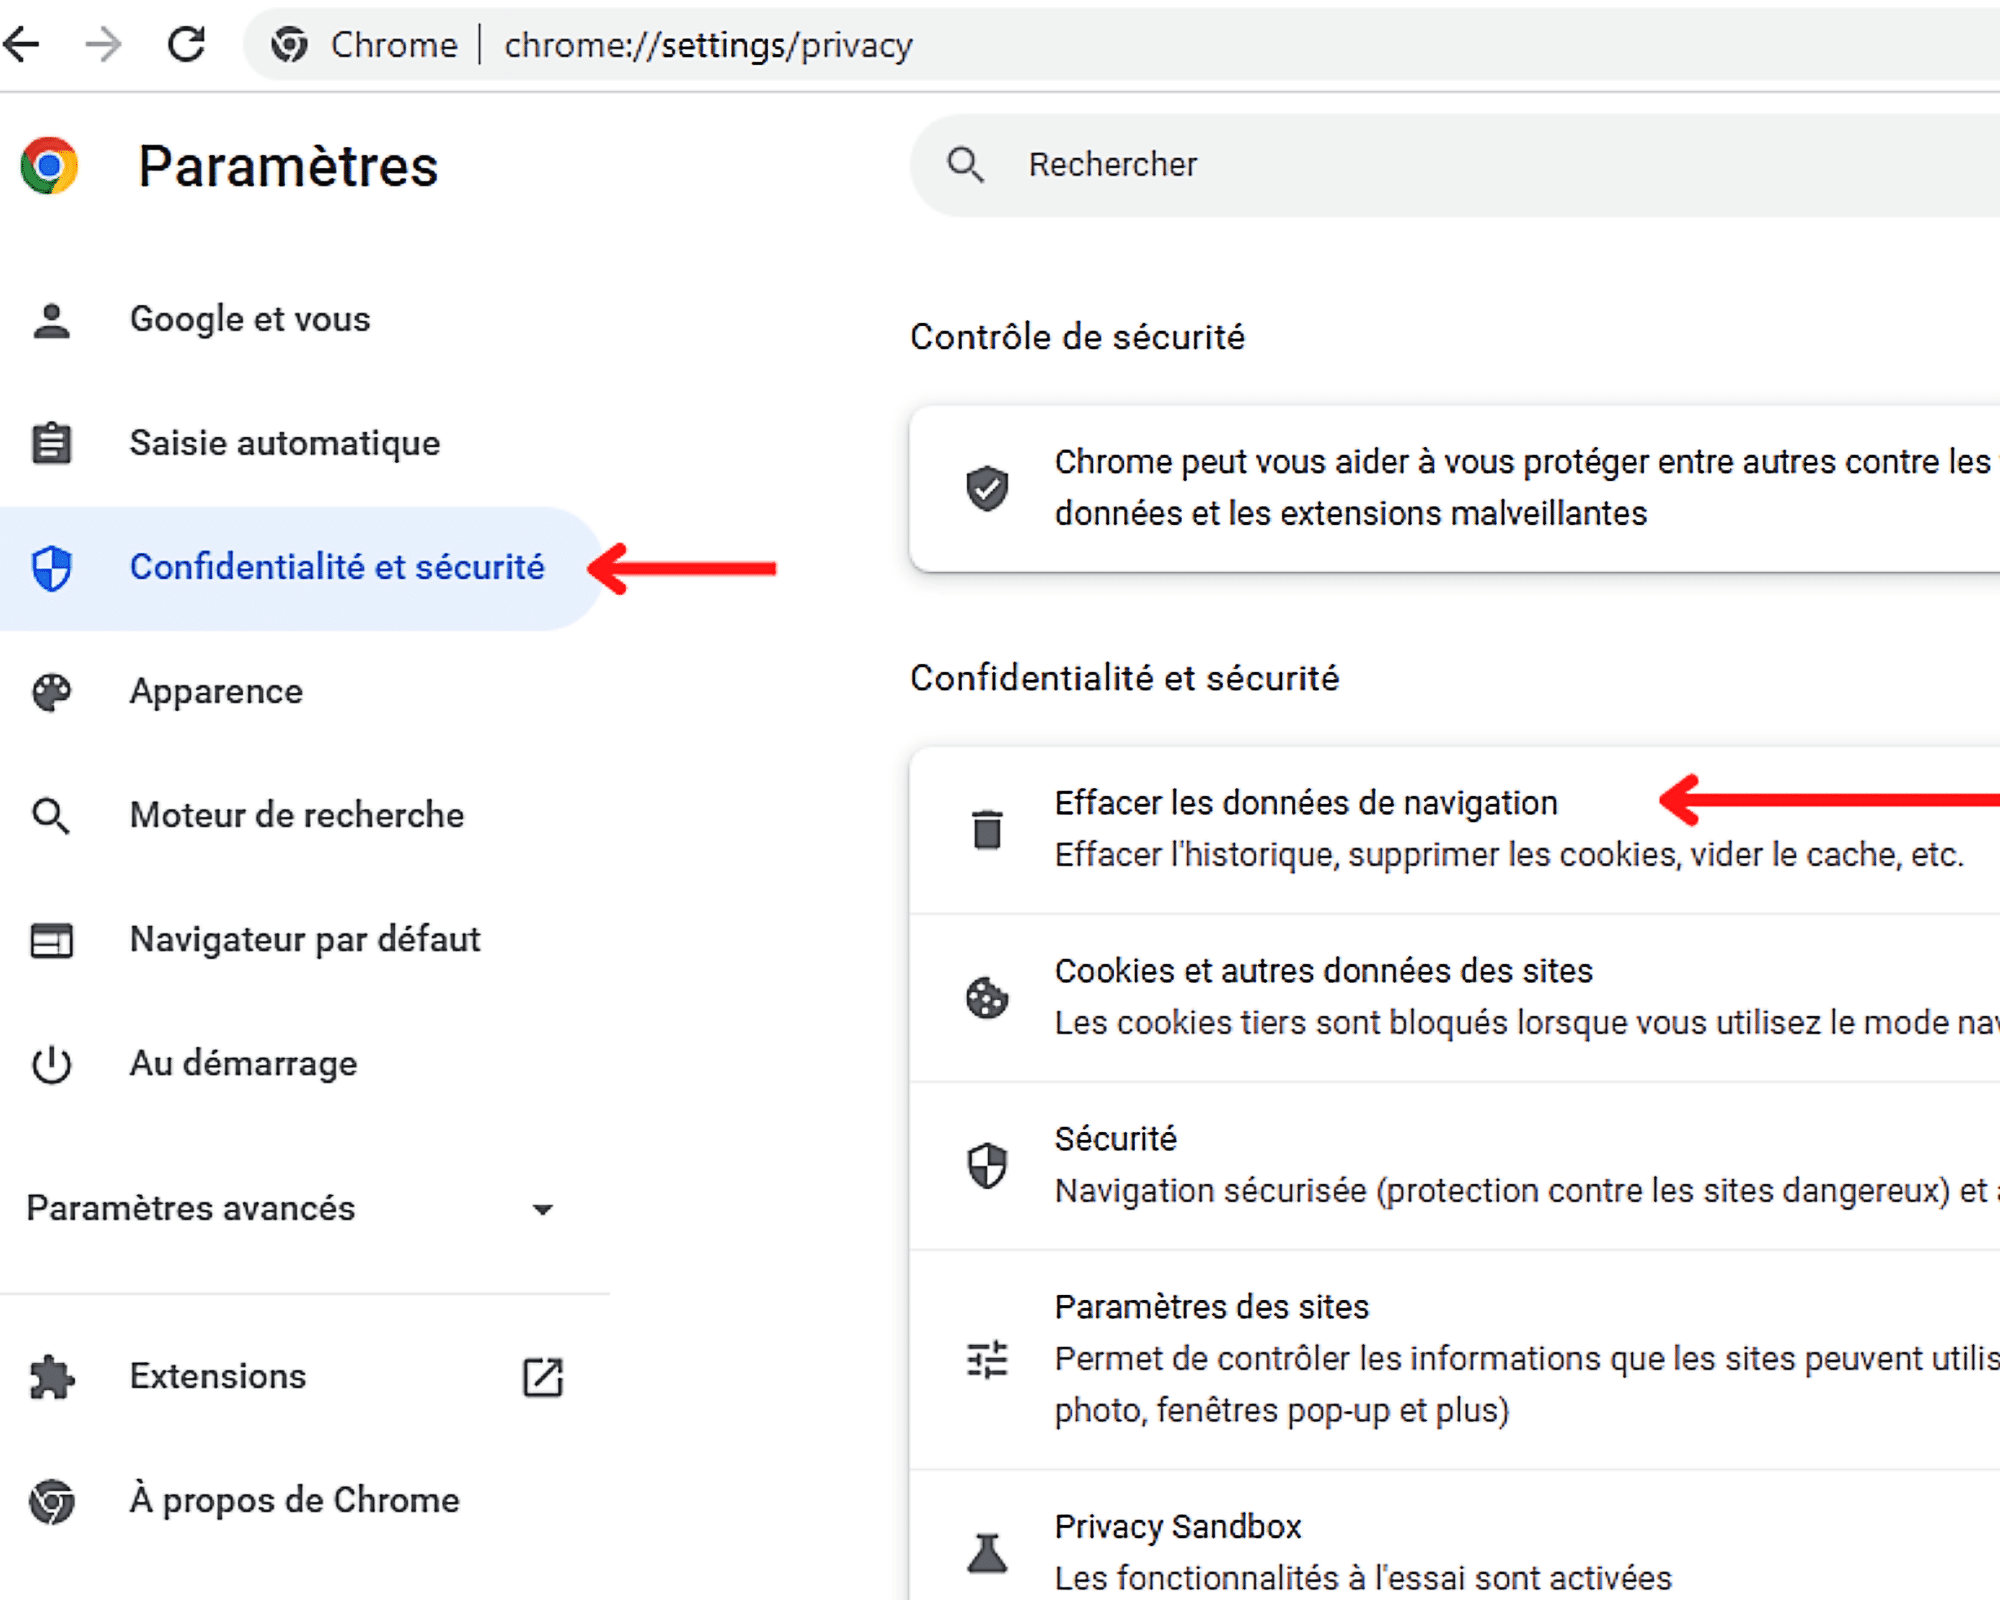
שלב 1: גישה להגדרות הפרטיות של Chrome
כדי לגשת להגדרות הסודיות, בחר, ברמה של סרגל התפריטים בצד שמאל, ” פרטיות ואבטחה »». לאחר מכן תמצאו בעמודה המרכזית, ליתר דיוק בקטע המפורסם, האפשרות ” נקה נתוני גלישה »». לחץ עליו כדי לעשות את השלב הבא.
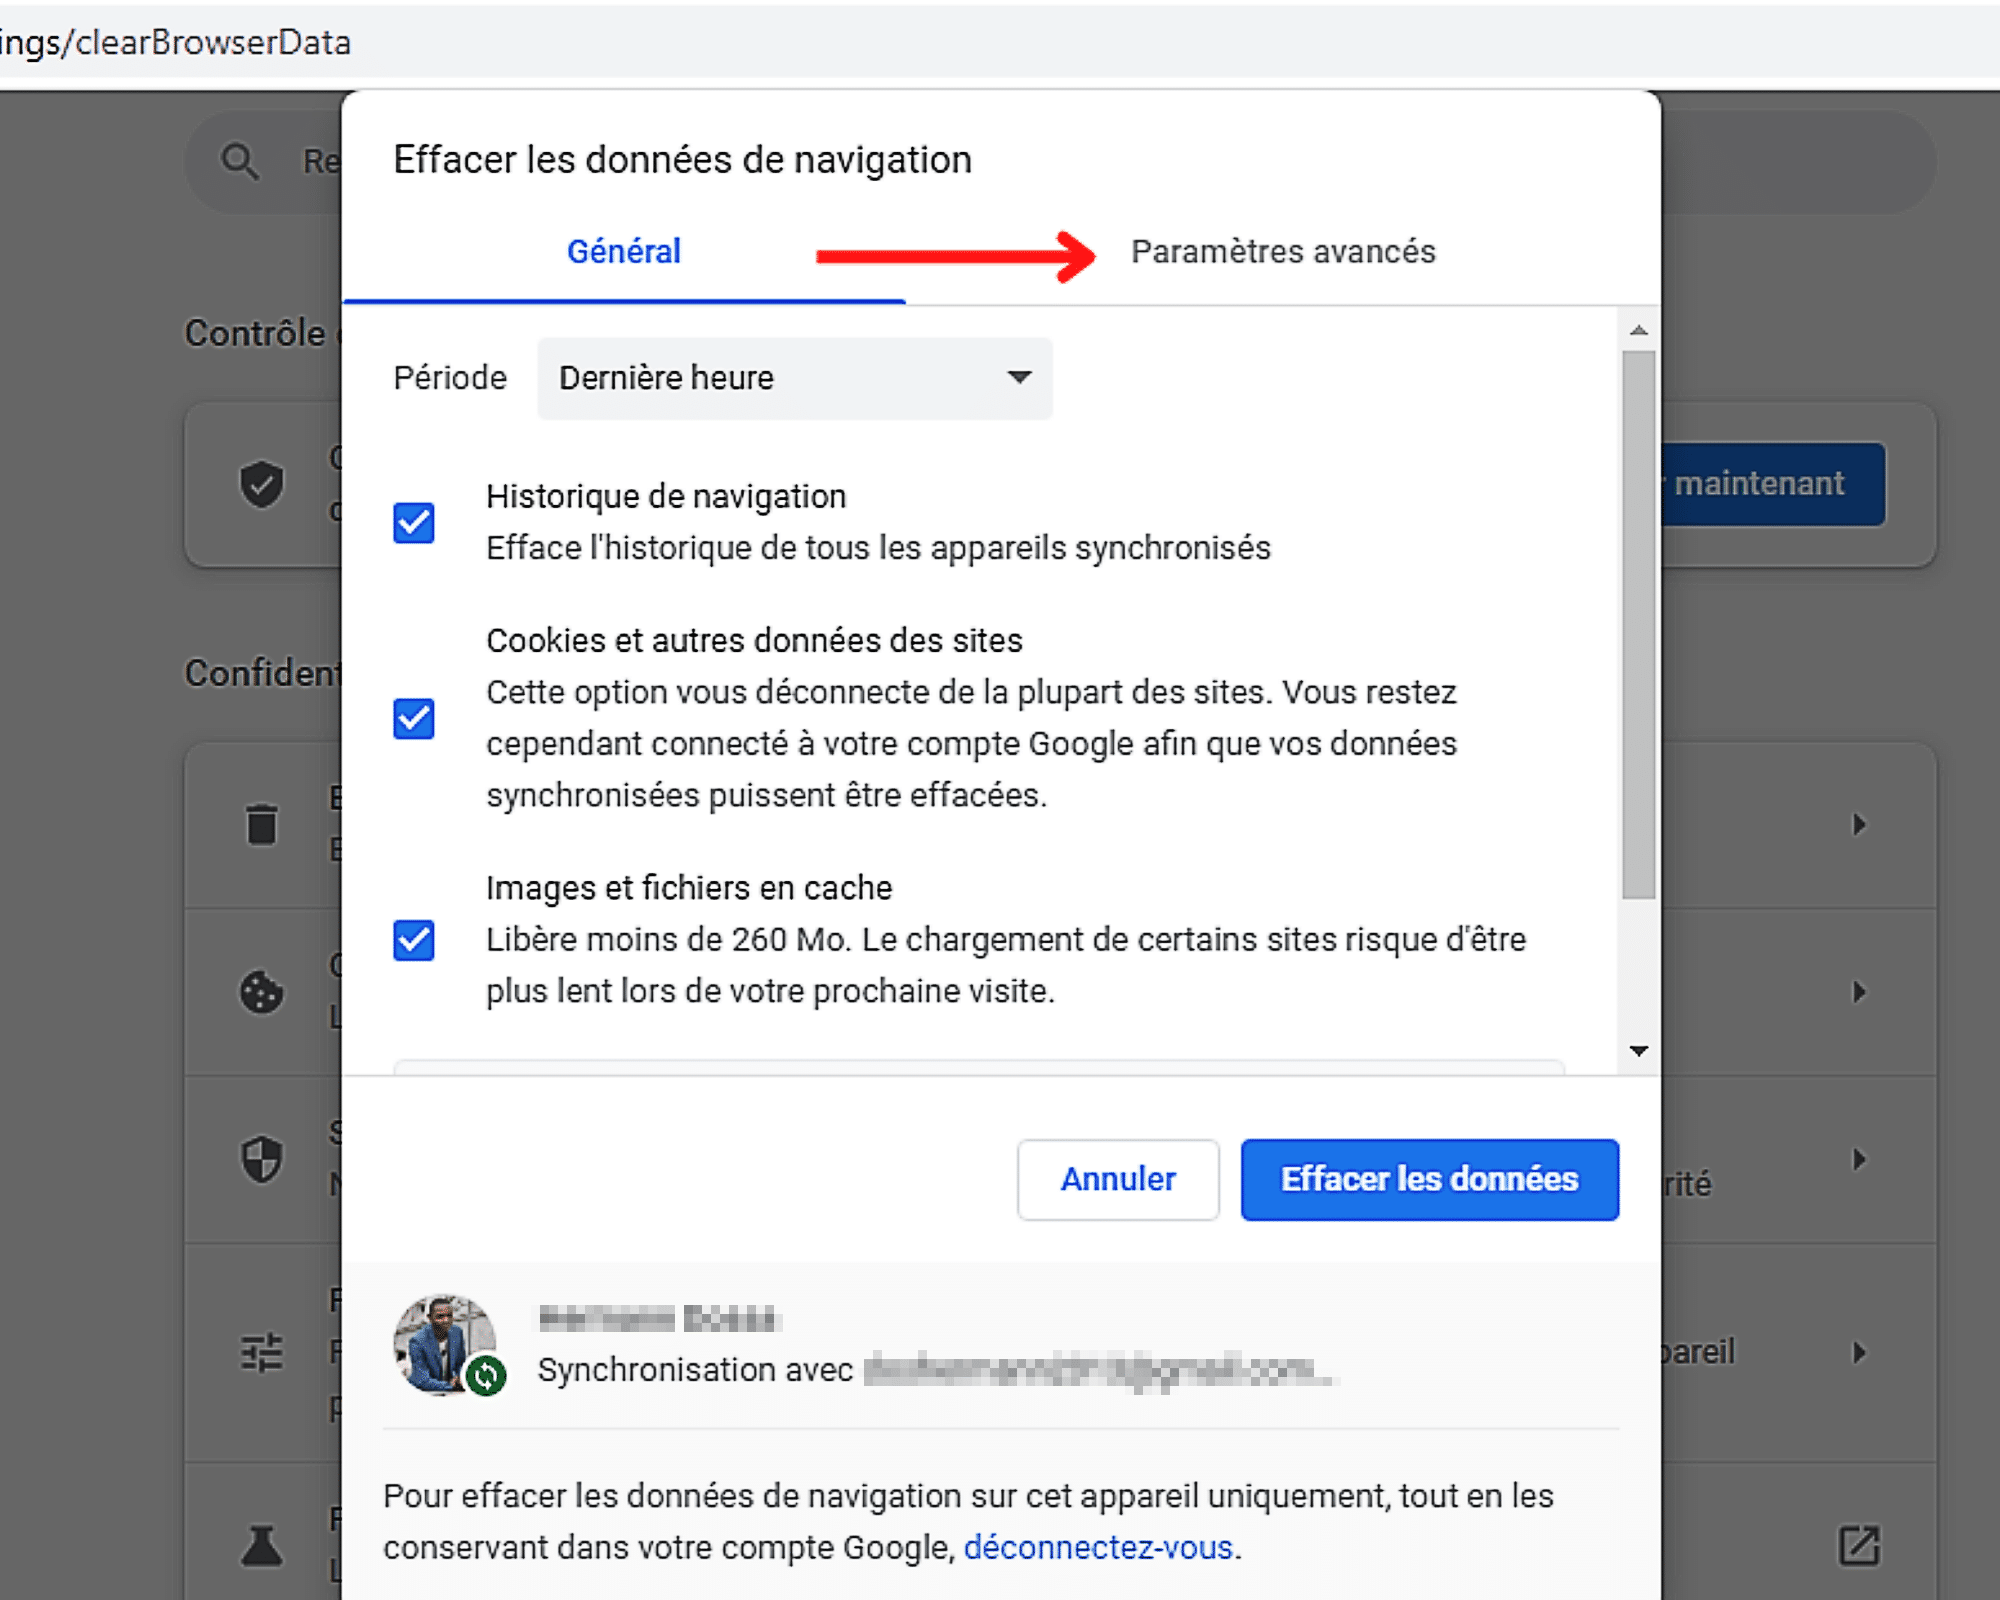
שלב 2: מחק סיסמאות ואפשרויות חיבור אחרות
כדי למחוק לצמיתות סיסמאות שנשמרו ב- Chrome, עליך למחוק נתוני ניווט מסוימים, כולל ” סיסמאות ואפשרויות חיבור אחרות »». אבל כדי להגיע לשם, עליכם ללחוץ תחילה על ” הגדרות מתקדמות ” בתוך ה צץ פְּתִיחָה.
ברגע שיש לך גישה לקטע ההגדרות, לחץ על התקופה ” שעה אחרונה “המוצג כברירת מחדל.
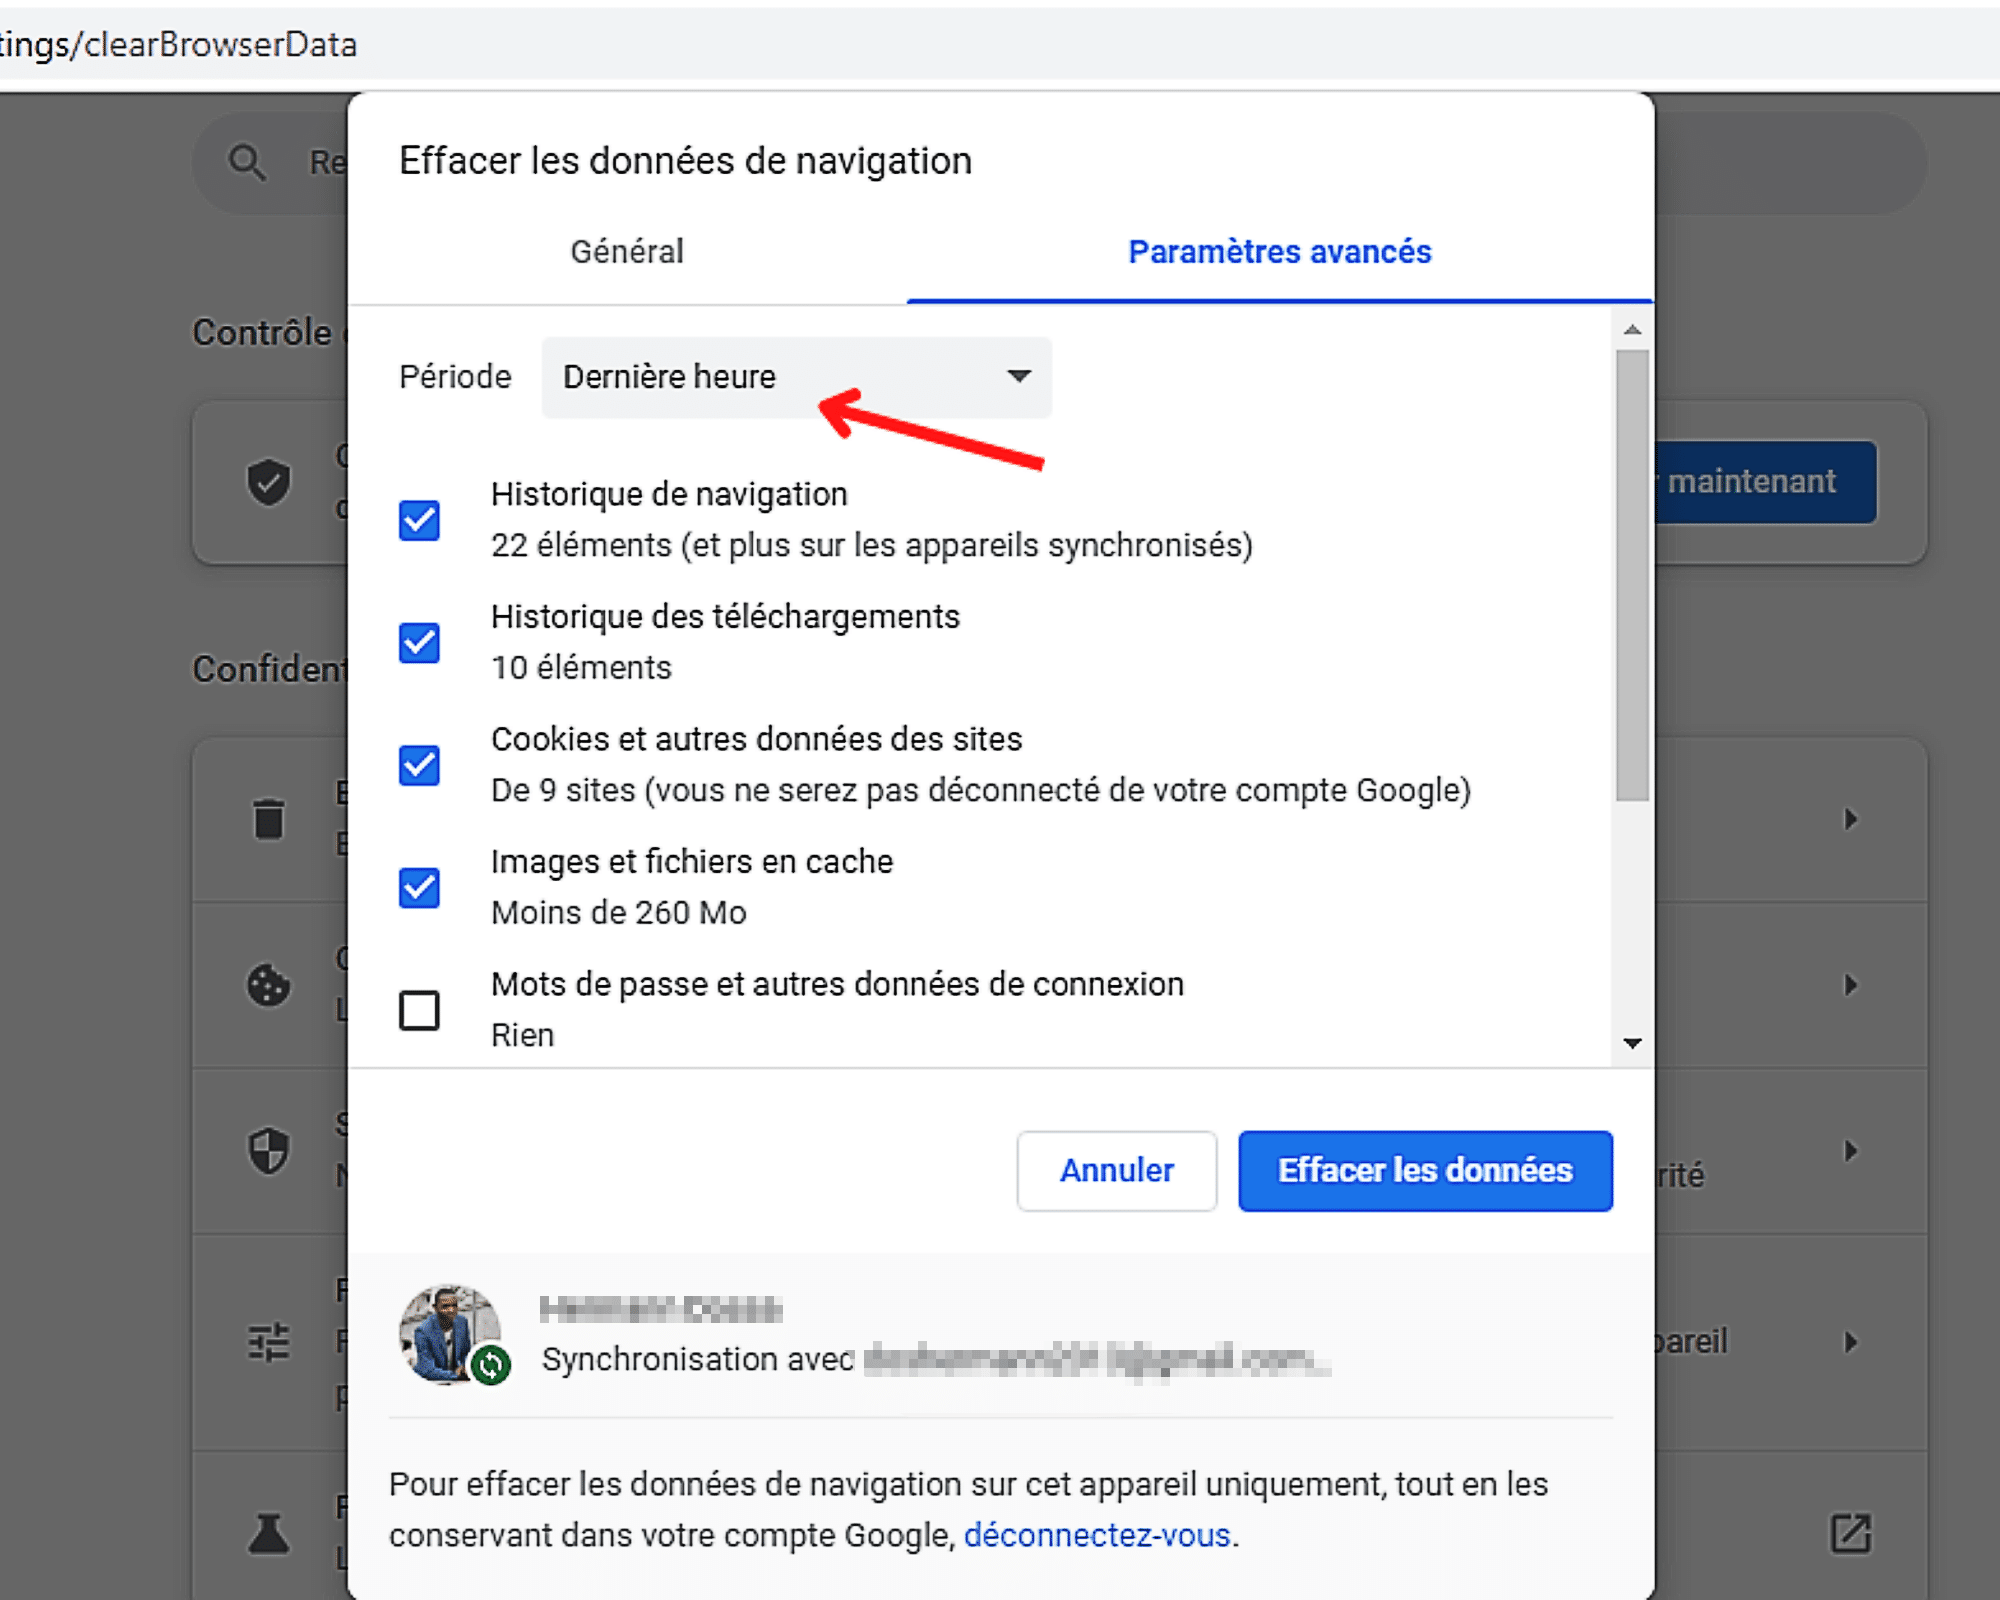
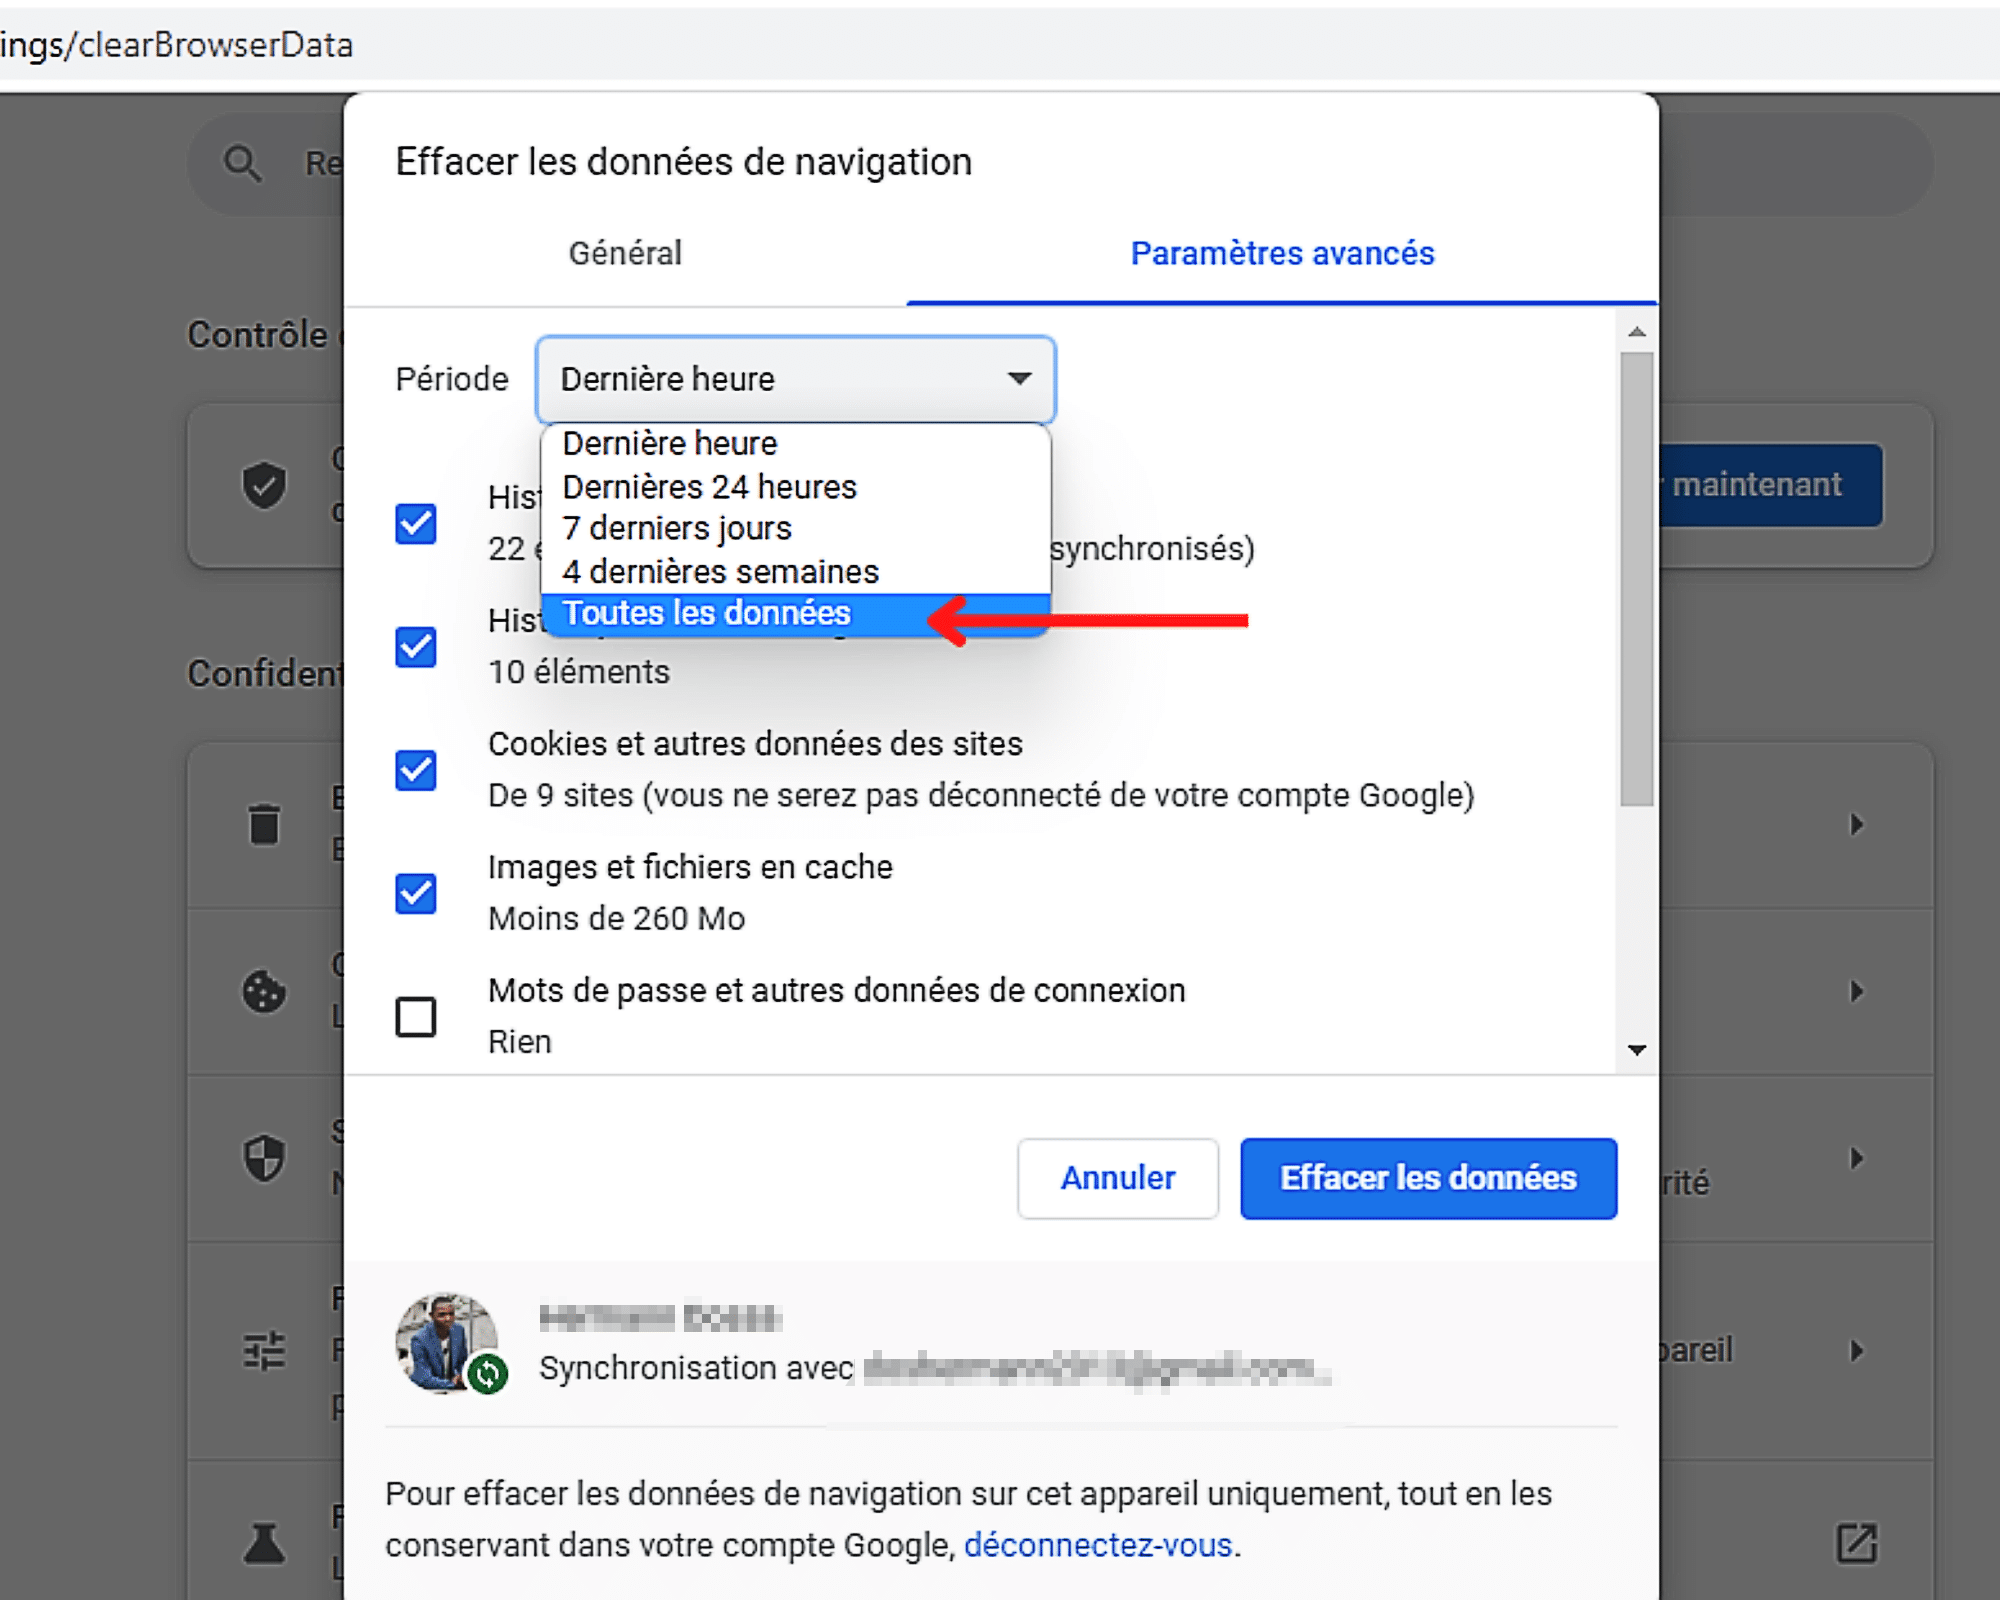
ואז בחר מתוך רשימת התקופות הזמינות ” כל הנתונים »».
זה נעשה, כעת תוכלו לבדוק את התיבה ” סיסמאות ונתוני חיבור אחרים בין נתוני הניווט.
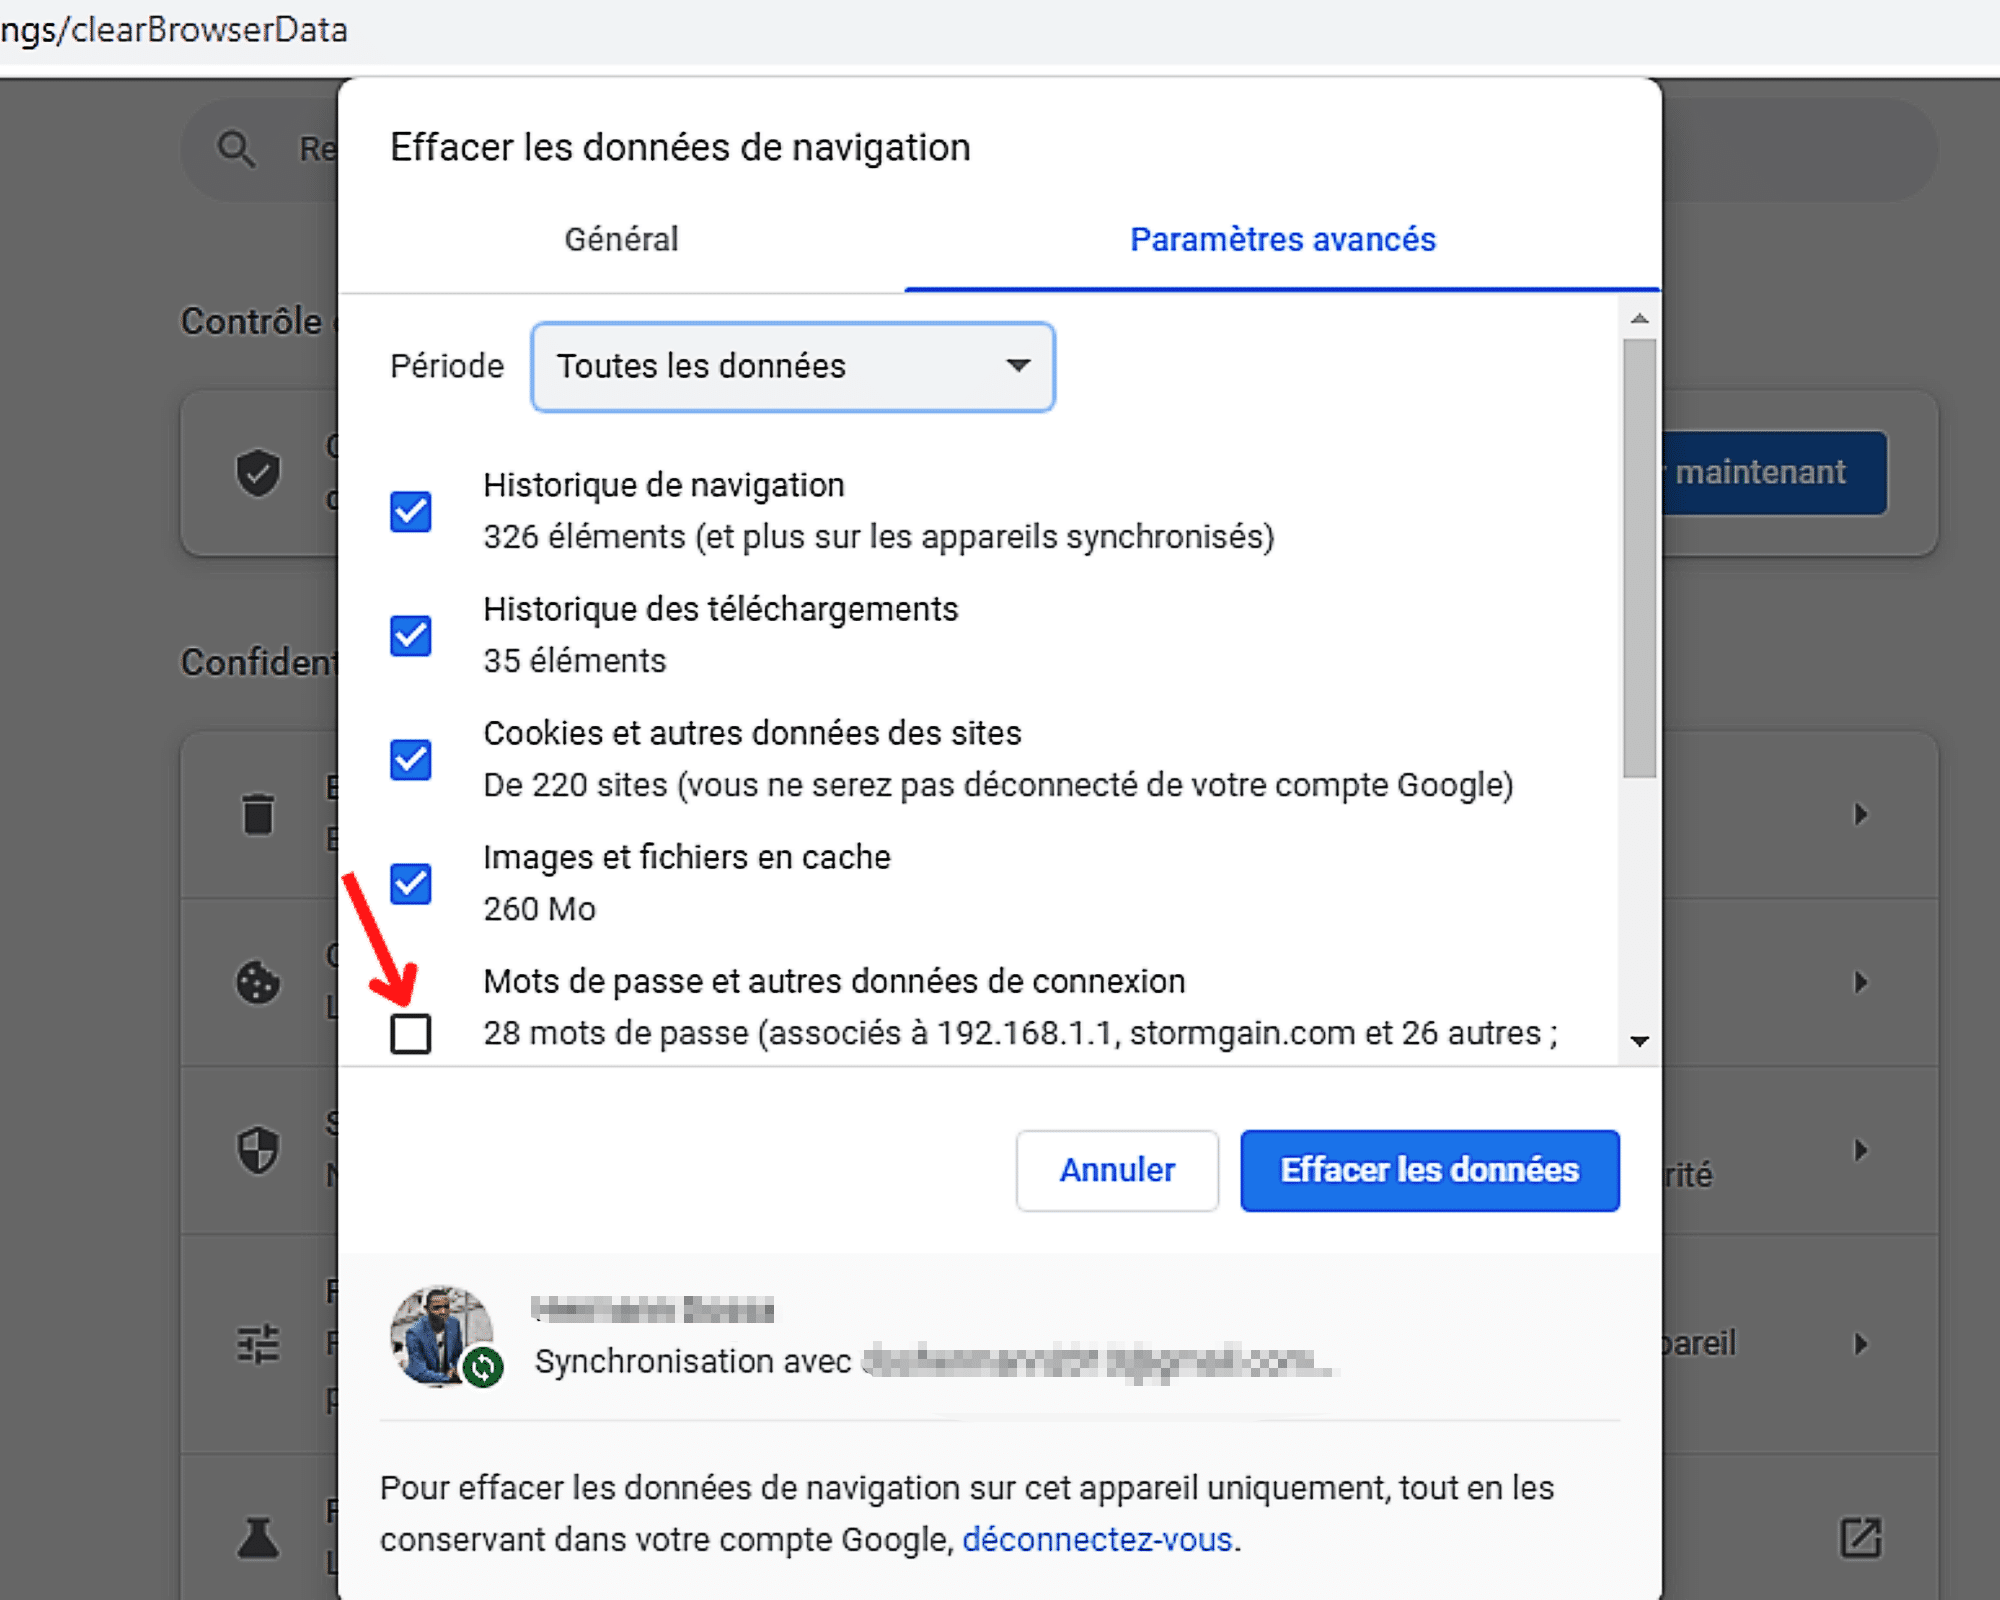
סוף סוף סיים את התהליך על ידי לחיצה על ” מחק נתונים »». אבל היזהר ! עליך לדעת שכל הנתונים שנבדקו ברשימה יימחקו ברגע שתלחצת על כפתור זה. כדי להימנע מפתיעה לא נעימה, אל תשכח לגלוש בפריטים המסומנים כדי לוודא שאלו שבחרת הם הנכונים.