


ניהול מכשירים וירטואליים עם מנהל מכשירי אנדרואיד
כשאתה מתקין את העומס של פיתוח עבודה של ממשק המשתמש של יישום מולטי -פלטפורמות .נֶטוֹ ב- Visual Studio, הכל מותקן עבורך. למידע נוסף על התצורה של .Net Maui עם Visual Studio, ראה צור את היישום הראשון שלך.
3 הדרכים הטובות ביותר לפתוח את אנדרואיד עם מנהל מכשירי אנדרואיד
הנייד האנדרואיד שלך נעול ? זו בעיה אמיתית. עם זאת, ניתן לפתוח אותו עם מנהל מכשירי אנדרואיד. הגישה היא פשוטה ואנחנו נותנים לך את כל הפרטים.
עדכון אחרון של לור מורו בתאריך: 12/22/2022
זהו מצב נדיר אך הוא נשאר אפשרי. ביטול נעילת נעילת מכשיר אנדרואיד הוא אף פעם לא עסקה פשוטה. מה אם תשכח את הקוד או הסיסמה שלך ? עכשיו אתה יכול להשתמש במנהל מכשירי אנדרואיד כדי לבטל את נעילת האנדרואיד שלך.
בנוסף, כמה אנשים מתעלמים מטכניקה זו למרות יעילותה. אפשר גם לפנות לדרואידקיט. תוכנה זו לעולם לא מאכזבת אותך. הישאר איתנו כדי לגלות את הדרכים הטובות ביותר לפתוח את נעילת ה- Android Mobile שלך.
[הדרכת וידאו: כיצד לפתוח את הנעילה של אנדרואיד ללא קוד]
![]()
- בטל את הנעילה עם מנהל מכשירי אנדרואיד
- ביטול נעילה באמצעות איתור המכשיר שלי
- ביטול הנעילה ללא קוד עם DroidKit
שיטה 1 השתמש במנהל מכשירי אנדרואיד לביטול נעילה
מנהל זה מציע מספר שירותים מרוחקים הנוגעים לסמארטפון אנדרואיד שלך. זה נגיש במחשב או נייד. פשוט לך לגוגל.COM/Android/מנהל מכשירים. סדרת תכונות תוצג מימין למסך. עם זאת, כדי לנצל זאת, יש להפעיל את המיקום בטלפון ולנייד האנדרואיד שלך צריך להיות מחובר לאינטרנט.
איך זה ? תכונת “אבטח את המכשיר” מוחצת את הנעילה המיוצרת במכשיר אנדרואיד. השירות ייתן לך אפשרות להגדיר סיסמה חדשה. לפיכך, מנהל מכשירי אנדרואיד ישתלט על הטלפון שלך. ברגע שמנעול זה יבוטל, הוא יהיה נגיש שוב. מתחת לשלבים הבאים.
- גישה לגוגל.COM/Android/Manager Adver אבטח את המכשיר
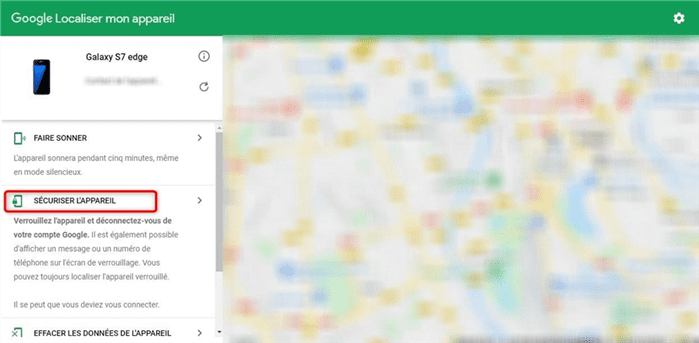
לחץ על אבטח את המכשיר
- הזנת הסיסמה של חשבון Google שלך ואז לחץ על הבא
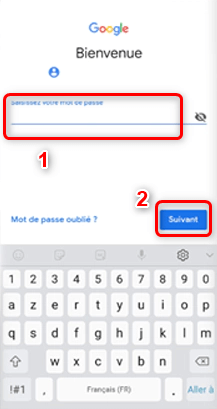
הכנס את הסיסמא
- הגדר סיסמת נעילה חדשה> לחץ על הבא
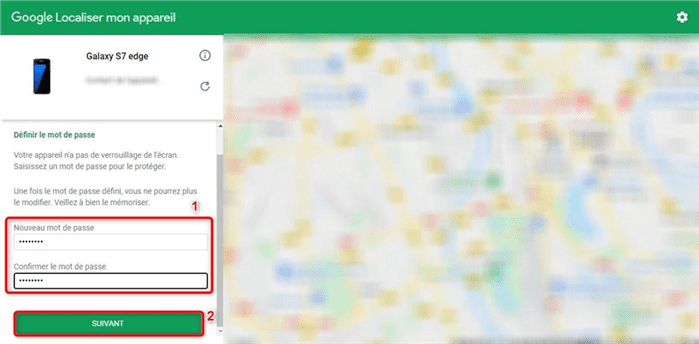
הגדר סיסמה
שיטה 2 ביטול נעילה של אנדרואיד באמצעות איתור המכשיר שלי
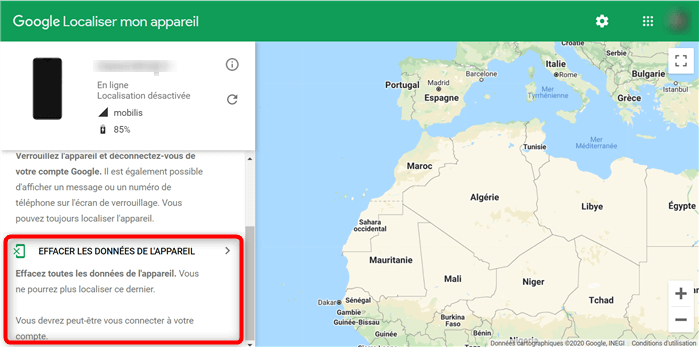
המשימה העיקרית של תכונה זו היא למקם את הטלפון החכם או הטאבלט של אנדרואיד. זה הופך להיות יקר מאוד במקרה של אובדן או גניבה. עם זאת, יש להפעיל את פונקציית המיקום לפני כן על מנת לנצל את כל השירותים הללו. בנוסף, זה מפגיש את כל המכשירים שלך הקשורים לחשבון Gmail שלך. מכשיר אנדרואיד שלך יימנע לאחר ביטול הרשימה.
עם זאת, הוא נתון לתנאים מסוימים. כדי לגשת אליו, תצטרך לעבור את מנהל מכשירי אנדרואיד. לכן באופן הגיוני שחייב את הסמארטפון שלך להיות מחובר לאינטרנט. יש לציין כי ביטול נעילת המכשיר בשיטה זו ימחק את כל הנתונים במכשיר האנדרואיד שלך. מתחת לתהליך הבאים.
- גישה www.גוגל.com/אנדרואיד/מצא ולהתחבר לחשבון Google שלך
ראה פרטי הפעלה
- לחץ על מחק את הנתונים מהמכשיר
מחק את הנתונים מהמכשיר
מכיוון שהנתונים יימחקו, עליכם לשמור את הטלפון אנדרואיד טוב יותר לפני שתתחיל לא לאבד נתונים חשובים.
שיטה 3 ביטול נעילה של אנדרואיד ללא קוד באמצעות DroidKit
בדרך כלל, מנהל מכשירי אנדרואיד יכול לעזור לך לפתוח את הטלפון שלך, אך אם אתה כבר לא זוכר את הסיסמה של חשבון Google שלך, איך לעשות? אל תדאג, במקרה זה, DroidKit נותן לך אפשרות זו. תוכל לקבור באופן סופי את תוכנית הנעילה ולהשתמש שוב במכשיר.
ככלי תיבה של מכשירי אנדרואיד, DroidKit לא רק מאפשר לך לפתוח את הנעילה של המסך ללא קוד, אלא גם לשחזר את הנתונים שנמחקו, כדי לעקוף את סמסונג, לנהל את כל נתוני האנדרואיד וכו ‘. אם לוקחים בחשבון כי כל הנתונים יבוטלו לאחר ביטול הנעילה, אתה יכול לשמור אותם בתחילת הדרך או לשחזר נתונים אבודים באמצעות DroidKit. הורד את DroidKit ופעל את נעילת Safe שלך.
- הפעל ימינה ועבור למודול ביטול נעילת מסך
- לחץ על לִמְחוֹק
לחץ על מחק עכשיו
- מחיקה של נעילת אנדרואיד מוצלחת
מחיקה של נעילת המסך המוגמר
סיכום
מנהל מכשירי אנדרואיד מסוגל לפתוח את הטלפון החכם שלך. עם זאת, DroidKit עוזב צעד קדימה בזכות מודול שחזור הנתונים שלו. אל תהססו להשתמש בתוכנה זו.
DROIDKIT – מנהל מכשירי אנדרואיד
- בטל את נעילת כל סוגי הנעילה של המסך באנדרואיד.
- העבר נתוני WhatsApp ללא אובדן נתונים.
- שמור, שחזור והעביר אפליקציות ואפליקציות ב 1 לחץ.
- אין צורך בפריצת סוהר או בשורש. אין סיכון לאובדן נתונים.
ניהול מכשירים וירטואליים עם מנהל מכשירי אנדרואיד
מאמר זה מתאר כיצד להשתמש במנהל התקני אנדרואיד כדי ליצור ולהגדיר מכשירים וירטואליים של אנדרואיד (AVD) המחקים מכשירים פיזיים של אנדרואיד. אתה יכול להשתמש במכשירים וירטואליים אלה כדי להפעיל ולבדוק את היישום שלך מבלי שתצטרך להיות תלוי במכשיר פיזי.
הפעל את האצת החומרה למכשירי אנדרואיד. למידע נוסף, עיין בהאצת חומרה לביצועי אמולטור.
מנהל מכשירי אנדרואיד ב- Windows
אתה משתמש במנהל ההתקנים של אנדרואיד כדי ליצור ולהגדיר את התצורה של מכשירים וירטואליים של אנדרואיד (AVD) הפועלים ב- Android Emulator. כל AVD הוא תצורת אמולטור המדמה התקן אנדרואיד פיזי. אתה יכול להריץ ולבדוק את היישום שלך בתצורות שונות המדמות מכשירי אנדרואיד פיזיים שונים.
תצורה נדרשת
כדי להשתמש במנהל ההתקנים של אנדרואיד, אתה זקוק לדברים הבאים:
- Visual Studio 2022: מהדורות קהילתיות, מקצועיות וארגוניות נתמכות.
- אנדרואיד SDK API ברמה 30 או מאוחר יותר. הקפד להתקין את אנדרואיד SDK במיקום ברירת המחדל שלו אם הוא כבר לא הותקן: C: \ קבצי תוכנית (x86) \ Android \ Android-SDK.
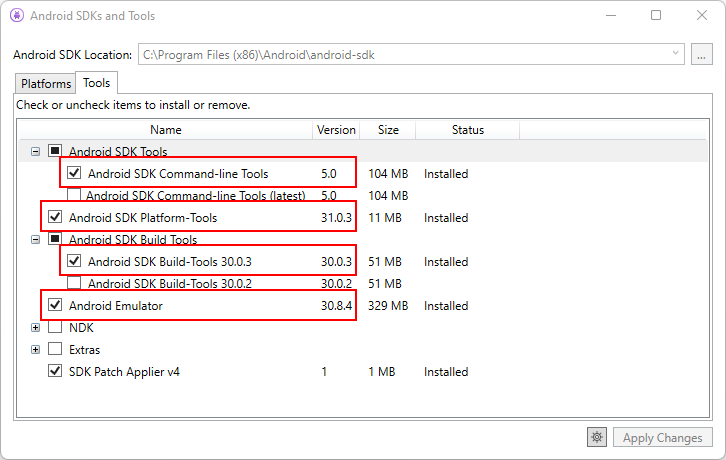
- יש להתקין את החבילות הבאות:
- כלי SDK אנדרואיד 5.0 או מאוחר יותר
- כלי פלטפורמה של אנדרואיד SDK 31.0.3 או מאוחר יותר
- SDK Android Build-Sools 30.0.2 או מאוחר יותר
- אמולטור אנדרואיד 30.8.4 או מאוחר יותר
יש להציג חבילות אלה עם המדינה מוּתקָן, כפי שמודגם בתמונת המסך הבאה:
כשאתה מתקין את העומס של פיתוח עבודה של ממשק המשתמש של יישום מולטי -פלטפורמות .נֶטוֹ ב- Visual Studio, הכל מותקן עבורך. למידע נוסף על התצורה של .Net Maui עם Visual Studio, ראה צור את היישום הראשון שלך.
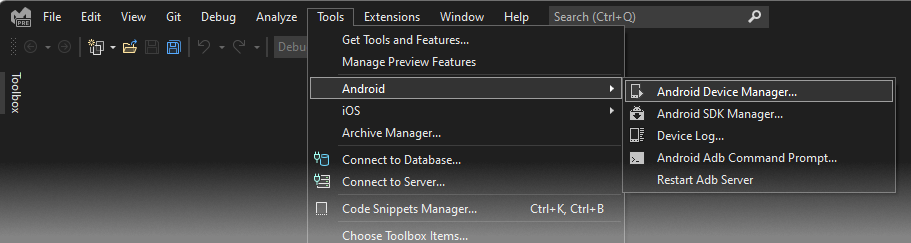
פתח את מנהל המכשירים
פתח את מנהל מכשירי אנדרואיד ב- Visual Studio מהתפריט כלים על ידי לחיצה כלים> אנדרואיד> מנהל מכשירים ::
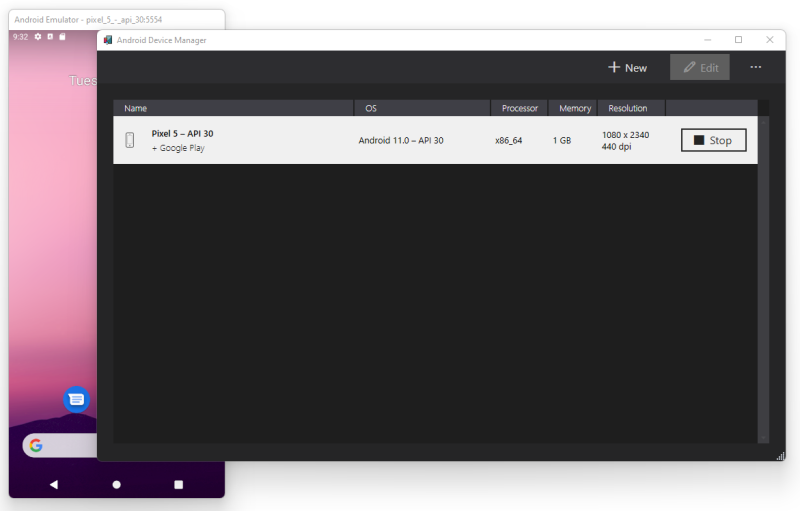
מסך ראשי
כשאתה מפעיל את מנהל ההתקנים של אנדרואיד, מסך מציג את כל המכשירים הווירטואליים המוגדרים כעת. עבור כל מכשיר וירטואלי, שֵׁם, L ‘עֶצֶם (גרסת אנדרואיד), מעבד, הכמות של זיכרון, בנוסף ל פתרון הבעיה המסך מוצג:
כשאתה בוחר מכשיר מהרשימה, הכפתור כדי להתחיל מופיע מימין. לחץ על הכפתור כדי להתחיל כדי להפעיל את האמולטור עם מכשיר וירטואלי זה. אם האמולטור פועל עם המכשיר הווירטואלי שנבחר, הכפתור כדי להתחיל הופך לכפתור תפסיק בו תוכלו להשתמש כדי לעצור את האמולטור.
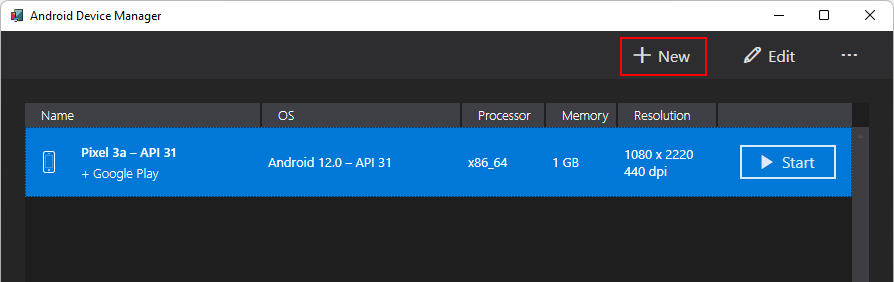
צור מכשיר
כדי ליצור מכשיר, לחץ על הכפתור חָדָשׁ ::
החלון מכשיר חדש מופיע. כדי לקבוע את התצורה של המכשיר, המשך כדלקמן:
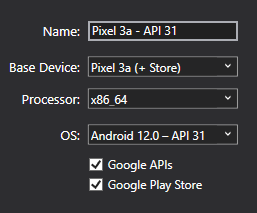
- תן שם חדש למכשיר. בדוגמה הבאה, המכשיר החדש נקרא פיקסל 3A – API 31.
- בחר מכשיר פיזי לחיקוי על ידי בחירת מכשיר באזור מכשיר בסיסי .
- בחר סוג של מעבד עבור מכשיר וירטואלי זה עם האזור מעבד . מומלץ לבחור x86_64 ולהפעיל תאוצה של חומרה.
- בחר את גרסת אנדרואיד (רמת API) עם האזור מערכת הפעלה . אם תבחר רמת API של אנדרואיד שטרם הותקנה, המנהל ההיקפי מציג את ההודעה יורד מכשיר חדש בתחתית המסך: הוא מוריד ומתקין את הקבצים הדרושים בעת יצירת המכשיר הווירטואלי החדש.
- אם ברצונך לכלול ממשקי API של שירותי Google Play במכשיר הווירטואלי שלך, בחר באפשרות Google API . כדי לכלול את אפליקציית חנות Google Play במכשיר הווירטואלי, בחר באפשרות חנות הגוגל סטור
הערות תמונות של חנות Google Play זמינות רק לסוגים מסוימים של מכשירים בסיסיים כמו פיקסל, פיקסל 2, פיקסל 3 ו- Nexus 5. זה מסומן על ידי הטקסט (+ עיוור) בשם התמונה.
- השתמש ברשימת המאפיינים כדי לשנות כמה מהמאפיינים המותאמים ביותר. כדי לבצע שינויים במאפיינים, ראה שינוי מאפייני המכשיר הווירטואלי של אנדרואיד.
- הוסף את כל המאפיינים הנוספים שעליך להגדיר במפורש עם האזור הוסף נכס בתחתית החלון:
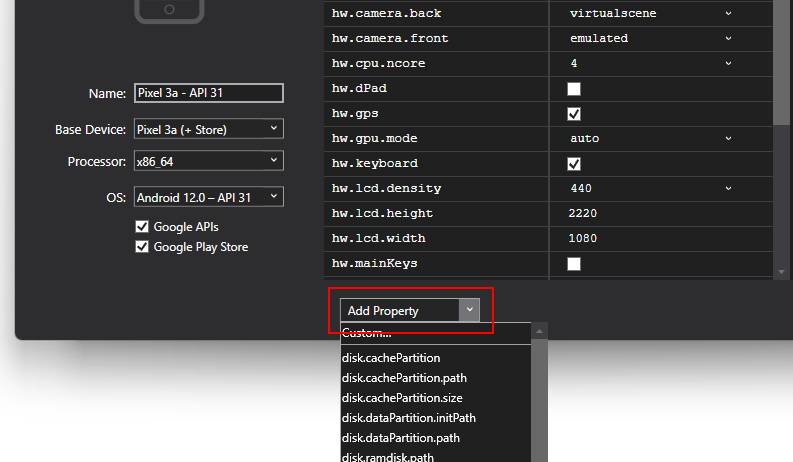 אתה יכול גם להגדיר נכס מותאם אישית על ידי בחירה מותאם אישית. .
 - לחץ על הכפתור לִיצוֹר ליצירת המכשיר החדש:
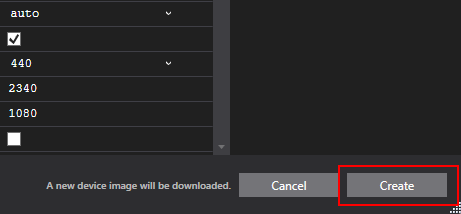 אתה יכול להשיג מסך רישיון כשאתה יוצר את המכשיר. בחר לְקַבֵּל אם אתה מקבל את תנאי חוזה הרישיון.
 - מנהל התקני אנדרואיד מוסיף את המכשיר החדש לרשימת המכשירים הווירטואליים המותקנים ומציג מחוון התקדמות יצירה בתהליך במהלך יצירת המכשיר:
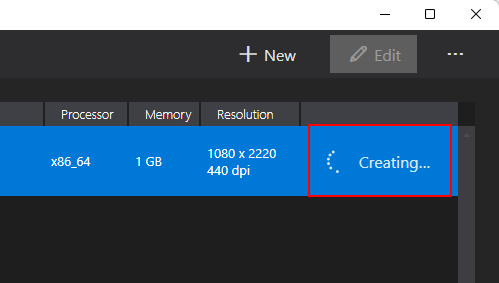
- לאחר סיום תהליך היצירה, המכשיר החדש מוצג ברשימת המכשירים הווירטואליים המותקנים עם כפתור כדי להתחיל , מוכן להשקה
- שכפול ושנה : שכפל את המכשיר שנבחר כעת ופותח אותו על המסך מכשיר חדש עם שם חדש הדומה למכשיר הקיים. לדוגמה, על ידי בחירה פיקסל 3A – API 31 ועל ידי לחיצה שכפול ושנה, דלפק מתווסף לשם: פיקסל 3A – API 31 (1).
- התחל עם הגדרות המפעל המוגדרות כברירת מחדל : הפעל את המכשיר עם התחלה קר.
- התחל עם עיתוני הליבה : הפעל את האמולטור ופותח את מדריך העיתונים של גרעין.
- הורד את תמונת המערכת : הורד את מערכת התמונות של מערכת ההפעלה אנדרואיד עבור המכשיר, אם היא כבר לא הורדה.
- לחשוף בחוקר : פותח את סייר Windows וגישה לתיקיה המכילה קבצי התקנים וירטואליים.
- לְתַקֵן : הפעל תיקון במכשיר.
- לאפס פרמטרים של מפעל: משחזר את הגדרות ברירת המחדל של המכשיר שנבחר, תוך ביטול כל השינויים שנעשו על ידי המשתמש למצב הפנימי של המכשיר במהלך ביצועו. פעולה זו מוחקת גם את ההתחלה המהירה הנוכחית אם יש. שינוי זה אינו משנה את השינויים שאתה מבצע במכשיר הווירטואלי בעת יצירת ושינוי. מוצג דו -שיח עם הזיכרון שלא ניתן לבטל איפוס זה. לחץ על איפוס להגדרות המפעל לאישור איפוס.
- לִמְחוֹק : הסר לצמיתות את המכשיר הווירטואלי שנבחר. מוצג דיאלוג שנזכר כי לא ניתן לבטל מחיקת מכשיר. לחץ על לִמְחוֹק אם אתה בטוח שברצונך למחוק את המכשיר.
- Android 5 כלי פקודה SDK.0 או מאוחר יותר
- כלי פלטפורמה של אנדרואיד SDK 31.0.3 או מאוחר יותר
- SDK Android Build-Sools 30.0.3 או מאוחר יותר
- פתח את ה מנהל מכשירי אנדרואיד.
- בחר ב- AVD במנהל התקני אנדרואיד.
- בתפריט אפשרויות נוספות ((. ), בחר לחשוף בחוקר.
- גש לתיקיה מיידי> Default_Boot .
- מחק את הקובץ תמונת מצב.pb ::
- הפעל מחדש את ה- AVD.
שנה את המכשיר
כדי לשנות מכשיר וירטואלי קיים, בחר אותו, ואז ללחוץ על כפתור שינוי:
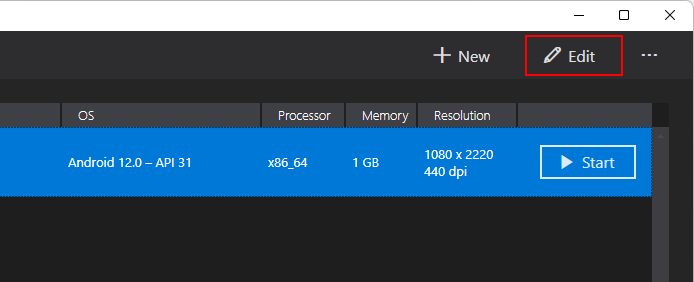
לחץ על לשנות להצגת החלון עוֹרֵך מכשיר עבור המכשיר הווירטואלי שנבחר.
החלון עוֹרֵך של המכשיר מפרט את המאפיינים של המכשיר הווירטואלי תחת העמודה תכונה , עם הערכים המתאימים של כל מאפיין בעמודה ערך . כאשר אתה בוחר נכס, תיאור מפורט של נכס זה מוצג מימין.
כדי לשנות מאפיין, שנה את ערכו בעמודה ערך. לדוגמה, בתמונת המסך הבאה, ה- HW.LCD.מאפיין צפיפות מוחלף על ידי 240 ::
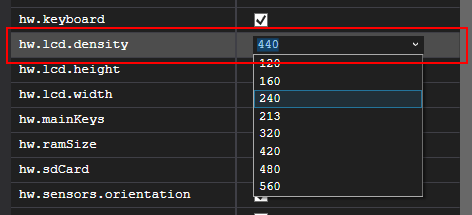
לאחר שביצעת את שינויי התצורה הדרושים, ללחוץ על כפתור שמור. למידע נוסף על שינוי המאפיינים של מכשירים וירטואליים, ראה שינוי מאפייני מכשירים וירטואליים של אנדרואיד.
אפשרויות נוספות
אפשרויות אחרות לשימוש במכשירים זמינות בתפריט DROP -Down אפשרויות נוספות ((. ):

תפריט האפשרויות הנוסף מכיל את האלמנטים הבאים:
פיתרון בעיות
החלקים הבאים מסבירים כיצד לאבחן ולפתור את הבעיות שיכולות להתרחש כאשר אתה משתמש במנהל התקני אנדרואיד כדי להגדיר מכשירים וירטואליים.
`אלמנט והוסיפו לו ** AndroidSDKPath ** הקצאה. הגדר תכונה זו לנתיב בו מותקן ה- SDK של אנדרואיד במחשב ושמור את הקובץ. לדוגמה, “ ייראה כמו הבאים אם ה- SDK של אנדרואיד הותקן ב _c: \\ תוכניות \\ Android \\ SDK_: TODO: האם Visual Studio מטפל בזה כמה עכשיו? “ xml` `לאחר ביצוע שינוי זה למשתמש **.Config **, אתה אמור להיות מסוגל להפעיל את מנהל ההתקנים של אנדרואיד. –>
גרסה שגויה של כלי אנדרואיד SDK
אם לא התקנת או התקנת את הכלים של פיתוח תוכנה לא נכון של אנדרואיד (SDK), ניתן להציג את תיבת הדו -שיח הזו עם ההשקה:
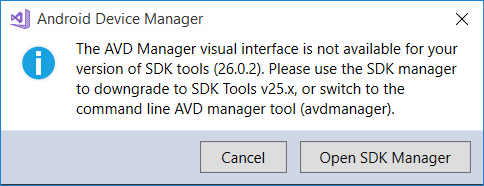
אם אתה רואה תיבת דו -שיח שגיאה זו, לחץ על פתח את מנהל ערכת פיתוח התוכנה (SDK) לפתיחת מנהל ערכת פיתוח תוכנה אנדרואיד (SDK). במנהל ערכת פיתוח תוכנה אנדרואיד (SDK), גש לכרטיסייה כלים והתקן את החבילות הבאות:
תמונת המצב מבטלת את ה- Wi-Fi ב- Android Oreo
אם יש לך AVD שהוגדר לאנדרואיד OREO עם גישה מדומה ל- Wi-Fi, הפעלה מחדש של ה- AVD לאחר תמונת מצב יכולה להוביל לביטול הגישה ל- Wi-Fi.
כדי להימנע מבעיה זו,

לאחר ביצוע שינויים אלה, ה- AVD יופעל מחדש במצב המאפשר ל- Wi-Fi לפעול שוב.