Windows 11: כיצד להכין צילום מסך וידאו של המחשב שלך
Contents
- 1 Windows 11: כיצד להכין צילום מסך וידאו של המחשב שלך
- 1.1 צלם צילום מסך או שמור את המסך על פני השטח
- 1.2 קטעים קשורים
- 1.3 Windows 11: כיצד להכין צילום מסך וידאו של המחשב שלך
- 1.4 1. פתח את כלי המסך
- 1.5 2. בחר את צילום המסך של הווידיאו
- 1.6 3. בחר את אזור הלכידה
- 1.7 4. שמור את צילום המסך שלך
- 1.8 5. שמור את הלכידה שלך
- 1.9 Windows 11: כלי צילום המסך הווידיאו זמין, כיצד להשתמש בו ?
- 1.10 צילום מסך וידאו: חידוש ארוך מיוח
- 1.11 כיצד לקחת צילום מסך בווידיאו ב- Windows 11 ?
שמור את הסרטון של המסכים שלך
צלם צילום מסך או שמור את המסך על פני השטח
צלם צילום מסך או שמור סרטון כדי להראות לאנשים אחרים מה יש על המסכים שלך. ואז שתף אותו כרצונך (דוא”ל, SMS, רשתות חברתיות).
בצע במהירות צילום מסך באחת משתי הדרכים הבאות:
-
בחר כדי להתחיל , הזן כלי צילום מסך בסרגל החיפוש, ואז בחר אותו בתוצאות. למידע נוסף, ראה השתמש בכלי צילום המסך כדי ללכוד צילומי מסך.
כדי לשמור את המסך שלך:
שם לב : משתמשי Windows 11 יכולים להשתמש בכלי צילום המסך. משתמשי Windows 10 יכולים לשמור את המסך שלהם באמצעות Clipchamp. גלה כיצד לבצע הקלטת מסך עם Clipchamp.
- בחר כדי להתחיל , הזן כלי צילום מסך בסרגל החיפוש, ואז בחר אותו בתוצאות. למידע נוסף, ראה השתמש בכלי צילום המסך כדי ללכוד צילומי מסך.
משטח מחשב נייד, משטח פרו, ספר פני השטח, פני השטח, פני השטח של סטודיו
להלן כמה דרכים אחרות לצלם מסך אם יש לך משטח מחשב נייד, משטח מקצוען, משטח ספר, משטח GO או משטח סטודיו.
מָסָך
-
לחץ על הכפתור בו זמנית הגבר את העוצמה + הכפתור דולק כבוי .
שם לב : קיצור דרך זה לא עובד על משטח מחשב נייד.
צילומי המסך שלך נשמרים אוטומטית בתיקיה תמונות > צילומי מסך פנימההחוקר של קבצים.
מָסָך
- לחץ על הכפתור ממושך לרדת בנפח + לַחְצָן דולק כבוי באותו הזמן.
- כדי להציג את צילום המסך שלך, בצע את אחת הפעולות הבאות:
- אם אתה משתמש בתמונות Google, פתח תמונות גוגל, ואז לחץ סִפְרִיָה > קובץ צילום מסך .
- אם אתה משתמש ב- OneDrive, פתח OneDrive במסך הבית שלך, ואז לחץ תמונות >תיקיית סייר >צילום מסך .
שמור את הסרטון של המסכים שלך
- דחף את החלק העליון של המסך כדי להציג את ההגדרות המהירות, ואז טאטא שוב למטה למטה.
- מצח שמאלה כדי להציג פרמטרים מהירים אחרים.
- לחץ על הקלטת מסך, ואילך כדי להתחיל כדי להתחיל להקליט.
- לאחר שסיימת ורוצה להפסיק להקליט, לטאטא מראש המסך, ואז לחץ על הודעה על מקליט מסך.
- כדי לראות את הסרטונים המוקלטים שלך, בצע את אחת הפעולות הבאות:
- אם אתה משתמש בתמונות Google, פתח תמונות גוגל, ואז לחץ סִפְרִיָה > קובץ סרטים.
- אם אתה משתמש ב- OneDrive, פתח OneDrive במסך הבית שלך, ואז לחץ תמונות >תיקיית סייר >סרטים .
עצה: אינך רואה את הקלטת מסך הפרמטרים המהירה ? בצע שתי תנועות סריקה כלפי מעלה מראש המסך, ואז לחץ על לשנות (אייקון עיפרון). לְהַלָן לשמור ולהחליק כדי להוסיף כרטיסים, החלק את מקליט המסך כלפי מעלה כדי להוסיף אותו.
מָסָך
- לחץ על הכפתור ממושך לרדת בנפח + לַחְצָן דולק כבוי באותו הזמן.
- כדי להציג את צילום המסך שלך, בצע את אחת הפעולות הבאות:
- אם אתה משתמש ב- OneDrive, פתח תמונות במסך הבית שלך, ואז לחץ תמונות >תיקיית סייר >צילום מסך .
- אם אתה משתמש בתמונות Google, פתח תמונות גוגל, ואז לחץ סִפְרִיָה > קובץ צילום מסך .
שמור את הסרטון של המסכים שלך
- דחף את החלק העליון של המסך כדי להציג את ההגדרות המהירות, ואז טאטא שוב למטה למטה.
- מצח שמאלה כדי להציג פרמטרים מהירים אחרים.
- לחץ על הקלטת מסך, ואילך כדי להתחיל כדי להתחיל להקליט.
- לאחר שסיימת ורוצה להפסיק להקליט, לטאטא מראש המסך, ואז לחץ על הודעה על מקליט מסך.
- כדי לראות את הסרטונים המוקלטים שלך, בצע את אחת הפעולות הבאות:
- אם אתה משתמש ב- OneDrive, פתח תמונות במסך הבית שלך, ואז לחץ תמונות >תיקיית סייר >סרטים .
- אם אתה משתמש בתמונות Google, פתח תמונות גוגל, ואז לחץ סִפְרִיָה > קובץ סרטים .
עצה: אינך רואה את הקלטת מסך הפרמטרים המהירה ? בצע שתי תנועות סריקה כלפי מעלה מראש המסך, ואז לחץ על לשנות (אייקון עיפרון). לְהַלָן לשמור ולהחליק כדי להוסיף כרטיסים, החלק את מקליט המסך כלפי מעלה כדי להוסיף אותו.
קטעים קשורים
- השתמש בכלי צילום המסך כדי ליצור צילומי מסך
- מקליט מסך ומצלמה מקוון – Clipchamp
- כיצד להשתמש בצמד פני השטח
- תכונות משטח הצמד
Windows 11: כיצד להכין צילום מסך וידאו של המחשב שלך
שמור צילום מסך של הווידיאו של המחשב שלך בכמה לחיצות ובלי להתקין תוכנת מפלגה שלישית.
הקלטת מה שקורה על מסך המחשב שלך בווידיאו הרבה יותר קל ממה שאתה יכול לדמיין תחת Windows 11. אכן, בניגוד למה שאתה יכול להאמין, אינך צריך להוריד ולהתקין תוכנת מפלגה שלישית כדי להגיע לשם.
במשך כמה חודשים, מיקרוסופט פרסה בכלי המסך של Windows 11 Native, אפשרות חדשה להפעיל צילום מסך וידאו. בזכות זה, אתה יכול בקלות להקליט סרטון של מה שמוצג על גבי המסך של המחשב שלך. עם זאת, היזהר, מבלי להבין את הבחירה שנעשתה על ידי מיקרוסופט, לא ניתן להפעיל את מודול צילום המסך של כלי המסך מהקיצור לקיצור הדרך קיצור הדרך. תצטרך לפתוח את היישום הייעודי כדי להשתמש בו. הנה כיצד להשתמש בו.
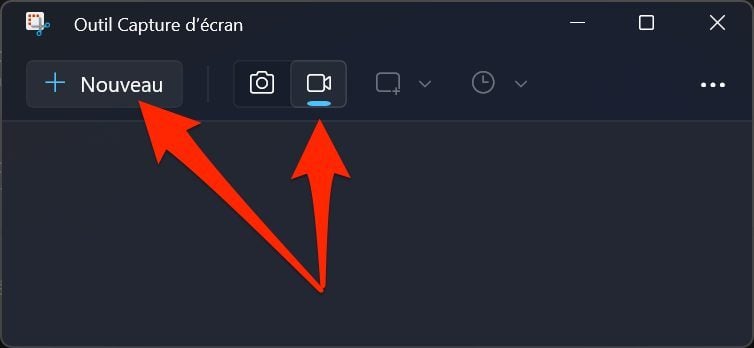
1. פתח את כלי המסך
כדי לפתוח את כלי המסך, שתי אפשרויות אפשריות. לשם כך, לחץ על התפריט כדי להתחיל, תחפש את זהכלי צילום מסך ולחץ על זה. אתה יכול גם להשתמש בקיצור המקלדת Windows + r, לקלט SNIPPER בחלון הפעלה ולחץ על המקש להיכנס של המקלדת.

2. בחר את צילום המסך של הווידיאו
כברירת מחדל, כלי לכידת המסך של Windows 11 מוגדר לתפוס תמונות קבועות. כדי ליצור צילום מסך וידאו, תצטרך לבחור את האפשרות המתאימה, המיוצגת על ידי מצלמה קטנה. ואז לחץ על הכפתור חָדָשׁ להפעלת צילום מסך חדש.
3. בחר את אזור הלכידה
לאחר מכן צריך להחשיך את המסך של המחשב שלך ולהציג צלב קטן. זהו הסמן לבחור את אזור המסך שברצונך לשמור בווידיאו. באמצעות העכבר, בחר את אזור המסך שישמר. לאחר מכן זה יופיע ברור.
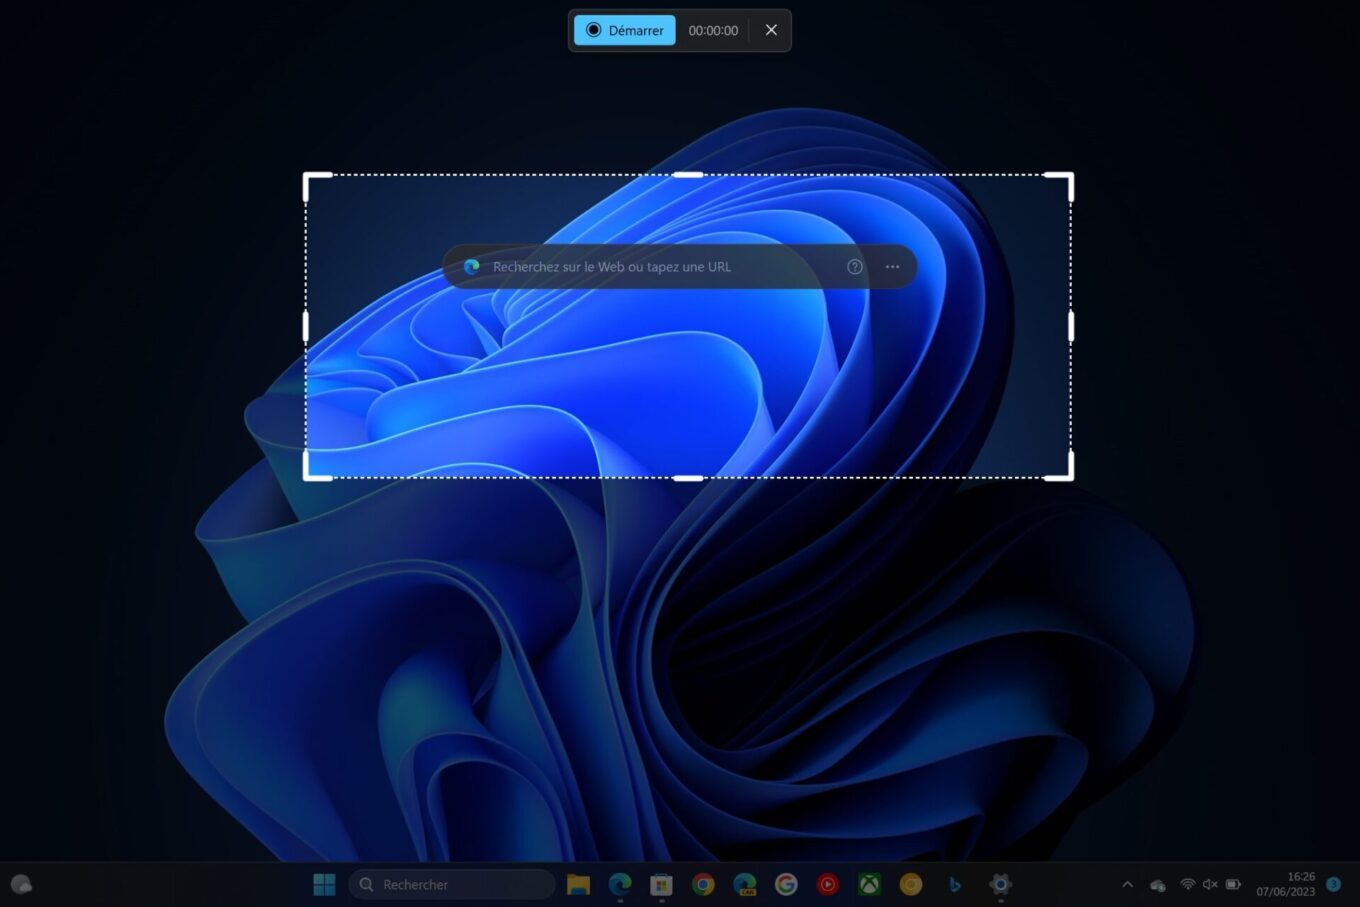
4. שמור את צילום המסך שלך
לאחר הגדרת אזור הלכידה שלך, לחץ על הכפתור כדי להתחיל מוצג במחסנית שנמצאת בראש המסך. לאחר מכן ספירה לאחור של שלוש שניות צריכה לפעול לפני שהכלי מתחיל להקליט את המניפולציות שאתה מבצע על המסך.
שים לב שאתה יכול, במידת הצורך, להשהות את הלכידה על ידי לחיצה על הכפתור הייעודי ולהחזיר את הקלטת קורות חיים על ידי לחיצה על כפתור הקריאה. לאחר סיום לכידת הווידיאו שלך, פשוט לחץ על כפתור העצירה המיוצג על ידי כיכר אדומה.
5. שמור את הלכידה שלך
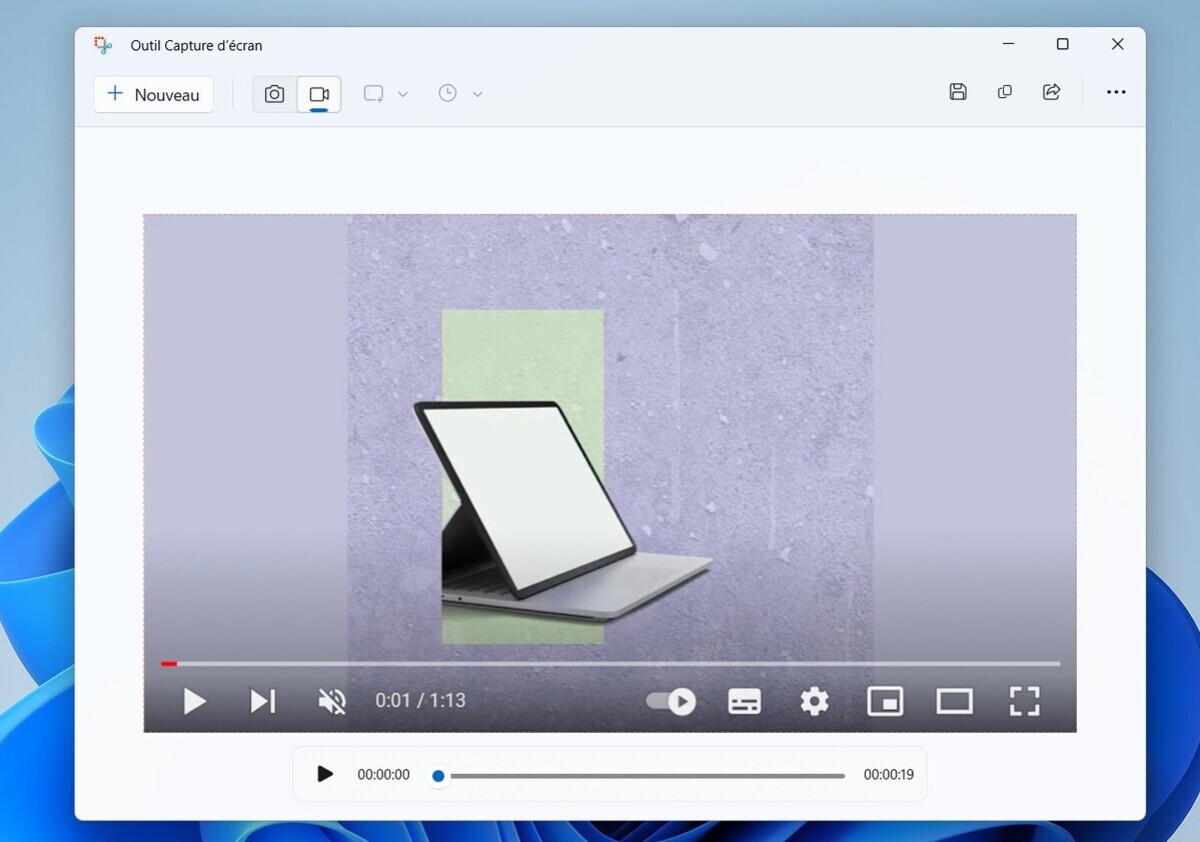
צילום המסך שלך הושלם כעת ומוצג באופן עקרוני באופן אוטומטי בחלון חלון מסך מסך. אתה יכול, במידת הצורך, להציג אותו. מעל הכל תצטרך לחשוב על שמירתו.
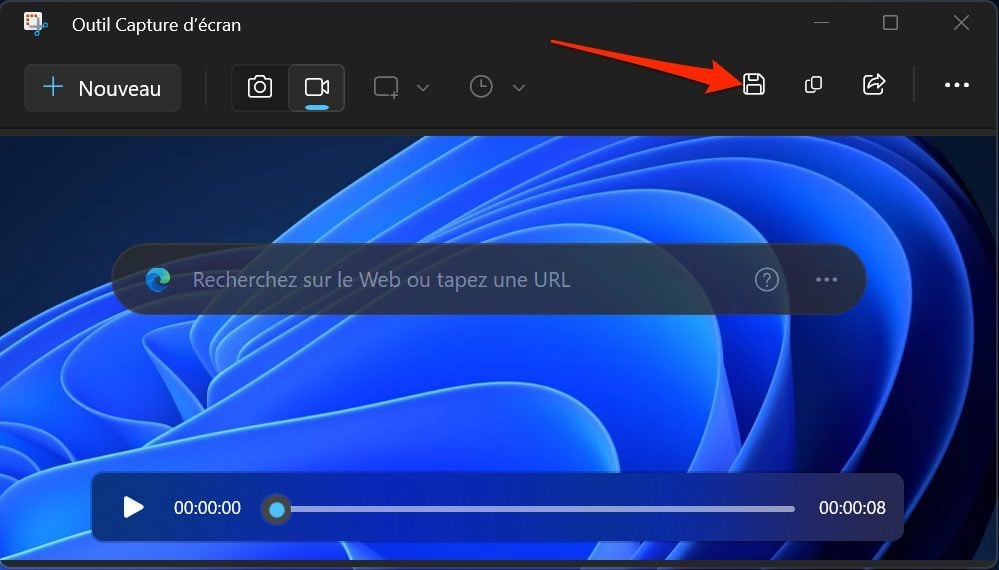
לשם כך, לחץ על כפתור ההקלטה המיוצג על ידי דיסק תקליטון בפינה השמאלית העליונה של החלון. כל צילומי המסך הווידיאו המיוצרים עם הכלי המקורי של Windows 11 נמצאים בפורמט .MP4.
Windows 11: כלי צילום המסך הווידיאו זמין, כיצד להשתמש בו ?
גלה כיצד לשמור את המסך שלך ב- Windows בעזרת כלי המסך הרשמי של מיקרוסופט.
חוסה בילון / פורסם ב -1 במרץ 2023 בשעה 11:32 בבוקר
צילום מסך וידאו: חידוש ארוך מיוח
מיקרוסופט הודיעה זה עתה על עדכון חשוב ב- Windows 11. בין התכונות החדשות שהכריזו על ידי המשרד, האפשרות ליצור צילום מסך וידאו הייתה צפויה על ידי משתמשים רבים. בבלוג הפוסטים שלו, מיקרוסופט מציין כי צילום המסך (כלי הצניחה באנגלית) שופר על מנת לחשוף תכונת הקלטת וידיאו.
תמונה שווה אלף מילים, אבל סרטון יכול לספר סיפור. לכל המורים, היוצרים, התלמידים, מומחי השיווק … הבנתם את צילום הווידיאו. לתפוס בקלות את מה שאתה עושה עם מקליט המסך החדש המשולב בכלי צילום המסך.
עד עכשיו, צילום המסך של הווידיאו היה זמין רק ב סרגל המשחקים של Xbox, לשימוש מוגבל, הפונקציונליות לא תמכה ברישום המשרד.
כיצד לקחת צילום מסך בווידיאו ב- Windows 11 ?
כדי לקחת צילום מסך בווידיאו ב- Windows, הנה כיצד להמשיך:
- פתח את יישום צילום המסך באמצעות פונקציית החיפוש בשורת המשימות של Windows. אתה יכול להשתמש בקיצור הדרך Windows + Maj + S Key,
- בחר האייקוןוִידֵאוֹ,
- לחץ על חָדָשׁ,
- בחר את הממד של המסך שברצונך ללכוד,
- לחץ על כדי להתחיל. מונה 3 שניות יופיע לפני שיפעל את לכידת הווידיאו. ברגע שהסרטון נלכד, הפסק את ההקלטה על ידי לחיצה על הכיכר האדומה.
טוב לדעת: עליך לוודא שיש לך את עדכון Windows 11 האחרון כדי לגשת למסך הווידיאו. מפגש ב הגדרות> Windows Update> עדכוני חיפוש.