


ITOP-skjermopptak-alt-i-en PC-skjermopptaker
For iPhone 8 og tidligere modeller:
iPhone: Hvordan lagre skjermen på video
Finn ut hvordan du starter et videoskjermbilde på iPhone.
Arthur Aballéa / Publisert 14. juni 2022 kl. 9:35
Fra utgivelsen av iOS 14 lar Apple iPhone og iPad -brukere lage skjermopptak uten å måtte gå gjennom en tredje -parti -applikasjon. Vi har listet opp trinnene du kan følge for at du skal utføre en plateskjerm på iPhone.
Hvordan lage en skjermopptak på iPhone
For å kunne få tilgang til funksjonaliteten, må enheten din ha iOS 14 eller hvilken som helst senere versjon. Før du lanserer det første skjermopptaket, må du legge til snarveien tilknyttet kontrollsenteret ditt:
- Vi sees i applikasjonen Innstillinger,
- Velg menyen Kontroll senter,
- Klikk på knappen Legg til representert av et lite grønt ikon,
- Velge Skjermoppføring og validere.
Når ikonet er lagt til i kontrollsenteret ditt, her er prosedyren for å følge en videoopptak på iPhone:
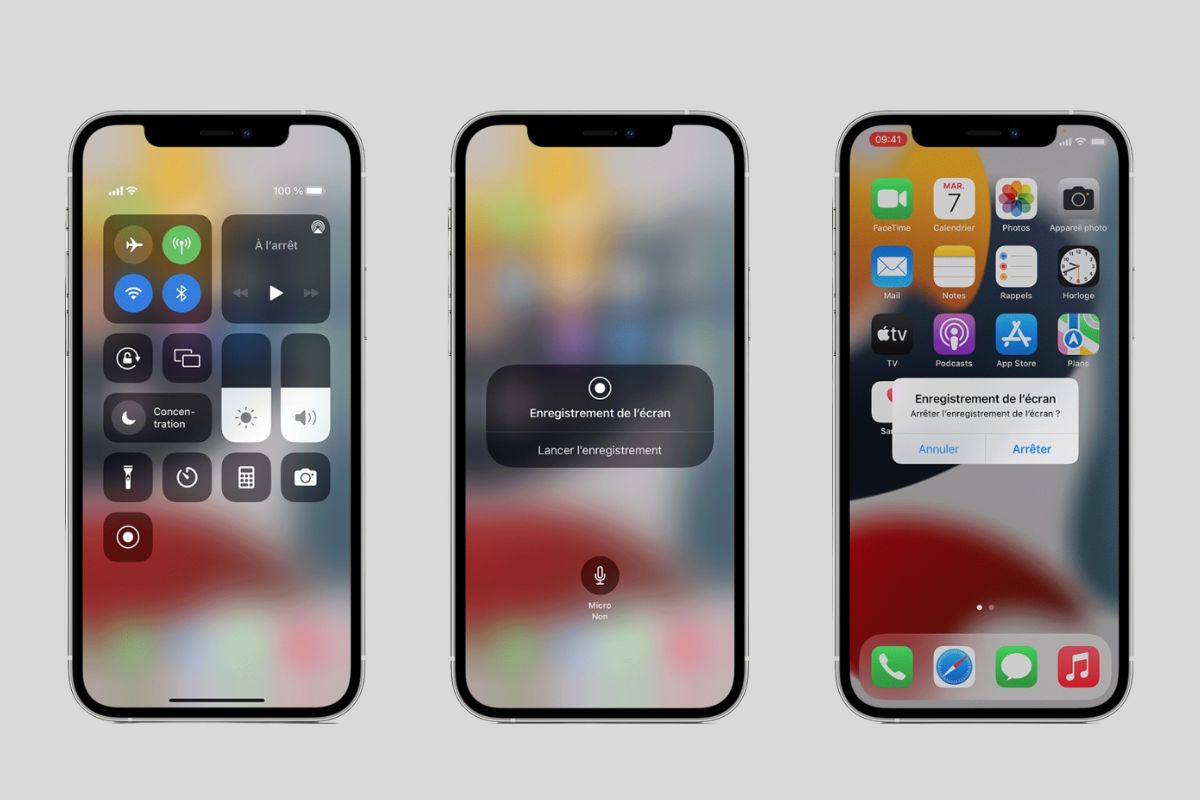
- Gjør en liten rulle øverst til høyre på skjermen for å få tilgang til iPhone -kontrollsenteret,
- Trykk på skjermopptakets snarvei representert av et punkt omgitt av en sirkel, og vent deretter i 3 sekunder,
- For å stoppe innspillingen, klikk på det lille røde ikonet som ligger øverst til venstre på skjermen, og velg deretter Stoppe.
Du kan finne alt skjermopptaket ditt i applikasjonen Bilder, I videoformat. Det er mulig å endre apper, og fortsette å bruke iPhone normalt under innspillingen.
Nyttig informasjon, nemlig på skjermopptak
For å optimalisere postene dine, her er en liste over nyttig informasjon å vite:
- Varslene vises fortsatt normalt under en videoopptak av skjermen, for å kutte dem, vurdere å aktivere modus Ikke forstyrr.
- Du kan ikke lagre skjermen og bruke funksjonaliteten Skjermkopi samtidig.
- Noen applikasjoner tillater deg ikke å spille inn lyd under plateskjermen din.
- Den sene innspillingsmeldingen blir automatisk filmet og inkludert i videoen av iPhone, for å slette den og få et rent rush, gå til applikasjonen Bilder, og endre videoen din ved å kutte ønsket passasje på slutten.
ITOP -skjermopptaker
Lagre alle PC -skjermaktivitetene jevnt og lagre i HD -kvalitet. Lagre høyytelsesspill eller 4K UHD -videoer uten Offset Capture Online -møter, leksjoner eller annet videoinnhold med et enkelt klikk Endre og tilpasse de innspilte videoene dine med den integrerte utgiveren Lagre video og lyd med en profesjonell og gratis skjermopptaker på din PC Gratis nedlasting Kjøp nå
Hvordan lage en skjermopptak på iPhone
Tchen Update 16-08-2023

Det har gått år siden iPhone dominerer markedet. Blant disse er skjermbildet på iPhone, sikkert allerede kjent for enhver iPhone -bruker. Imidlertid med hensyn til driften avSkjermoppføring på iPhone, Mye mindre vet hvordan du bruker det. Enten du vil lage morsomme videoer eller lagre utrolige øyeblikk under et spill, er det viktig å lære å lagre skjermen på iPhone. Det er av denne grunn at denne artikkelen viser deg hvordan du filmer skjermen på iPhone på en enkel og perfekt måte. Jeg håper at du etter å ha lest denne bloggen kan spille inn de dyrebare øyeblikkene i livet ditt og dele dem med andre.
- Lagre skjermen på iPhone med en integrert opptaker
- Hvordan filme din iPhone -skjerm med tredje -partiprogramvare
- Bonus: Hvordan lagre skjermen på PC?
- 1. Gå plate
- 2. Dr Fone iOS -skjermopptaker
- 3. TechSmith Capture
- Konklusjon
Lagre skjermen på iPhone med en integrert opptaker
På grunn av alle de fantastiske funksjonene og det faktum at det lar oss lagre iPhone -skjermen med lyden av systemet og mikrofonen, er den integrerte iPhone -opptakeren noe du ikke må gå glipp av. Du vil vite mer ? La oss dykke der.
Trinn 1. Aktiver skjermopptaksfunksjonen
- Åpne innstillinger”.
- Velg “Kontrollsenter”.
- Trykk på “+” -tegnet ved siden av “skjermopptak” for å flytte det i “Inkluder” -delen.

2. trinn. Start opptak
For iPhone X og overlegne modeller:
- Utfør en topp opp til bunnen fra øverste høyre hjørne av skjermen
- Trykk på “Skjermopptak” -knappen for å starte innspillingen. (Hvis du trenger å spille inn lyd, må du sørge for at du har aktivert mikrofonen.))
For iPhone 8 og tidligere modeller:
- Lag en sveip fra bunnen til toppen fra det nedre hjørnet av en hvilken som helst skjerm
- Trykk på “Skjermopptak” -knappen for å starte innspillingen (sørg også for at mikrofonen er aktivert hvis du bruker stemmen din.))

Tips: Hvis du ikke vil bli avbrutt under opptaket, er det best at du legger enheten din i plansmodus.
Trinn 3: Finn og endre innspillingen
Når innspillingen er ferdig, er alle videoene i “Bilder”. Du kan trykke på “Endre” -knappen øverst til høyre på skjermen for å endre opptaket. Nederst på skjermen, ved å flytte den gule pilen, kan du klippe videoen. Du kan også trykke på “Reading” -knappen for å se hvordan det ser ut når du publiserer.
Å være et integrert verktøy, er det veldig praktisk for iPhone -brukere å registrere iPhone -skjermer, så enkelt og trygt. Imidlertid har denne skjermopptakeren visse grenser: å beskytte innholdet, visse musikk- og videoapplikasjoner som Apple Music, YouTube og Spotify, lar deg ikke lagre skjermen mens de leser musikk eller videoer.
Hvordan filme din iPhone -skjerm med tredje -partiprogramvare
Hvis du faktisk trenger flere funksjoner for å avgrense innspillingen din, for eksempel et museklikk, ingen forsinkelse og en lengre opptakstid, fortsett å lese. I denne delen vil vi vise deg 3 tredje -partyverktøy for å hjelpe deg med å registrere skjermen på iPhone enklere. Enten du vil lagre skjermen på en hvilken som helst iPhone -app eller vise telefonskjermen på PC, vil du finne disse nyttige verktøyene.
1. Gå plate
Go Record ligner veldig på den integrerte iPhone -opptakeren. Det er faktisk også gratis og har nesten de samme trinnene som den integrerte iPhone -opptakeren. For å bruke den, må du vise skjermen, opp eller ned avhengig av modellen til iPhone, fra skjermen for å vise kontrollsenteret. Utfør deretter nøyaktig de samme trinnene som når du bruker den integrerte iPhone -opptakeren for å lagre skjermen på iPhone.

Lær å enkelt lagre skjermen på iPhone med Go Record:
Trinn 1. Skyv skjermen opp nedenfra, trykk og hold “innspillings” -knappen.
2. trinn. Velg “Go Record” som opptaker.
Trinn 3. Trykk på “Start kringkasting” for Lagre skjermen på iPhone.
Tips: Forsikre deg om at du har aktivert skjermopptaket på iPhone på forhånd.
- IPhone -skjermopptak på alle applikasjoner og på alle spill.
- Mikrofonfunksjonen er tilgjengelig under opptak.
- Støtte for alle iPhone -modeller.
- Rediger etter innspilling er ikke direkte tilgjengelig på Go Record.
2. Dr Fone iOS -skjermopptaker
Her presenterer jeg deg et annet formidabelt verktøy, Dr Fone iOS -skjermopptaker. Det kan ikke bare brukes til å lagre skjermen på iPhone, iPad og iPod, men også vise telefonskjermen på datamaskinen. Så du kan lagre skjermen på iPhone direkte på PC.

Her er trinnene for å enkelt fange skjermen på iPhone med Dr Fone iOS -skjermopptaker:
Trinn 1. Last ned og installer iOS -opptaker.
2. trinn. Gå deretter til Innstillinger> Generelt> Styring av enheter, velg iOS -skjermopptakerdistributøren og trykk “Trust”.
Trinn 3. Trykk på “OK” hvis et kontekstuelt vindu ber deg om å la skjermoppføringen få tilgang til bildene.

Trinn 4. Velg videooppløsning.

Trinn 5. Trykk på “Neste” for å begynne å spille inn skjermen på iPhone.
- IOS jailbreak -enheter og ikke -jailbreak støttes.
- Lett å bruke
- Datatelefonskjermfunksjon er tilgjengelig
- Bare tilgjengelig for iOS 8 og påfølgende versjoner.
- Kan ikke lastes ned i Apple Store.
3. TechSmith Capture
Den siste iPhone -opptakeren jeg anbefaler er Techsmith Capture, et gratis verktøy utviklet av Snagit. Enten du vil fange gameplay, platepresentasjoner eller lage videooversikter i App Store, kan du enkelt oppnå det med Techsmith.
Følg trinnene nedenfor for enkelt å lagre skjermen på iPhone:
Trinn 1: Gå til “Innstillinger” og velg “Kontrollsenter”, deretter “Tilpass sjekkene”. Trykk deretter på “+” -knappen for å aktivere opptaksfunksjonen.
2. trinn: Brow opp fra bunnen av skjermen og trykk på “Recording” -knappen. Trykk på “Techsmith Capture”. Hvis du vil filme en skjerm med lyd, trykker du på “mikrofon” -knappen.
Trinn 3: Trykk på “Start kringkasting” for å starte opptakskurset

- iPhone, iPad og iPod støttes alle.
- Enkel deling av innspilling av filer på Camtasia eller Snagit.
- Bare MP4 -utgangsformatet er tilgjengelig.
Bonus: Hvordan lagre skjermen på PC?
Å spesifisere skjermen på mobil for å dele alle øyeblikk av glede og vår fritid har blitt veldig populær i disse dager, spesielt blant de yngste. Imidlertid, med hensyn til videokonferanser og online -kurs, overgår PCen mobil når det gjelder innspillingskvalitet. Her er noen av de beste skjermopptakersverktøyene på PC for deg.
Vinduer:
1. ITOP -skjermopptaker – En profesjonell skjermopptaker under Windows, slik at brukere kan fange opp videoer av høy kvalitet i flere formater og gi dem ut direkte på ITOP -skjermopptaker.

Utmerkede funksjoner ved ITOP -skjermopptaker:
- Ubegrenset opptakstid.
- Stabil, enkel, trygg og enkel å bruke.
- Fleksibel for å lagre hele eller eneste deler av skjermen.
- Rediger etter at innspillingen er direkte tilgjengelig på ITOP -skjermopptaket.
- Garantert kvalitet for ethvert videoopptakformat.
2. Flashback Express – Gratis skjermbildeprogramvare på Windows, lager vannmerkevideoer.
3. Camtasia – En skjermopptaker og en alt-i-ett avansert videoredigerer.
Mac:
OBS Studio – En åpen kildekode HD -skjermopptaker på Windows, Mac og Linux. Imidlertid vil du sikkert finne det litt vanskelig å bruke.
Konklusjon
Denne artikkelen viser ikke bare 4 midler tilLagre skjermen på iPhone, Men presenterer også 4 programvare for å fange opp videoer på PC. Hvis du også leter etter en alt-i-ett-opptaker med utgave på PC, vil ITOP Screen Recorder være det beste alternativet fordi den har den siste komprimeringsteknikken, noe som fører til best mulig videokvalitet med en redusert størrelse. Og i tillegg lar det deg spille inn stemmen din med en mikrofon og filme ansiktet ditt ved hjelp av et webkamera.
- Lagre en del av skjermen med lyd.
- Spar 4K/1080p -videoer uten tidsbegrensning.
- Montering fantastiske videoer med den integrerte avanserte redigereren.
- Lagre videoer i MP4/AVI -format, etc., og del dem med ett klikk.