


Videoskjermbilder på Mac med letthet
Contents
- 1 Videoskjermbilder på Mac med letthet
- 1.1 3 metoder for å lagre Mac -skjermen med letthet
- 1.2 Metode 1. Lagre Mac -skjermen med det interne og eksterne via et profesjonelt verktøy
- 1.3 Metode 2. MAC -innspilling Mac ved hjelp av QuickTime
- 1.4 Metode 3. Start en videofangst på Mac ved hjelp av skjermbildet Verktøylinje
- 1.5 Konklusjon
- 1.6 Populære artikler
- 1.7 Mac -videoskjermbilde
- 1.8 Topp 5 videoopptaksprogramvare og skjermopptak for Mac
- 1.9 Programvaren for beste videoopptak og Mac -skjermopptak
Trinn 3: For å slutte å lagre Mac -skjermen, klikker du på “Stopp opptak” -knappen i menylinjen.
3 metoder for å lagre Mac -skjermen med letthet

28. juli 2023
- 1. Mac -skjermopptak med et profesjonelt verktøy��
- 2. Mac -skjermopptak ved hjelp av QuickTime
- 3. Mac -skjermopptak via skjermbildet Verktøylinje

Kjøp en gratis
Skjermopptaker + Video Converter
Selv om Mac har det integrerte innspillingsverktøyet som QuickTime, fanger det ikke lyden av systemet og slipper en stor fil. Hvis du ikke er fornøyd med den enkle skjermopptaket, Fonepaw skjermopptaker er et avansert verktøy som kan lagre Mac -skjermen med dets interne og eksterne.
Vi ber om å lagre MAC -skjermen av mange grunner, noen ganger for å registrere en visjon om en konferanse som Microsoft -team, noen ganger for å registrere et webkamera -arrangement, etc. Så det er metoder som kan gjøre MAC -skjermopptak i effektivitet ? Ja, selvfølgelig ! I denne artikkelen vil vi presentere deg 3 enkle, men pålitelige måter å hjelpe deg Lag videoskjermbilde på Mac.
Før du konsulterer detaljene, la oss se den sammenlignende tabellen nedenfor for disse 3 metodene for å filme Mac -skjermen:
| Registrert område | Videoopptak med lyd | Produksjon | Film webkameraet | Video Montage | Andre moduser for Mac -videoopptak | |
| Fonepaw | Tilpassbar, fullskjerm, fast vindu | Gratis å velge | MOV, MP4, M4V, GIF | Bare/med skjermen | ✅ | ✅ |
| Rask | Tilpassbar, fullskjerm | Bare mikrofonlyd | MOV | Bare | ✅ | ❌ |
| Skjermbilde verktøylinje | Tilpassbar, fullskjerm | ❌ | ❌ | ❌ |
Metode 1. Lagre Mac -skjermen med det interne og eksterne via et profesjonelt verktøy
Det første vi tenker på Mac -skjermopptak er åpenbart å bruke verktøyene som følger med Mac -datamaskinen. Disse integrerte verktøyene lar deg imidlertid ikke fritt velge bilde- og lydkilden for å spille inn. Hvis de ikke oppfyller dine behov, hvorfor ikke prøve mer profesjonell programvare ?
I dette tilfellet, Fonepaw skjermopptaker er et veldig godt valg for videoopptak på Mac. Som en profesjonell opptaker er denne programvaren gratis å velge kilden til å fange opp. Dessuten gir det også flere verktøy for avansert Mac -videoopptak.
De kraftige egenskapene til Fonepaw Screen Recorder
- Fire videoutgangsformater for Mac -versjonen: MOV, MP4, M4V, GIF;
- Mac -skjermopptak med intern og ekstern lyd;
- Mac -videofangst med webkamera;
- Personlig område som skal fanges opp;
- Mulig å gjøre øyeblikksbilder under Mac -skjermopptak;
- Å fikse vinduet som skal lagres;
- Innspilling rundt eller fulgte musemarkøren;
- Tilgjengelig fra oppgavens planlegger og justering av registreringsvarighet.
Guide: Lagre skjermvideoen på Mac med Fonepaw Screen Recordur
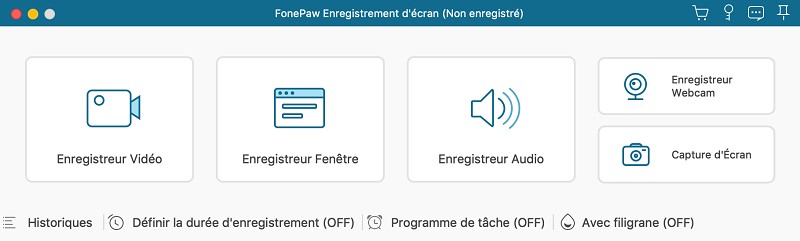
Trinn 1: Last ned og installer Fonepaw Screen Recorder for Mac. Klikk på hovedgrensesnittet på “Videoopptaker” .
Trinn 2: Bestem Mac -skjermsonen for å registrere. Aktiver deretter den interne/eksterne lyden du vil fange og justere lydvolumet. Du kan også aktivere webkameraet ditt som du vil.
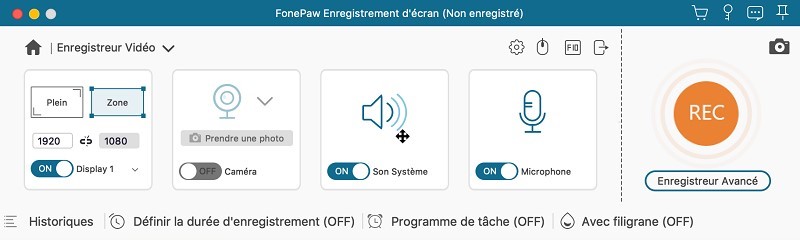
Trinn 3: Når du er klar for skjermopptak på Mac, klikker du bare på knappen “Rec”. Under Mac -videoopptaksprosessen kan du bruke merknadsverktøy for å legge til notater eller bilder.
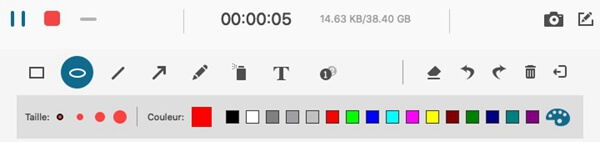
Trinn 4: Som du vil fullføre Mac -skjermopptaket, trykk Red Square Stop -knappen. Hvis du er fornøyd med videoen som er spilt inn etter forhåndsvisning, klikker du på “Lagre” for å lagre den.
�� For å lære mer om Fonepaw Screen Recorder, vennligst se følgende video:
Metode 2. MAC -innspilling Mac ved hjelp av QuickTime
I tillegg til å lese multimediafiler, Rask er også i stand til å lage et skjermopptak på Mac. I tillegg kan han også gjøre videofangst av webkamera på Mac. Legg imidlertid merke til at denne metoden bare registrerer mikrofonlyd. Hvis du vil lagre Mac -skjermen med den interne lyden, må du laste ned en lydforlengelse.

La merke til :
- Her forklarer vi deg hvordan du bruker QuickTime til å lage en Mac -skjermopptak med mikrofonlyden. Hvis du vil lagre lyden fra Mac -systemet ditt, kan du bruke Lydblomst Med QuickTime. Les den andre delen av denne artikkelen for å konsultere de detaljerte trinnene: Hvordan lagre Mac -skjermen med den interne lyden ?
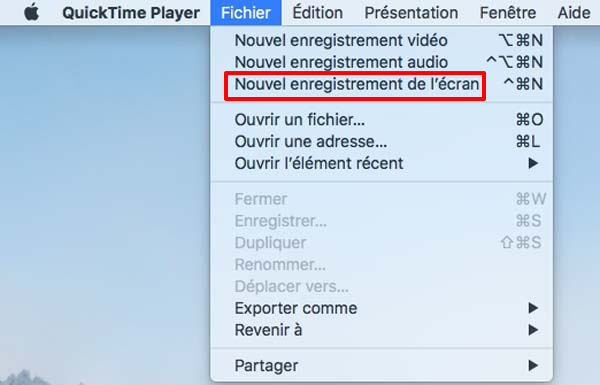
Trinn 1: På Mac -datamaskinen din, finn QuickTime i “Finder”> “applikasjoner” og start den. Deretter, i menylinjen, klikker du på “Fil” og velger “Ny skjermopptak”.
Trinn 2: En boks med skjermopptakingsverktøy vises deretter. Klikk på pil nedstrøms pil ved siden av den røde opptaksknappen. Deretter vises en meny. Her kan du velge kilden til mikrofonen din.
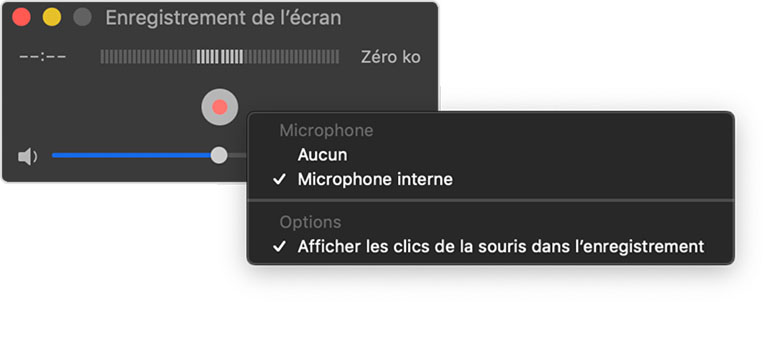
Trinn 3: Etter innstillingen for innstillingen for registrering, klikk på Den røde knappen Å starte skjermbildet med lyden på Mac. Når du vil stoppe Mac -videoopptaket, klikker du på stoppikonet på menylinjen øverst.

Trinn 4: Et lagret videovindu vises på skjermen. Der kan du lage den enkle redigering og endre navnet og utgivelsesfilen til videoen. Til slutt klikker du på “Lagre” og videoen vil bli lagret med hell.

Metode 3. Start en videofangst på Mac ved hjelp av skjermbildet Verktøylinje
For brukere av MacOS Mojave og de øvre versjonene er det fortsatt en måte – skjermbildet Verktøylinje for å lage skjermopptaket på Mac. Imidlertid har dette verktøyet også sine begrensninger: det er ikke i stand til å registrere intern lyd og filme webkameraet.
Råd:
- Hvis du vil oppfylle alle dine MAC -innspillingskrav, kan du returnere til seksjonen Fonepaw skjermopptaker.
For å vise dette integrerte verktøyet, må du trykke på disse tre tastene samtidig: Maj + kommando + 5 . Etter det kan du velge å lagre fullskjerm eller en valgt del.

1. Lagre Mac -skjermen
Trinn 1: Klikk på knappen “Lagre fullskjerm” I skjermkommandoer. Pekeren din blir til et kamera.
Trinn 2: Klikk på hvilken som helst skjerm for å begynne å lagre Mac -skjermbildet, eller klikk “Lagre” i skjermkommandoer.
Trinn 3: For å slutte å lagre Mac -skjermen, klikker du på “Stopp opptak” -knappen i menylinjen.

2. Lagre en valgt del av Mac -skjermen
Trinn 1: Velg alternativet “Lagre den valgte delen” .
Trinn 2: Skyv for å velge et område på skjermen for å registrere. For å flytte hele utvalget, skyv fra innsiden av utvalget.
Trinn 3: For å starte innspillingen, klikker du “Lagre” i kommandoene på skjermen.
Trinn 4: Til slutt, stopp Mac -videoopptaket ved å klikke på “Stopp opptak” -knappen i menylinjen.

La merke til :
- For å fullføre skjermopptaket på Mac, kan du også trykke på Kontroll + kontroll + flukt .
Konklusjon
Her er alle 3 praktiske metoder for å starte en Mac -skjermopptak. Avhengig av introduksjonen vår, kan du se at et integrert verktøy ville være det enkleste valget for videoopptak på Mac. Imidlertid, hvis du vil lage en skjermbildefangst med den interne lyden, er det synd at ingen av disse to metodene er tilstrekkelig til å dekke dine behov.
I dette tilfellet er profesjonell programvare som Fonepaw skjermopptaker er den eneste mektige assistenten som kan hjelpe deg med å løse problemet. Hvis du ber om å garantere en god opplevelse på Mac -videoopptak, ikke nøl med å prøve det nå !
Populære artikler
- Topp 10 programvare for å filme Windows 10 -skjermen
- Topp 10 programvare for å filme sin gratis Mac -skjerm
- Topp 10 beste gratis lydopptaksprogramvare for Windows/Mac
- Lagre zoommøtet uten autorisasjon på Windows/Mac
- Hvordan lagre en YouTube -video på PC ?
Mac -videoskjermbilde

Hvordan lage et skjermbilde på Mac ?
- 07/17/2019
- Konfigurasjon
Skjermbilder er ofte nyttige på daglig basis. Enten du skal sende dem til vennene dine, eller i sammenheng med arbeidet, er det virkelig lettere å vise direkte et bilde enn å måtte beskrive en situasjon. Ta skjermbilder med MacBook eller IMAC er enkel og enkel. Vi presenterer for deg alle MAC -tastatursnarveier for skjermbilder så ..

Åpne Mac Task Manager og analyser bruken av ressurser
- 01/19/2023
- Konfigurasjon
Som under Windows kan Mac Task Manager åpnes ved hjelp av en snarvei. I motsetning til Windows -versjonen, lukker manageren imidlertid bare programmer. Hvis du vil se ytelsen til prosessoren og energiforbruket, kan du åpne Mac Task Manager, men også aktivitetsinstruktøren for ..

G-Stock Studio Shutterstock
Videoopptak i Windows 10 med Xbox -spilllinjen
- 10/15/2020
- Konfigurasjon
Webinar, opplæringsprogrammer eller spill: skjermbildefangst er en praktisk funksjon på mange felt. Fra Windows 10 er skjermbilde integrert i operativsystemet, noe som gjør bruken av et tredje -parti -program overflødig. Oppdag trinn for trinn hvordan du lager en skjermbildefangst i Windows 10.

De viktigste MAC -tastaturets snarveier
- 08/10/2020
- Konfigurasjon
Apple tilbyr mange Mac -snarveier for å utføre spesifikke handlinger. Disse snarveiene gjør arbeidet med datamaskin mye enklere. Jo mer du kjenner Mac Keys -kombinasjoner, jo raskere kan du bruke Apple, noe som sparer deg for mye tid. Oversiktelsen vår presenterer et utvalg av de viktigste MAC -tastatursnarveiene for en ..
Lag en fil på Mac: Trinn-for-trinn-forklaringer
- 07/10/2021
- Konfigurasjon
Organiser dokumentene dine, bilder og andre digitale filer på Mac -en din ved å bruke forskjellige mapper. Dette lar deg ha en bedre oversikt og spare tid. Opprettelsen av en ny mappe er veldig enkel under macOS: vi viser deg tre måter å opprette mapper på Mac og legge til eller slette filer.
Topp 5 videoopptaksprogramvare og skjermopptak for Mac

Det er mange grunner til at du kan bli ført til en Programvare for videoopptak.
Hvis du liker å fange morsomme øyeblikk i en video, en film eller til og med en animasjon, må du bruke programvare til videoskjermbilde. Det kan også være lurt å reprodusere en filmscene med sekvenser. Hvis du er en kinoelsker, en erfaren tekniker eller en sugende, kan det være lurt å finne kontinuitetsfeil, studere strukturen til bilder, tilbehør og monteringseffekter som brukes i spesifikke sekvenser av en video. Det er så mange grunner til at du vil lagre en videobilde.
For Mac -brukere er det noen få løsninger for fangst av Mac -video. La oss oppdage sammen den 5 beste programvaren for videoopptak for macOS.
Programvaren for beste videoopptak og Mac -skjermopptak
1. Wondershare Filmora
Wondershare Filmora er en av de beste programvarene for videoopptak på Mac. Det har et veldig enkelt å håndtere grensesnitt for amatører.
Flere Filmora Video Tutorials >>
Wondershare Filmora, enkel, gratis, men kraftig programvare for å gjøre videoredigering mer effektiv ! Du kan laste ned og prøve Filmora gratis via følgende lenker:
For Win11 / Win10 / 8.1/8/7 (64 biter)
For macOS v 10.14 eller senere
Sikker nedlastingsgaranti, null ondsinnet programvare
- Lagre videoskjerm i flere formater: AVI, MPEG, WAV, DAT, EVO og mange andre.
- Fang Mac -video og endre dem direkte.
- Eksporter sekvensene som er fanget og modifisert til YouTube, Vimeo, en DVD eller til andre enheter eller plattformer uten å bryte hodet.
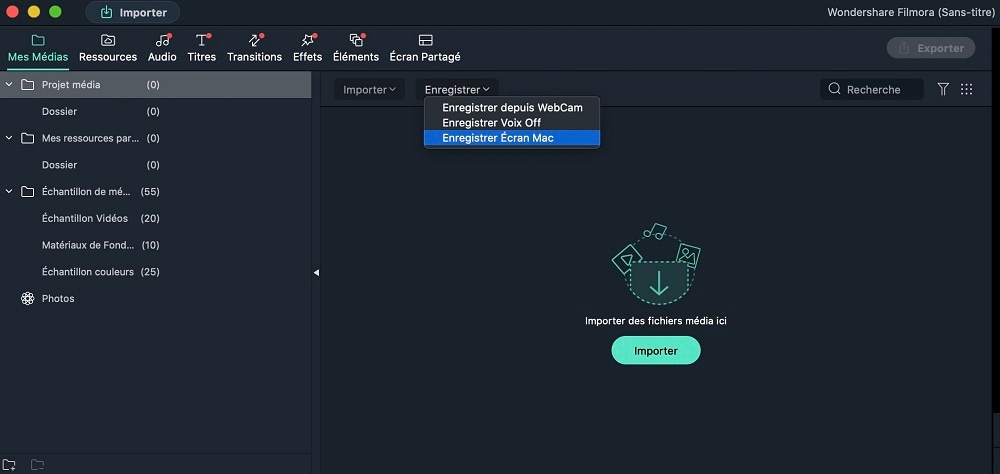
Trinn 1: Åpne Filmora og bare klikk på “Lagre Mac -skjerm“Å begynne å lagre og fange dataskjermen.
2. trinn: Juster Filmora -skjermopptakeren. Du kan fange fullskjerm eller den tilpassede skjermen, velge bildefrekvens og videokvalitet, vise museklikk i opptak, ta opp samtidig fra et webkamera, etc. Klikk deretter på den røde knappen for å starte.

Trinn 3: Etter å ha stoppet skjermopptaket, finner du videoen som er spilt inn i Filmora Media Library. Skyv og legg videoen på tidslinjen og les videoekstrakt. Nå kan du fortsette å gjøre en god videoredigering, for eksempel kutting, scoring, zoom, legge til effekter osv.
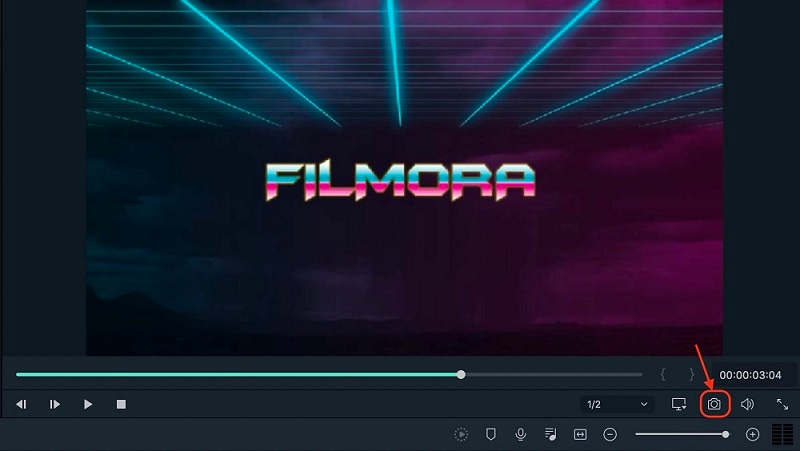
Å lage en Mac -videoopptak, Bare klikk på ikonet “Skjermbilde“, som ligger nede til høyre for grensesnittet. Sekvensen blir umiddelbart og automatisk registrert i Filmora -biblioteket. For å finne denne videoopptaket på datamaskinen din, høyreklikk over og hår “avslører i Finder”.
Wondershare Filmora er den mest kompatible og enkleste programvaren for Mac -skjermopptak, gitt de flere formatene du må håndtere og ta hensyn til egenskapene du har på Mac -en din. I tillegg trenger du programvare som vil gi deg tåkete eller improviserte sekvenser og skjermbilder. Disse er alltid godt under kvaliteten, og det kan være et betydelig tap når det gjelder resultatene.
Wondershare Filmora, enkel, gratis, men kraftig programvare for å gjøre videoredigering mer effektiv ! Du kan laste ned og prøve Filmora gratis via følgende lenker: