Windows 11: Hvordan lage et videoskjermbilde av PCen din
Contents
- 1 Windows 11: Hvordan lage et videoskjermbilde av PCen din
- 1.1 Ta et skjermbilde eller lagre skjermen på overflaten
- 1.2 Relaterte seksjoner
- 1.3 Windows 11: Hvordan lage et videoskjermbilde av PCen din
- 1.4 1. Åpne skjermbildetverktøyet
- 1.5 2. Velg videoskjermbildet
- 1.6 3. Velg fangstsonen
- 1.7 4. Lagre skjermbildet
- 1.8 5. Lagre fangsten
- 1.9 Windows 11: Video -skjermbildet er tilgjengelig, hvordan du bruker det ?
- 1.10 Videoskjermbilde: En langvarig nyhet
- 1.11 Hvordan du tar et videoskjermbilde på Windows 11 ?
Lagre videoen på skjermene dine
Ta et skjermbilde eller lagre skjermen på overflaten
Ta et skjermbilde eller lagre en video for å vise andre mennesker hva som er på skjermene dine. Del det deretter som du ønsker (e -post, SMS, sosiale nettverk).
Lag raskt et skjermbilde på en av følgende to måter:
-
Plukke ut Å starte opp , Skriv inn skjermbildeverktøy i søkefeltet, og velg det deretter i resultatene. For mer informasjon, se Bruk skjermbildetverktøyet for å fange skjermbilder.
For å lagre skjermen:
La merke til : Windows 11 -brukere kan bruke skjermbildetverktøyet. Windows 10 -brukere kan lagre skjermen med utklipp. Finn ut hvordan du lager et skjermopptak med utklipp.
- Plukke ut Å starte opp , Skriv inn skjermbildeverktøy i søkefeltet, og velg det deretter i resultatene. For mer informasjon, se Bruk skjermbildetverktøyet for å fange skjermbilder.
Laptop Surface, Pro Surface, Surface Book, Go Surface, Studio Surface
Her er noen andre måter å ta et skjermbilde hvis du har en bærbar overflate, en Pro -overflate, en bokoverflate, en GO -overflate eller en studioflate.
Skjerm
-
Trykk på knappen samtidig Skru opp lyden + Knappen På av .
La merke til : Denne snarveien fungerer ikke på en bærbar overflate.
Skjermbildene lagres automatisk i mappen Bilder > Skjermbilder iUtforskeren av filer.
Skjerm
- Trykk på knappen langvarig Gå ned volumet + Knapp På av samtidig.
- For å vise skjermbildet, utfør en av følgende operasjoner:
- Hvis du bruker Google -bilder, åpner du Google -bilder, Trykk deretter Bibliotek > Fil Skjermbilde .
- Hvis du bruker OneDrive, åpent OneDrive På startskjermen, trykk deretter Bilder >Explorer -mappe >Skjermbilde .
Lagre videoen på skjermene dine
- Brow ned fra toppen av skjermen for å vise hurtiginnstillingene, og sveiper deretter ned igjen.
- Brow til venstre for å vise andre raske parametere.
- trykke på Skjermoppføring, deretter på Å starte opp Å begynne å spille inn.
- Når du er ferdig og vil stoppe opptaket, kan du feie ned fra toppen av skjermen, og trykk deretter på Varsel om skjermopptaker.
- For å se de innspilte videoene dine, utføre en av følgende operasjoner:
- Hvis du bruker Google -bilder, åpner du Google -bilder, Trykk deretter Bibliotek > Fil Filmer.
- Hvis du bruker OneDrive, åpent OneDrive På startskjermen, trykk deretter Bilder >Explorer -mappe >Filmer .
Råd: Du ser ikke hurtigparameterskjermopptaket ? Utfør to skannebevegelser oppover fra toppen av skjermen, og trykk deretter Å modifisere (blyantikon). Under Vedlikehold og skyv for å legge til vignetter, Skyv skjermopptakeren oppover for å legge den til.
Skjerm
- Trykk på knappen langvarig Gå ned volumet + Knapp På av samtidig.
- For å vise skjermbildet, utfør en av følgende operasjoner:
- Hvis du bruker OneDrive, åpent Bilder På startskjermen, trykk deretter Bilder >Explorer -mappe >Skjermbilde .
- Hvis du bruker Google -bilder, åpner du Google -bilder, Trykk deretter Bibliotek > Fil Skjermbilde .
Lagre videoen på skjermene dine
- Brow ned fra toppen av skjermen for å vise hurtiginnstillingene, og sveiper deretter ned igjen.
- Brow til venstre for å vise andre raske parametere.
- trykke på Skjermoppføring, deretter på Å starte opp Å begynne å spille inn.
- Når du er ferdig og vil stoppe opptaket, kan du feie ned fra toppen av skjermen, og trykk deretter på Varsel om skjermopptaker.
- For å se de innspilte videoene dine, utføre en av følgende operasjoner:
- Hvis du bruker OneDrive, åpent Bilder På startskjermen, trykk deretter Bilder >Explorer -mappe >Filmer .
- Hvis du bruker Google -bilder, åpner du Google -bilder, Trykk deretter Bibliotek > Fil Filmer .
Råd: Du ser ikke hurtigparameterskjermopptaket ? Utfør to skannebevegelser oppover fra toppen av skjermen, og trykk deretter Å modifisere (blyantikon). Under Vedlikehold og skyv for å legge til vignetter, Skyv skjermopptakeren oppover for å legge den til.
Relaterte seksjoner
- Bruk skjermbildet til å lage skjermbilder
- Online skjerm- og kameraopptaker – utklipp
- Hvordan bruke overflateduo
- Duo overflatefunksjoner
Windows 11: Hvordan lage et videoskjermbilde av PCen din

Lagre et videoskjermbilde av PC -en din med noen få klikk og uten å installere tredje -parti -programvare.
Å spille inn hva som skjer på PC -skjermen på video er mye enklere enn du kan forestille deg under Windows 11. I motsetning til hva du kan tro, trenger du ikke å laste ned og installere tredje -parti -programvare for å komme dit.
I noen måneder nå har Microsoft distribuert i Windows 11 Native skjermbildeverktøyet, et nytt alternativ for å starte et videospillskotte. Takket være denne kan du veldig enkelt spille inn en video av hva som vises på skjermen på datamaskinen. Vær imidlertid forsiktig, uten å forstå valget som Microsoft har gjort, kan ikke videoskjermbildet for skjermbildet til videospillet lanseres fra snarveien snarvei. Du må åpne den dedikerte applikasjonen for å bruke den. Slik bruker du det.
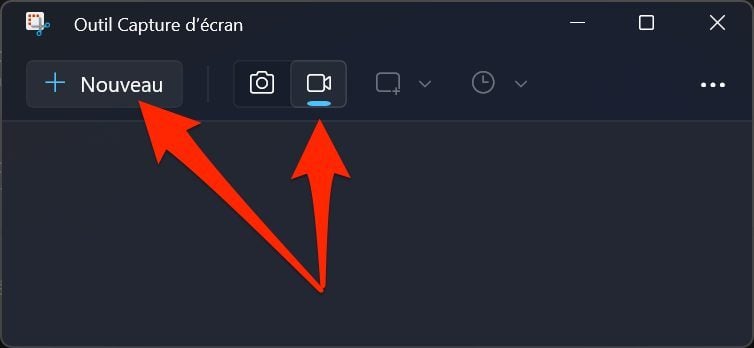
1. Åpne skjermbildetverktøyet
For å åpne skjermbildetverktøyet er to alternativer mulig. For å gjøre dette, klikk på menyen Å starte opp, Se etter detSkjermbildeverktøy og klikk på dette. Du kan også bruke tastaturets snarvei Windows + R, å legge inn Snipper I vinduet Kjør og trykk på tasten Tast inn av tastaturet.

2. Velg videoskjermbildet
Som standard er Windows 11 Screen Capture Tool konfigurert til å ta faste bilder. For å lage et videoskjermbilde, må du velge det passende alternativet, representert av et lite kamera. Klikk deretter på knappen Ny Å lansere et nytt videoskjermbilde.
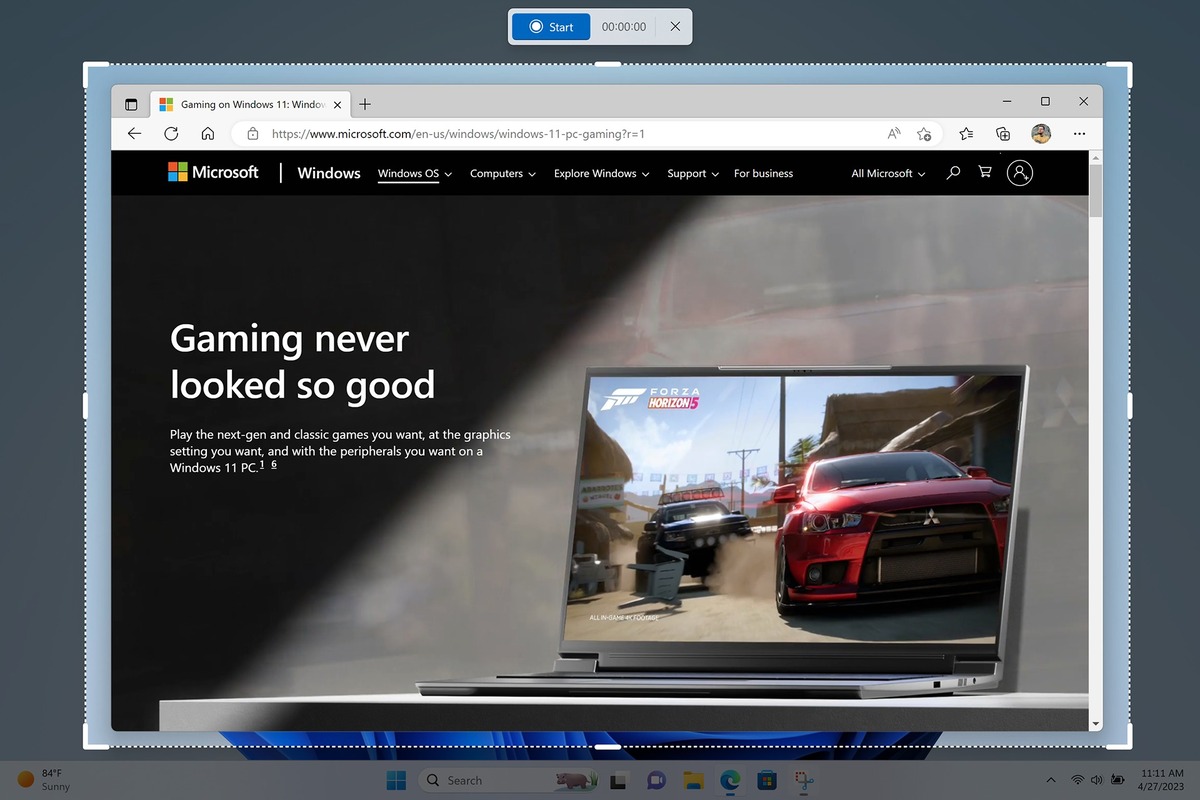
3. Velg fangstsonen
Skjermen på PCen din skal deretter mørkere og vise et lite kors. Dette er markøren for å velge skjermområdet du vil lagre på video. Bruke musen, velg skjermsonen som skal lagres. Dette vil da vises klart.
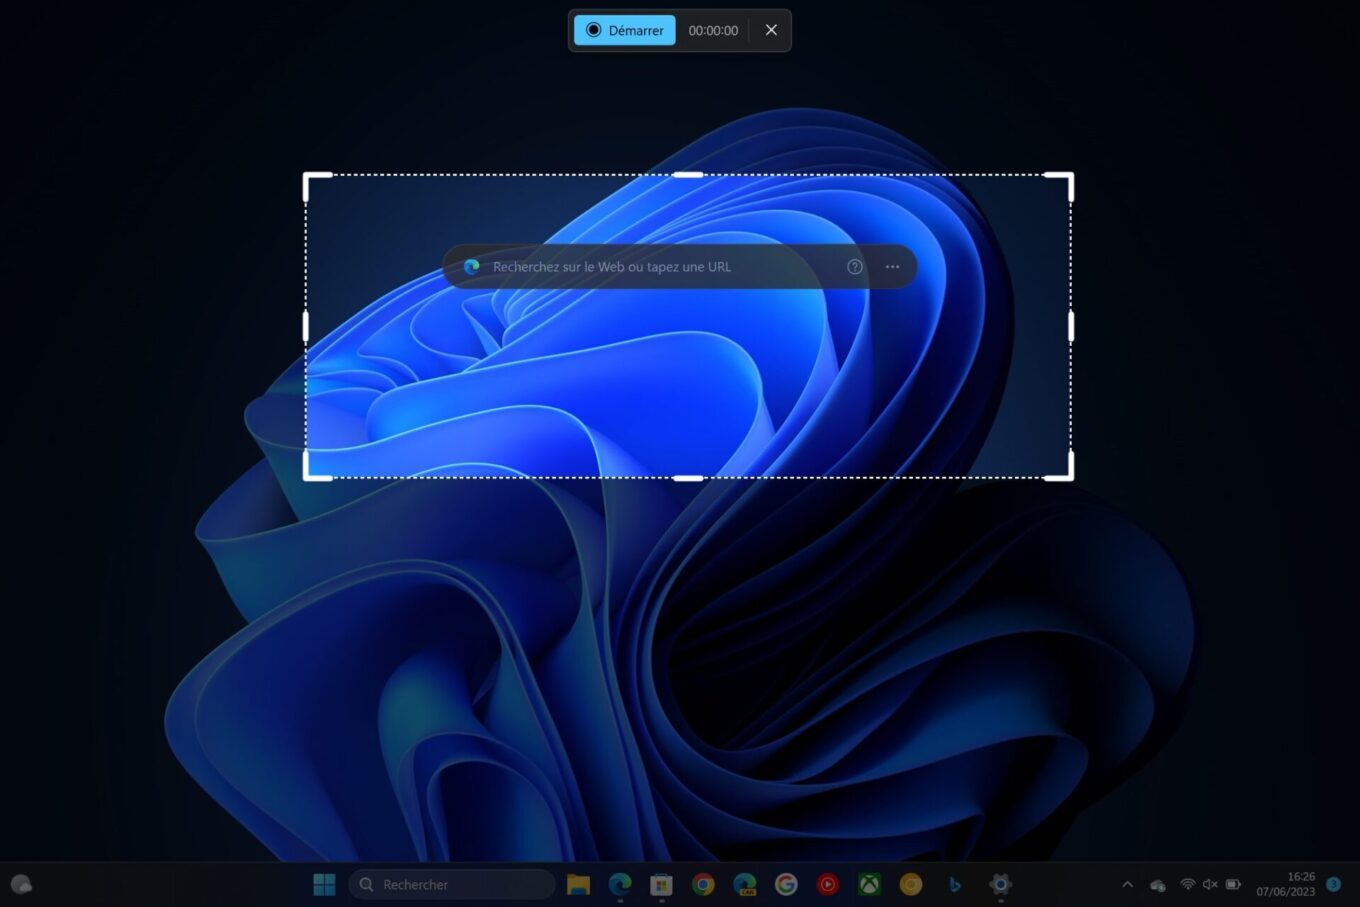
4. Lagre skjermbildet
Når fangstsonen din er definert, klikker du på knappen Å starte opp vises i kassetten som er til stede øverst på skjermen. En nedtelling på tre sekunder bør deretter kjøre før verktøyet begynner å registrere manipulasjonene du lager på skjermen.
Merk at du, når det er nødvendig, kan ta opp fangsten ved å klikke på den dedikerte knappen, og gjenoppta opptaket ved å klikke på leseknappen. Når videoopptaket er ferdig, klikker du bare på stoppknappen som er representert med en rød firkant.
5. Lagre fangsten
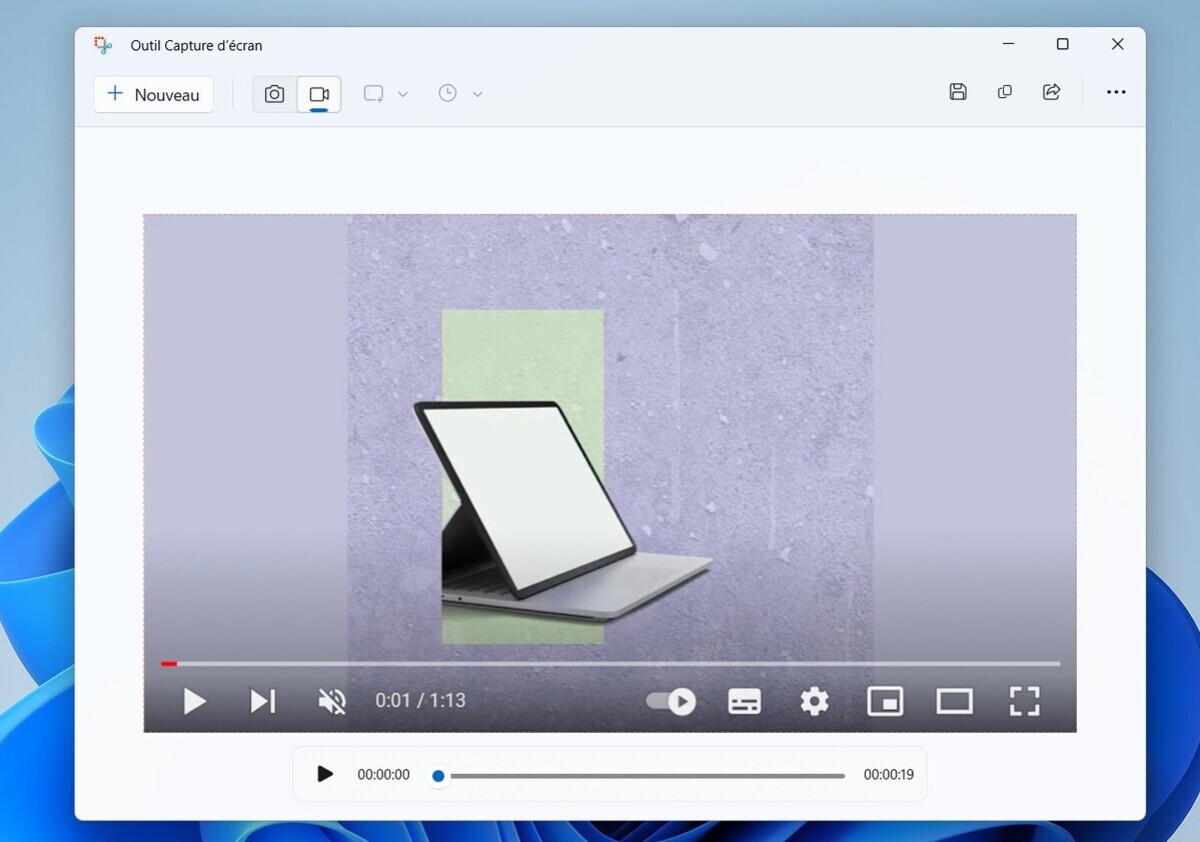
Skjermbildet er nå fullført og vises i prinsippet automatisk i et vindu på skjermbilde. Du kan om nødvendig se det. Fremfor alt må du tenke på å lagre det.
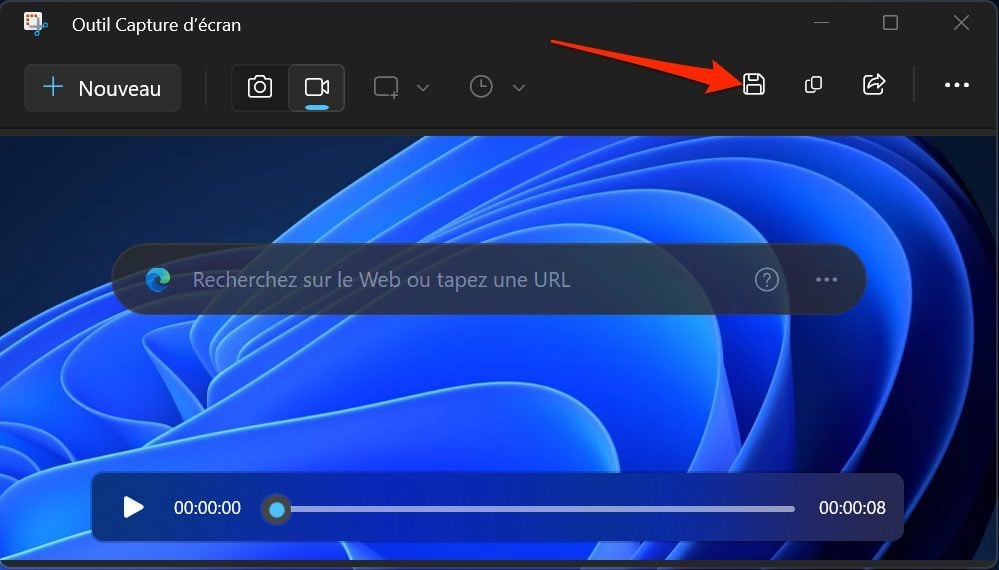
For å gjøre dette, klikk på opptaksknappen representert med en diskett øverst til høyre i vinduet. Alle videoskjermbilder laget med det innfødte Windows 11 -verktøyet er i format .MP4.
Windows 11: Video -skjermbildet er tilgjengelig, hvordan du bruker det ?
Finn ut hvordan du lagrer skjermen på Windows med Microsoft offisielle skjermbildeverktøy.
José Billon / publisert 1. mars 2023 klokka 11:32
Videoskjermbilde: En langvarig nyhet
Microsoft har nettopp kunngjort en viktig oppdatering på Windows 11. Blant de nye funksjonene som er kunngjort av firmaet, var muligheten for å lage et videoskjermbilde forventet av mange brukere. I sin innleggsblogg indikerer Microsoft at skjermbildet (snippingsverktøyet på engelsk) er forbedret for å avsløre en videoopptaksfunksjon.
Et bilde er verdt tusen ord, men en video kan fortelle en historie. For alle lærere, skapere, studenter, markedsføringsspesialister … har du forstått videobildet. Enkelt fange det du gjør med den nye skjermopptakeren integrert i skjermbildetverktøyet.
Inntil nå har videoskjermbildet bare vært tilgjengelig i Xbox Game Bar, For begrenset bruk støttet ikke funksjonaliteten registrering av kontoret.
Hvordan du tar et videoskjermbilde på Windows 11 ?
For å ta et videoskjermbilde på Windows, her er hvordan du går frem:
- Åpne skjermbilde -applikasjonen via søkefunksjonen i Windows oppgavelinje. Du kan bruke snarveien Windows + Maj + S -tast,
- Plukke ut ikonetvideo,
- Klikk på Ny,
- Velg dimensjonen på skjermen du vil fange,
- Klikk på Å starte opp. En 3 -sekunders teller vises før du lanserer videoopptaket. Når videoen er tatt, stopp innspillingen ved å klikke på den røde torget.
Godt å vite: Du må sørge for at du har den nyeste Windows 11 -oppdateringen for å få tilgang til videospilleren. Møte på Innstillinger> Windows -oppdatering> Søkeoppdateringer.